Tom's DL-44 ANH Solo Blaster

thd9791

Master Member
RPF PREMIUM MEMBER
This is my first step into a larger world...

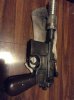
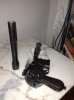
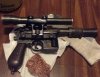
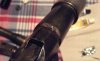
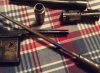
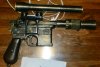
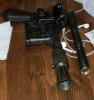
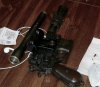
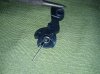
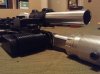
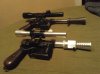
DMachinist early Flash Hider, Bull Barrel and scope
DSCN3570.jpgDSCN3589.jpg

DSCN3595.jpgDSCN3594.jpg

....Blast-Tech grill...
DSCN3574.jpgDSCN3590.jpg

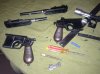
I originally picked up a Denix and attempted to sand down the barrel for this project. I did it wrong, and it was irreversible so I waited for another to pass by for half price

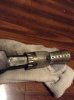
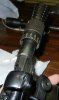
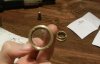
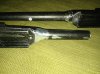
I used the old one to learn how to disassemble the thing. I then disassembled my new one so I can get access to the internals much much easier. The hammer on my new one was crooked and wobbled... after swapping out both spring and hammer from the old one, it turns out the casting was just small enough to not be able to sit properly in the gun ..weird...anyways, with new hammer in place I took a dremel cut off wheel and made my marks to correctly work the barrel. I made right angle cuts and filed down the surfaces in a straight line all the way around and that seemed to work! Drilled a nice fat hole right into the barrel for the set screw too!

DSCN3605.jpgDSCN3608.jpg

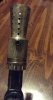
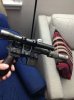
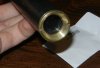
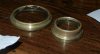
The mount...I picked up a beautiful one from Todd's Costumes. Everything fits flush, the dovetail looks great and I love the dark blued finish.

DSCN3586.jpgDSCN3580.JPG

DSCN3588.jpg

DSCN3592.jpgDSCN3591.jpgDSCN3593.jpg

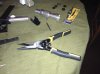
All I had to do was drill two holes and tap them. Solos Hold wasn't quite right, for the Denix castings there is still no room if you pull the hammer back all the way - you end up drilling into the hammer a bit but that doesn't affect the workings of the mechanism.

I actually removed the hammer completely to tap the hole. "Irwin" taps have an extended tip that rights your tap and helps you do it at a 90 degree angle. They even come with the accompanying drill bit - but I DID look up the correct size for that tap beforehand. (as an FYI, if you don't need taps that right themselves, just buy a set of labeled drill bits with that size you need and use regular taps, it's so much cheaper)

Anyway...I got the 10/32 tap set for Todd's mounts and went at it. With the hammer gone I could tap all the way through (and yes I drilled it by hand using the cross bar as a guide for the pilot hole)

I lined up the second hole, drilled that and added a nut to the back inside the magazine housing.

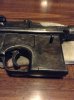
the bull barrel rattles a bit but I can't wait to do the finish on this thing....

Thank you dmachinist and ToddsCostumes !

I'll add pics soon, my computer wonked out on me today and I'm debating calling it after eight years but I can't quite afford that. Need a job first :lol
 

Attachments

  • image.jpeg
    image.jpeg
    1.7 MB · Views: 167
  • image.jpeg
    image.jpeg
    1,022.5 KB · Views: 124
  • image.jpeg
    image.jpeg
    2.1 MB · Views: 152
  • image.jpeg
    image.jpeg
    2.5 MB · Views: 153
Last edited by a moderator:
Hers some more! That's my dads greedo killer in the background!

so, for clarification, i became overwhelmed tapping out pins, swapping denix parts - to the point I went ahead and filed the barrel....drilled/tapped the two holes in one day!
 

Attachments

  • image.jpeg
    image.jpeg
    1.2 MB · Views: 154
  • image.jpeg
    image.jpeg
    1.2 MB · Views: 208
Last edited:
Wow, I'm really quite impressed with Todd's mount. For just a fleeting moment, I just considered swapping my cast DEC mount with it. Then I realised that would be unpatriotic of me to @dmachinist, since I have sworn under oath my loyalty to his parts, coupled with the fact that I really have no intention of mucking about with my DL after the headache I had messing with it. :wacko

Looking forward to how yours comes out. With your track record, it should come out perfect!
 
That means a lot - I have to say the dmachinist parts are excellent. Even finding out there were seperate brass inserts and glass got me all giddy.

My one thing...I feel like Todd's different idea for the bull barrel is more realistic.
I always thought the bull and the frame met with incredible precision, and thats not something the prop dept was known for :lol
ANH_realhero_left.jpg

This is what Todds Costumes decided to do.
Screen Shot 2016-02-02 at 11.14.35 PM.png
and that might explain it.

Unless there was evidence it was a sleeve over the original barrel.

regardless, I have the earlier dmachinist sleeve barrel that has a thicker section beneath the FH. It's solid craftsmanship and will be staying on my Hero :)
 
Didn't Todd's do that because of how the mauser supposedly assembles in another film? I have a Todd's kit on order. Did you get the mount from the main site or his yard sale?
 
Didn't Todd's do that because of how the mauser supposedly assembles in another film? I have a Todd's kit on order. Did you get the mount from the main site or his yard sale?
Main site my man :)

and yea I think that's why they did it. Since it was a job for another movie, probably with more gunsmith skill, I always figured it was put together this way.
 
I just ordered Todds blaster today as an earlier birthday present. I cannot explain how excited I am for it. I picked up a Graflex from a run here in November, and that came out amazing. This community is making the little boy that grew up on Star Wars incredibly happy.
 
This really is an incredible community.

So, I went a little crazy today. I regretfully forgot to document my progress, so here's an explanation

I tapped the pins out of my Denix's rail and separated top from bottom. I thus began to strip the darned thing. I used 60-80 grit rough sandpaper and it took less than an hour! To get in the small spots I used a pack of dollar nail files from the corner store on my block. Emory boards I guess they're called? This served to strip the paint and rough up the surface in one go. The corner store also only had copper scrub pads that "worked like steel wool" and I got some of those to use at the end.

I also scuffed up the bull barrel and flash hider. At this point everything was silver and scratched looking.

Each piece I held over the stove and dropped into a ziplock bag with a little bit of aluminum black in it. Other than the bull barrel, it took immediately! I massaged the bag and rolled the warm parts around in it to help get good coverage. There were some parts and spots that didn't get any darker, and for those I put on latex gloves and manually heated them over the stove....and dabbed a Q-tip of aluminum black on those areas. The bottle says to rinse them off in cold water after every application, so I went slow and did it little by little.

The bull barrel was frustrating - I ended up sanding, and re-blackening it twice. The white stuff showed up too, someone in the DEC thread talked about it and it turned out to be leftover black stuff from a previous application, but it was easily buffed off with those copper scrubbers.

I only did the FH once or twice and it darkened to a more brown then the grey/brown/blue tone of the Denix itself. I liked this, the FH was a lighter color than the blaster anyways.

The FH looks like a great rusty relic, it doesn't show up on my pictures though, imagine it a lot more brown colored and spotty. The gun is a bit spotty too, but multiple applications and copper scrubs evened out the tone.
DSCN3612.jpgDSCN3611.jpg
DSCN3616.jpgDSCN3615.jpgDSCN3613.jpg
 
Here are some more shots!
 

Attachments

  • image.jpeg
    image.jpeg
    951.9 KB · Views: 141
  • image.jpeg
    image.jpeg
    811.9 KB · Views: 122
  • image.jpeg
    image.jpeg
    980.7 KB · Views: 136
  • image.jpeg
    image.jpeg
    920.3 KB · Views: 127
I also have an inside out sock and I've been buffing it with johnsons paste wax, thanks to chizbot
 
Last edited by a moderator:
After getting some drinks with chizbot I came to the realization the real FH was much darker, and that meant my bull barrel could match the gun as well. Got out the AL Black and started experimenting with baggies, hand application with a tissue and different scratching/sandpaper prep. The cast FH was quite the qwerky one. too much ended up working in my favor and not flaking off, getting very dark very quickly, but it got cloudy right after, so I scraped some of that off with my copper scrub and did one more hand application, and immediately waxed it when it looked good!
 

Attachments

  • IMG_3223.JPG
    IMG_3223.JPG
    512.2 KB · Views: 160
Last edited by a moderator:
Today I drilled a little hole between the screws on the dovetail. Now the set screw that runs through the mount has a better surface area to grip.

i also roughed up the barrels, swabbed on some JB Weld and jammed the bull barrel into place. I held it in place with the flash hider screw while it cured.

my filing job on the Denix left a little gap where the bull barrel sits, so I smeared some JB Weld in there too, using a finger in paper towel and tooth pick to smear some clean lines!
 

Attachments

  • image.jpeg
    image.jpeg
    377.7 KB · Views: 134
  • image.jpeg
    image.jpeg
    810.1 KB · Views: 127
Thanks! I have better pictures here. The JB welded Barrel & Barrel gap. Welding the lenses into the frames got really messy! There's very little tolerance here, but I was able to wipe up the lenses. Also, I stuck packing tape on my bull barrel. Now my Flash Hider doesn't move at all - prop trick taken from lightsaber bubbles and boards!
 

Attachments

  • DSCN3659.jpg
    DSCN3659.jpg
    559.1 KB · Views: 109
  • DSCN3653.jpg
    DSCN3653.jpg
    129.9 KB · Views: 103
  • DSCN3650.jpg
    DSCN3650.jpg
    362.4 KB · Views: 107
  • DSCN3647.jpg
    DSCN3647.jpg
    316.7 KB · Views: 112
  • DSCN3643.jpg
    DSCN3643.jpg
    1.8 MB · Views: 109
  • DSCN3641.jpg
    DSCN3641.jpg
    910.4 KB · Views: 110
  • DSCN3638.jpg
    DSCN3638.jpg
    753.6 KB · Views: 117
Here are some larger shots of the gun now...waiting to do something with the solid cast dial...

funny...how I placed the barrel here looks like the bunker blaster :lol
 

Attachments

  • DSCN3660.jpg
    DSCN3660.jpg
    630.9 KB · Views: 128
  • DSCN3661.jpg
    DSCN3661.jpg
    494.1 KB · Views: 118
  • DSCN3663.jpg
    DSCN3663.jpg
    279.7 KB · Views: 127
  • DSCN3664.jpg
    DSCN3664.jpg
    416.5 KB · Views: 112
This looks great! Todd's kit looks great, I have a DEC kit (which I love) but thinking of getting one of Todd's too. Its a great price point for steel parts

I havent fit the bull barrel, Im afraid of messing it up
 
This thread is more than 7 years old.

Your message may be considered spam for the following reasons:

  1. This thread hasn't been active in some time. A new post in this thread might not contribute constructively to this discussion after so long.
If you wish to reply despite these issues, check the box below before replying.
Be aware that malicious compliance may result in more severe penalties.
Back
Top