Grommash Build. Last Page new pics of the silicone glove. 01/25/2017

Re: Grommash by Alphatech Last page Grom got hair transplants 04/09/2016

So here is the tutorial on the head of Grommash.
Once I had the torso laid up in silicone I knew I could move forward on the build. First thing was to make an armature to sculpt on. I had an old bust cast of myself that is heavy as hell so I made a silicone mold of the face and cast it in epoxy.
facebuild40.JPGfacebuild39.JPGfacebuild37.JPG

Then it was on to getting some clay on it. This was my very first try at Monster Clay. I can only say one thing, I would use it on everything if I could.
facebuild36.JPGfacebuild29.JPGfacebuild41.JPG

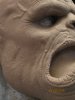
Once I got to a curtain point I knew I need to do the lower teeth so I could work those into the face I went for size and proportion.
facebuild26.JPGfacebuild27.JPGfacebuild30.JPGfacebuild23.JPGfacebuild25.JPGfacebuild28.JPGfacebuild24.JPGfacebuild21.JPGfacebuild43.JPG

Then I placed them and sculpted the gums.
facebuild124.JPGfacebuild19.JPGfacebuild18.JPGfacebuild17.JPGfacebuild15.JPGfacebuild44.JPGfacebuild16.JPG

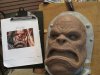
Then it was on to finishing the skin.
My and Gromm.
facebuild46.JPG

I have to break here only 24 photos allowed per post.
 

Attachments

  • facebuild42.JPG
    facebuild42.JPG
    2.4 MB · Views: 95
Last edited:
Re: Grommash by Alphatech Last page Grom has a do 04/06/2016

Ok to the skin.
facebuild33.JPGfacebuild35.JPGfacebuild34.JPGfacebuild123.JPGfacebuild38.JPGfacebuild45.JPGfacebuild32.JPGfacebuild31.JPG

I molded his face next in Epoxacoat and Epoxy/fiberglass. I don't know where those photos are but when I find them I will post them. At this point I knew I needed to start on the underskull. I used the mold I did for my armature and filled it will 2 part soft foam. This was to lay up the fiberglass on and be able to remove it easily. I covered the foam with a couple of coats of Plasti dip then a couple coats of PVA.
facebuild53.JPGfacebuild2.JPGfacebuild3.JPGfacebuild52.JPGfacebuild4.JPG

Once I made sure the underskull fit ok I build the collapsible core. It wasn't pretty but it worked well. I'm a control freak and I wanted control of the skin thickness.
facebuild7.JPGfacebuild8.JPGfacebuild51.JPGfacebuild49.JPGfacebuild12.JPGfacebuild10.JPGfacebuild9.JPGfacebuild6.JPGfacebuild50.JPG

First pull.
facebuild11.JPGfacebuild13.JPG

That's 24. Next post.
 
Re: Grommash by Alphatech Last page Grom got hair transplants 04/09/2016

facebuild14.JPG

Placing the teeth just for fun.
facebuild.JPG
Ok because I had to.

I sculpted the upper teeth at some point
facebuild60.JPG

I needed to finish up the underskull. Earlier in the year a friend stopped by to show me this mask he had bought. It was cheap but when I started looking at it I noticed the jaw hinged and the upper lip had a bit of movement. I could see just enough to set me in a direction other than a cable deal like I had done several times before on a gorilla and a werewolf. I was excited. This thing really works well.
facebuild59.JPGfacebuild125.JPGfacebuild126.JPGfacebuild127.JPG

I worked for an entire day on this next part and ended up not using it. I thought it would be really cool for the lower lip to move down when the upper lip went up as the mouth opened. I fabricated this little bar and it worked great. When I clued the throw down face on and put it through it's paces you really could hardly tell even though it move almost 3/5 of an inch. I decided to shelf the lower lip movement. I chalked up the day to a learning experience.
facebuild57.JPGfacebuild56.JPGfacebuild58.JPGfacebuild55.JPGfacebuild1.JPGfacebuild54.JPG

As I was making a short movement video I realized I needed some structure behind the skin in the jaw area. I place the face back in the mold and laid up a jaw in it.
facebuild62.JPGfacebuild63.JPG

I got the upper gums done somewhere around this time. I added some dark spot which I would have done to the lowers had I thought about it more. Hinds sight truly is 20/20
facebuild61.JPG

Lower jaw structure.
facebuild65.JPGfacebuild66.JPGfacebuild64.JPG

Then I attached the welders helmet had strap. These have always served me well.
facebuild70.JPG

That's it for today. I will try to get the rest of the head build up in the morning.
 
Re: Grommash by Alphatech Last page- 70 new pic-half the head tutorial 04/09/2016

Dude. Im at a loss for words. This is gorgeous. How the HELL do you know how to do all this? This looks like its professional! I want to do this kind of stuff! I dont even know where to begin... :cry
 
Re: Grommash by Alphatech Last page- 70 new pic-half the head tutorial 04/09/2016

Thanks Snikt, I've just been doing this stuff as a hobby most of my life.
Ok onward through the fog.
This is a little out of order but eventually I decided to add a couple of molars to the lower jaw. I figured if someone is right on top of this face when the mouth is open I wanted them to see these teeth. These pictures also show how I achieved the jaw return. I happened to have these little tiny ball joint things for model airplanes that worked great to attach the rubber bands. I then put on as many bands as it took which was 3 on each side. This is also when I attached the spandex curtain to cover my mouth.
facebuild103.JPGfacebuild104.JPGfacebuild98.JPGfacebuild108.JPGfacebuild109.JPGfacebuild100.JPG

On to the ears. I roughed them in and compared them to the head before I affixed them to something to finish the sculpts.
facebuild69.JPGfacebuild71.JPGfacebuild72.JPGfacebuild74.JPGfacebuild75.JPGfacebuild76.JPGfacebuild77.JPG

When I molded these I inserted a 1/4 inch diameter rod before pouring the silicone. I knew I would need to have something on the underskull to support them.
facebuild79.JPGfacebuild78.JPGfacebuild82.JPGfacebuild80.JPGfacebuild81.JPGfacebuild84.JPGfacebuild83.JPGfacebuild85.JPGfacebuild86.JPGfacebuild87.JPG

I have to add this here, when I was seaming these ear I tried using the same silicone which was Echoflex20 and it just would not set up no matter what I did. I used thivex so I thought that was the problem then I didn't use it. I was smoothing it with alcohol so I tried naptha. Nothing worked. Eventually I tinted my GE I silicone and that worked.

I fabricated this new underskull strictly to hold the mask for painting. I hot glued the mold core together and then used a heat gun to mold this plastic around around the core which gave me the exact shape of the inside of the mask. I pulled it off the core and rubber banded it onto my bust and it was time to paint.
facebuild91.JPG

That's 24 photos. on to the next post.
 
Re: Grommash by Alphatech Last page- 70 new pic-half the head tutorial 04/09/2016

I used the same paint technique as the torso, GEI silicone thinned with Naptha, tinted with oil base paint.
facebuild93.JPGfacebuild92.JPGfacebuild94.JPGfacebuild95.JPGfacebuild96.JPG

Onto punching hair. Unfortunately I learned something after I had already punched this beard and that was to dip the needle into thinned GE1 silicone with each hair. I didn't really think about this aspect until I was about halfway through with the beard. I ended up spraying a layer of silicone over the stubble and on the backside. We will see how that works over time. I am still pissed at myself for not researching that better. I started with the nose hairs. I actually punched in hairs form my wife's hair brush. She is Hispanic so they are the right color. She thinks I'm weird. I found some other hair for the beard.
facebuild106.JPGfacebuild97.JPGfacebuild105.JPGfacebuild107.JPG

While I was taking breaks punching hair, it took a total of around 40 hours, I was sculpting the topknot holder, nose ring, earrings, and cartilage piercings.
facebuild101.JPGfacebuild99.JPGfacebuild102.JPGfacebuild88.JPGfacebuild90.JPGfacebuild89.JPG

The finished face.
facebuild112.JPGfacebuild110.JPGfacebuild111.JPG

I decided to stitch the wig onto the underskull/mask so I could remove it if I screwed something up. If I had glued it into the silicone I could not do that as easily. I place the wig where it needed to be then marked where I needed to drill the small holes to stitch through. That last one is Grommash when he first wakes up in the morning.
facebuild114.JPGfacebuild113.JPGfacebuild115.JPGfacebuild116.JPG

The ponytail was next. I actually bought a second wig to use for the tail. I used an old vacuum attachment riveted to the top of the underskull to keep the ponytail in place. I cut the part of the wig that I needed and rolled it up and stuffed it into the small pipe. I used 2 pins at right angles to each other to hold the tail in place. I then pushed the pipe onto the holder on the skull, pulled the surrounding hair up around it then slid on the topknot holder then slid a pin in from the back to hold everything in place.
facebuild128.JPGfacebuild117.JPG
 
Re: Grommash by Alphatech Last page- 70 new pic-half the head tutorial 04/09/2016

The first photo is of the wig before the hairline is punched in.
facebuild121.JPGfacebuild129.JPG

Finally after the hairline was fixed. I still need to trim up the hair a bit and add a couple of little things. I will get some better photos up in a couple of days.
facebuild122.JPGfacebuild120.JPGfacebuild118.JPG
 
Last edited:
Re: Grommash by Alphatech Last page-over 100 pics post for the head tutorial 04/10/20

This is so amazing... I'm at loss for words.
 
Re: Grommash by Alphatech Last page-over 100 pics post for the head tutorial 04/10/20

How did you get those wonderful pores? (89 batman joker style)
 
Re: Grommash by Alphatech Last page-over 100 pics post for the head tutorial 04/10/20

Thank you for documenting your progress so in-depth...ly.

When I saw that this thread had a 100 picture update, I about jumped out of my seat with joy. This build is so much fun to follow.
 
Re: Grommash by Alphatech Last page-over 100 pics post for the head tutorial 04/10/20

I want to thank everyone for checkin in on my build. Hey Snikt all those pores and little wrinkles were done by placing a sandwich bag on the clay and using a needle like tool to basically draw everything onto the clay. It is a little trial and error until you get what you like.

I will post some of the final photos in a bit.

Im familiar with that method but dude, you did that individually?!?! There wasnt some other trick to it?! :eek
 
Re: Grommash by Alphatech Last face molding and head final photos 04/12/2016

Updates?! Its been 2 weeks. I need a fix.
 
Re: Grommash by Alphatech Last face molding and head final photos 04/12/2016

Sorry Dude i was out of town visiting the family. I'm almost done with the shoulder armor sculpt so I will at least get a few up of that soon.
 
Re: Grommash by Alphatech Last face molding and head final photos 04/12/2016

Finally finished the sculpt of the shoulder armor.
This first pic is one I found online and just loved the look. Thank you who ever you are who designed this.
RPF1.jpg
I needed something to sculpt on so I fabricated this shoulder armature. I used plaster bandages then back filled with 2 part rigid foam. I painted on a couple of layers of enamel so the plaster wouldn't absorb the oil from the clay.
RPF2.jpgrpf3.jpgrpf4.jpg
Then I started building up the clay. I used Saran wrap on one half then free handed the surface design then flipped the Saran wrap and traced it on to the side. This helped in achieving the symmetry.
rpf5.jpgrpf6.jpgrpf7.jpg
I just had to see how it looked with his head in place.

rpf8.jpgrpf9.jpg
Once I had it looking just right I had to start aging and scarring it up.
These are the finished sculpt. I was trying to make it look like it was iron formed in an ancient sand cast.

rpf10.jpgrpf11.jpgrpf12.jpgrpf13.jpgrpf14.jpgrpf15.jpgrpf16.jpgrpf17.jpgrpf18.jpgrpf19.jpgrpf20.jpgrpf21.jpgrpf22.jpgrpf23.jpg

Onto molding. Thanks for looking.
 
Re: Grommash by Alphatech Last Page 23 new pics of shoulder armor sculpt. 05/06/16

Speachless. just brilliant, majestic. Can't wait to see the finished product.
 
This thread is more than 6 years old.

Your message may be considered spam for the following reasons:

  1. This thread hasn't been active in some time. A new post in this thread might not contribute constructively to this discussion after so long.
If you wish to reply despite these issues, check the box below before replying.
Be aware that malicious compliance may result in more severe penalties.
Back
Top