"What?!" I hear you exclaim, "There was no Green Leader!"
Exactly! This project is of a Y-Wing that wasn't. I didn't want to get bogged down by which Y-wing had what kit part and what pipe configuration, etc. etc. I'm using all of the various reference photos of the different Y-Wings to create my own unique version. As I've said on other projects, every replica is an artistic interpretation of the original, this one is mine. Where possible, I'll use the correct donor parts and match the hull configuration but I'm not going to worry too much about it being exactly like the original. I already have some ideas for some areas where I want to change up the details a bit. And I've got a unique idea for the paint job, something that hasn't been done before. But more on that when the time comes...
The Y-Wing has been my favorite of all the models created for the Star Wars galaxy. I've toyed around with building one for many, many years, heck since I first saw the film in 1978 but just haven't felt the time was right. Well now it is!
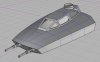
The first step is to do an overall digital model that will be used for creating the main fuselage, cockpit, and the structural details. This model is going to be a one-off. No overall molds. I've got two Airfix Saturn Vs for the engines. The main fuselage will be massed up in plexiglas around an aluminum armature. The forward cockpit section will be modeled digitally and 3D printed. Then I'll either use the print or make a mold and cast it. As I said, some of the parts will be from donor kits, some will be digitally modeled and 3D printed and others will be built up from scratch.
Many thanks go to RPF member ProfKSergeev who has very generously loaned me quite a few of the donor parts he's been collecting for his Y-Wing project to mold and cast for mine!
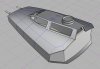
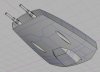
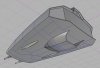
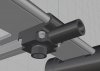
Here are some pix of a very rough digital model of the Y.


MORE ON THE "OPEN SOURCE" ASPECT OF THIS PROJECT
In an effort to encourage Studio Scale modeling I will be posting some of the files that I've created so that others can build their own Y-Wing models. Included will be 3D model files, 3D printing files, laser cutting files and other drawing files. Eventually I hope to have complete orthographic "blueprints" but that's going to take some time. The 3D printing files ARE NOT to print a completely detailed, ready to paint model, they are just of the bare fuselage sections onto which the kit parts are added. While being far from a complete model, this should allow people to get past the very difficult hurtle of starting a Y-Wing from scratch.
The 3D printing main fuselage files are intended for printing with added supports which need to be added by the slicing software. You can also have the parts printed at a service bureau like Shapeways.com. Their "White, Strong and Flexible" material works very well for these parts and is reasonably priced. The finer detail parts like the control vanes need to be printed in their Ultra or Extreme detail plastic to come out nicely.
Even with all these files, building a Y is still very much a DIY project and will require a fair amount of scratch building and head scratching! But I encourage anyone that's every wanted a model of this great fighter to take on the challenge. You'll get a lot of support here on the RPF.
I am also hoping that others will contribute to this open source project, improving on the work I've done with these files or in other ways. There has already been a major push to identify and map all of the kit parts used by the original ILM modelmakers. These efforts are fantastic!
THERE HAS BEEN A LITTLE BIT OF CONFUSION ABOUT THE OPEN SOURCE REPOSITORY. THE REPOSITORY IS NOT A COMPLETE SETS OF FILES FOR PRINTING A Y-WING, NOR IS IT ALL OF THE FILES I CREATED FOR THIS PROJECT. FILES FOR PARTS WHICH I WAS SELLING, ARE NOT INCLUDED IN THE REPOSITORY. IN ADDITION, ALL OF MY PARTS RUNS FOR THIS PROJECT ARE NOW SOLD OUT AND CLOSED.
OPEN SOURCE REPOSITORY IS HERE:
Y-Wing Fighter - Google Drive
The following is a (more or less) complete list of all the various components that go into a "Green Leader" Y-Wing.
Note - All of DaveG's parts run are closed. But most of the 3D printing and other plan files for these parts are available in the Repository so people can make them for their own personal (non-commercial) use.
Armature - available from DaveG (run closed)
Laser cut Tee Plate
½” aluminum spar tube
½” x ¾” aluminum C channel
10-24 x 1” socket head cap screws (4)
10-24 x ¾” socket head cap screws (8)
10-24 x ½” socket head cap screws (2)
10-24 x ¾” truss head machine screws (3)
10-24 hex nuts (17)
10-24 small pattern flat washers (16)
Armature mounting block - 3D printed
Nacelle cores – 3D printed or DaveG’s laser cut acrylic parts (run closed)
Main Fuselage – 3D printed
Rear left shell
Rear right shell
Middle left shell
Middle right shell
Front shell
Bottom yolk
Neck Fuselage – 3D printed
Droid block
Front sloped block
Rear block
Bottom “oil pan” block
Forward Fuselage – castings available from DaveG (run closed)
Upper shell
Lower shell
Canopy
Torpedo bay
Forward laser cut bulkhead
Read laser cut bulkhead (3 parts)
Torpedo bay laser cut bulkhead
Cockpit interior – Scratch build with kit parts or a 3D printed one from Gus76
Engines
Main body – AMT Saturn V first stage shells (2 kits required)
Nose cones – vintage L’Eggs shells or DaveG castings (run closed)
Tee Struts – Plastruct ABS ¼” Tees – 8 lengths needed
1 ¼” Plastuct tubing (3 to 4 inches)
7/8" Plastruct tubing (3 to 4 inches)
Avid Thermalloy aluminum heat sinks (2)
Tail shrouds - vintage L’Eggs shells or DaveG castings (run closed)
Control vanes and “shocks” – 3D printed
Kit parts – Lots and LOTS of kit parts.
See parts map threads for more information on the various kit parts needed.
Engine greeblie/nernie panel castings are being offered by Masterpiece Models.
Rumor is that MM will be offering additional kit part sets for the Y-Wing at some time.
DaveG is not and will not be offering kit part castings!
Studio Kitbash is offering sets of nernie castings.
You will also need a variety of Plastruct tubing and/or brass and copper rod from 1/16” to 1/4” for the various piping details.
Exactly! This project is of a Y-Wing that wasn't. I didn't want to get bogged down by which Y-wing had what kit part and what pipe configuration, etc. etc. I'm using all of the various reference photos of the different Y-Wings to create my own unique version. As I've said on other projects, every replica is an artistic interpretation of the original, this one is mine. Where possible, I'll use the correct donor parts and match the hull configuration but I'm not going to worry too much about it being exactly like the original. I already have some ideas for some areas where I want to change up the details a bit. And I've got a unique idea for the paint job, something that hasn't been done before. But more on that when the time comes...
The Y-Wing has been my favorite of all the models created for the Star Wars galaxy. I've toyed around with building one for many, many years, heck since I first saw the film in 1978 but just haven't felt the time was right. Well now it is!
The first step is to do an overall digital model that will be used for creating the main fuselage, cockpit, and the structural details. This model is going to be a one-off. No overall molds. I've got two Airfix Saturn Vs for the engines. The main fuselage will be massed up in plexiglas around an aluminum armature. The forward cockpit section will be modeled digitally and 3D printed. Then I'll either use the print or make a mold and cast it. As I said, some of the parts will be from donor kits, some will be digitally modeled and 3D printed and others will be built up from scratch.
Many thanks go to RPF member ProfKSergeev who has very generously loaned me quite a few of the donor parts he's been collecting for his Y-Wing project to mold and cast for mine!
Here are some pix of a very rough digital model of the Y.
MORE ON THE "OPEN SOURCE" ASPECT OF THIS PROJECT
In an effort to encourage Studio Scale modeling I will be posting some of the files that I've created so that others can build their own Y-Wing models. Included will be 3D model files, 3D printing files, laser cutting files and other drawing files. Eventually I hope to have complete orthographic "blueprints" but that's going to take some time. The 3D printing files ARE NOT to print a completely detailed, ready to paint model, they are just of the bare fuselage sections onto which the kit parts are added. While being far from a complete model, this should allow people to get past the very difficult hurtle of starting a Y-Wing from scratch.
The 3D printing main fuselage files are intended for printing with added supports which need to be added by the slicing software. You can also have the parts printed at a service bureau like Shapeways.com. Their "White, Strong and Flexible" material works very well for these parts and is reasonably priced. The finer detail parts like the control vanes need to be printed in their Ultra or Extreme detail plastic to come out nicely.
Even with all these files, building a Y is still very much a DIY project and will require a fair amount of scratch building and head scratching! But I encourage anyone that's every wanted a model of this great fighter to take on the challenge. You'll get a lot of support here on the RPF.
I am also hoping that others will contribute to this open source project, improving on the work I've done with these files or in other ways. There has already been a major push to identify and map all of the kit parts used by the original ILM modelmakers. These efforts are fantastic!
THERE HAS BEEN A LITTLE BIT OF CONFUSION ABOUT THE OPEN SOURCE REPOSITORY. THE REPOSITORY IS NOT A COMPLETE SETS OF FILES FOR PRINTING A Y-WING, NOR IS IT ALL OF THE FILES I CREATED FOR THIS PROJECT. FILES FOR PARTS WHICH I WAS SELLING, ARE NOT INCLUDED IN THE REPOSITORY. IN ADDITION, ALL OF MY PARTS RUNS FOR THIS PROJECT ARE NOW SOLD OUT AND CLOSED.
OPEN SOURCE REPOSITORY IS HERE:
Y-Wing Fighter - Google Drive
The following is a (more or less) complete list of all the various components that go into a "Green Leader" Y-Wing.
Note - All of DaveG's parts run are closed. But most of the 3D printing and other plan files for these parts are available in the Repository so people can make them for their own personal (non-commercial) use.
Armature - available from DaveG (run closed)
Laser cut Tee Plate
½” aluminum spar tube
½” x ¾” aluminum C channel
10-24 x 1” socket head cap screws (4)
10-24 x ¾” socket head cap screws (8)
10-24 x ½” socket head cap screws (2)
10-24 x ¾” truss head machine screws (3)
10-24 hex nuts (17)
10-24 small pattern flat washers (16)
Armature mounting block - 3D printed
Nacelle cores – 3D printed or DaveG’s laser cut acrylic parts (run closed)
Main Fuselage – 3D printed
Rear left shell
Rear right shell
Middle left shell
Middle right shell
Front shell
Bottom yolk
Neck Fuselage – 3D printed
Droid block
Front sloped block
Rear block
Bottom “oil pan” block
Forward Fuselage – castings available from DaveG (run closed)
Upper shell
Lower shell
Canopy
Torpedo bay
Forward laser cut bulkhead
Read laser cut bulkhead (3 parts)
Torpedo bay laser cut bulkhead
Cockpit interior – Scratch build with kit parts or a 3D printed one from Gus76
Engines
Main body – AMT Saturn V first stage shells (2 kits required)
Nose cones – vintage L’Eggs shells or DaveG castings (run closed)
Tee Struts – Plastruct ABS ¼” Tees – 8 lengths needed
1 ¼” Plastuct tubing (3 to 4 inches)
7/8" Plastruct tubing (3 to 4 inches)
Avid Thermalloy aluminum heat sinks (2)
Tail shrouds - vintage L’Eggs shells or DaveG castings (run closed)
Control vanes and “shocks” – 3D printed
Kit parts – Lots and LOTS of kit parts.
See parts map threads for more information on the various kit parts needed.
Engine greeblie/nernie panel castings are being offered by Masterpiece Models.
Rumor is that MM will be offering additional kit part sets for the Y-Wing at some time.
DaveG is not and will not be offering kit part castings!
Studio Kitbash is offering sets of nernie castings.
You will also need a variety of Plastruct tubing and/or brass and copper rod from 1/16” to 1/4” for the various piping details.
Last edited:
")