Hello everyone. It has been a very long time since I posted something on here.
Lot of things has changed, including the fact that I decided to leave my job to spend all my time in sculpting and Fx makeups.
So, this is the result of a commission by a guy who wanted to be Jim Carrey from "The Mask".
I worked with monsterclay for the sculpture, ultracal 30 for the molds and foam latex for the final pieces.
it was the first time for me working with foam latex... I'm overall satisfied with the results.
First, I took the face lifecast of my customer in prosthetic grade Alginate (I worked with a slow time alginate from Formx, really love the setting time of it, about 7 minutes, so I have plenty of time to check that all my areas are thicken enough) backed up with plaster bandages

Then I started working on my face piece - I decided to go with only two pieces, I later discovered that perhaps a separate chin piece would have been a little more easier when applying the makeup.
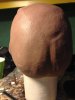
These are the blocked volumes


then I started adding some texture in it - Looking at the images of the original makeup, I found out that a general pore texture is what he seems to have in pretty much any area. Anyway, I decided to adding pores without stamps, by hand, to have a slightly more realistic look.


At this point, I was ready to cast it in Ultracal. I added flashing to my sculpture - I forgot to take photos of this passage - and then released the positive.

The lighter clay is the clay I used for my flashing. You can see that I left some contact area on the neck and on the lateral edges. You can also see my eye-keys.
Then, i began sculpting my cowl piece. Same process, except that I used a general size mannequin head.
View attachment 539369
This time I needed to creat a two-part head mold. Again, I currently have no photos of the process (I begin working faster due to my deadline)
It has been made in Ultracal, too.
I will be posting updates soon - I have still plenty of progess to show you. Hope you enjoy for now!
Lot of things has changed, including the fact that I decided to leave my job to spend all my time in sculpting and Fx makeups.
So, this is the result of a commission by a guy who wanted to be Jim Carrey from "The Mask".
I worked with monsterclay for the sculpture, ultracal 30 for the molds and foam latex for the final pieces.
it was the first time for me working with foam latex... I'm overall satisfied with the results.
First, I took the face lifecast of my customer in prosthetic grade Alginate (I worked with a slow time alginate from Formx, really love the setting time of it, about 7 minutes, so I have plenty of time to check that all my areas are thicken enough) backed up with plaster bandages
Then I started working on my face piece - I decided to go with only two pieces, I later discovered that perhaps a separate chin piece would have been a little more easier when applying the makeup.
These are the blocked volumes
then I started adding some texture in it - Looking at the images of the original makeup, I found out that a general pore texture is what he seems to have in pretty much any area. Anyway, I decided to adding pores without stamps, by hand, to have a slightly more realistic look.
At this point, I was ready to cast it in Ultracal. I added flashing to my sculpture - I forgot to take photos of this passage - and then released the positive.
The lighter clay is the clay I used for my flashing. You can see that I left some contact area on the neck and on the lateral edges. You can also see my eye-keys.
Then, i began sculpting my cowl piece. Same process, except that I used a general size mannequin head.
View attachment 539369
This time I needed to creat a two-part head mold. Again, I currently have no photos of the process (I begin working faster due to my deadline)
It has been made in Ultracal, too.
I will be posting updates soon - I have still plenty of progess to show you. Hope you enjoy for now!


")