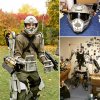
Edge of Tomorrow - Exo Suit

CZMarty

New Member
Since it's been some months into this project, I can finally share some progress on the exo suit.

I've been captured by the suits from Edge of Tomorrow ever since I saw the movie for the first time and while there might be better ways of spending hard earned money and my spare time, I simply had to build one.

My design is based on an aluminium load bearing "frame" made out of 2 and 3 mm sheet that will be covered by hollow plastic cover parts to give the exoskeleton the necessary bulk and correct shapes without being too heavy. I've been able to source the exact bearings (or slewing rings to be specific) used on the original so most joints copy those on the screen used suit.

XxRFoW4.jpg GRqc8oc.jpg m5qhWMh.jpg

I'm doing most of 3D work in Solidworks, followed by exporting STL files into Pepakura for unfolding and printing. My only gripe so far is the lack of options for material thickness in Pepakura. I have to adjust every single 3D model for printing to account for thickness of the PS sheets, otherwise the parts would end up being too large at least in one dimension.

sqpTkB9.jpg NdkZcwI.jpg e6uocOl.jpg

Almost all the exterior parts are done from high impact polystyrene sheets in 0,5;1;2 and 3 mm thickness. I can get them fairly cheap, they are reasonably easy to work with and can be chemically welded together with solvent based glue. Since I don't have access to affordable 3D printing, most parts will have to be either made completely from scratch or copied in urethane from a scratchbuilt master.
Here's an example of the composite frame, a hollow HI PS exterior part with a matching aluminium support.

VcWTcgi.jpg 6uQi0Cm.jpg

Due to the sheer number of slewing rings and plastic rod ends needed to build two complete suits, I've created molds for them and cast them in urethane resin. This approach might sacrifice some load bearing capacity but I feel confident that even these copies are still overkill for this application.

YbpwU8R.jpg TivVXi3.jpg

I'm hoping that this progress sharing will motivate me to do at least something on the suit every single day. Stay tuned for semi-regular updates.
Any ideas and C&C are most welcome.

7Ca7nJ1.jpg aYXWUws.jpg
 
Ambitious build. I like those suits a lot too. I think you have a solid plan to build it.

I thought solidworks had an option (or maybe a plugin) that lets you convert parts into sheet material. But maybe not, it has been a while for me.
 
Going to be watching this, great build. If you can export your solid works file to vector or just autocad, you may be able to send you parts off to a laser cutter (service)and just have the pieces cut out, it kind of looks like that is what your doing. Some metal shops can laser cut from dwg/ai/cad file think metals if you weld.
good luck, keep it up.
 
Thanks for the comments, I'm aware that this is by no means a one month project. While I was looking for references and similar projects, I came across a number of "soft" exosuits (my guess would be EVA foam) and my conclusion is that I should either do it right and as a hard frame or I don't even have to bother.

While Solidworks can work with sheet material, I have yet to find a way to unfold extrusions just like Pepakura would. Still, this sheet metal plugin was perfect for designing the aluminium frame, both for bend geometry/drawings and the follow up laser cutting.

I don't own a laser cutter and that's why I have to yet experiment with cutting polystyrene sheets. From what I've read it is not exactly ideal because it tends to melt at the cut instead of creating a nice edge but it could be made to work. Right now I'll stick to scoring and snapping the thinner sheets, everything from 3mm up gets cut to shape on my bandsaw.
 
One more part rougly shaped and glued together. Even though Solidworks assemblies can tell you if things go together, there is certain satisfaction in gluing all those unfolded shapes together and bringing a 3D model to life. This is the upper half of a knee joint, again mostly hollow and with reinforcing ribs.

p5yMBoe.jpg yw8HAIL.jpg QPqW0Gy.jpg nlGUNRW.jpg DGoMbRp.jpg
 
A word of warning for anyone who considers working with HI PS sheets or similar sheet plastic - if you want to make clean, precise holes, stay away from regular twist drills. They will 'grab' the plastic as they go through and this tendency gets worse with bigger drill bits. Flat drill bits are the way to go with no grabbing and surprisingly clean edges.

8BVXGcJ.jpg Xx1DQvL.jpg jIIig3s.jpg yzI8ge8.jpg einvhIT.jpg QXhK42G.jpg

Now I just need to recast 24 fake hex head 'screws' for all these shallow holes.
 
Apologies for the lack of progress pics but with how hectic has my schedule been, most of the time I forgot to take pictures or post them online.
The suits are still far from finished, though the second con test was a success. This time no screws came undone but the ball joints for all of the pistons seem to be way too fragile without any sort of reinforcement, I'll most likely have to drill them out and put some pins through.

HncmhKp.jpg qHJyCHN.jpg F9oLjuZ.jpg

Now that the base construction seems to be sound and durable to withstand multiple con days, I can get back to the details, chest plates and other key pieces that are still missing.
The thigh strapping system is also in need of a rework because right now it tends to work more like a point of rotation instead of keeping the thigh section parallel to the leg.

More pictures from the con
 
Thanks, they are surprisingly comfortable to move in. Each suit weighs in at about 30 kg but because of the hard frame, not all of that weight is on your back and arms. The only thing to keep in mind is that you have to walk with your legs apart to avoid scuffing the plastic parts on the insides of shins and feet.
Snowboard bindings keep the combat boots more or less glued in place so you really can just stomp around.
 
Hey there this looks great what did you use for the hydrolic pistons on the legs and did you manage to find a low priced source for the slewing rings iv found myself needing a few but the only ones i can find are nearly 70 pounds each ! omg thats expensive, but again love this build your efforts are amazing :)
 
Thanks! The pistons are based off of IGUS KARM 08 rod ends, the rest of the hardware is completely custom made to fit aluminium tubing. And yeah, the original slewing rings are super expensive and probably engineered for much tougher applications than cosplaying. I've solved that issue by casting my own copies in urethane resin, cut the costs per slewing ring to the point where I could make a couple spares. So far they've held up, no cracking or significant wear to be seen.
 
Hey, I don't mean to be rude about this but considering that nobody helped me with their CAD files and eventually I had to dump quite some time into development, testing and refining of the load bearing frame, I am under no obligation to share my solidworks files. I'm sure you understand.
 
Hey guys, sorry for the lack of progress updates, I'll try to make up for it in the following weeks.
Firstly, I've been able to get the last couple latches directly from Sugatsune, it should cover this and even some future projects.

FVSN7MEm.jpg

Even though my current color scheme is the more common gray/green, I was tempted to make a 'dog soldier' style faceplate for the helmet. Now I just need to cut the skull stencil and airbrush some white over it before it gets all weathered and scratched.

14715710_1802033616702647_6329799954281717003_o.jpg 14633215_1802033813369294_405248287473690111_o.jpg 14712646_1802033810035961_4551454711760354366_o.jpg 14715429_1802033806702628_4491044202800389214_o.jpg
 
I totally want that helmet!

There can be only one! Aside from all the originals and some fan made helmets :p

I've put my vinyl cutter to work, done some more airbrushed details on the rest of the suit aside from that big, badass looking dog skull. I think the theme works even without an all-black suit and helmet, what's your opinion, guys?

fXeauDG.jpg FNnKRhp.jpg
 
Looks great in either color.

So is the face shield custom made? I've found the helmet on airsoft sites as well as military gear sites (the real deal there), but no face shields at all that look like that.
 
Yep, it's custom made to fit this particular airsoft replica helmet and this style of ear covers. Some airsoft face masks come close but none match the screen used shield.

I took some measurements off of behind the scenes pics and created my shield in Solidworks. It's mostly 3mm sheet styrene, with 3d printed reinforcing parts in the corners.
 
I had a blast at a local con last weekend, even though it's been the longest time that I've worn the exosuit in a single day and that definitely took its toll.
The redesigned strapping system works far better than the previous iteration, I just need to shift the thigh straps a little higher and I should be golden. Now it really works with you when you walk around, no need to worry that something will come undone.

14902969_1793959940872794_1053263001520338118_o.jpg Crones_01.jpg Crones_02.jpg nMSbfr7.jpg

Time to get working on the chest piece and all the other missing details.
 
I only just watched this again last night and find this thread now. VERY COOL and executed brilliantly.
 
This thread is more than 4 years old.

Your message may be considered spam for the following reasons:

  1. This thread hasn't been active in some time. A new post in this thread might not contribute constructively to this discussion after so long.
If you wish to reply despite these issues, check the box below before replying.
Be aware that malicious compliance may result in more severe penalties.
Back
Top