McQuarrie Vader WIP Scratch Build & Research (Studio 49)

This is a great build. I'll be following it closely! Well done so far.

Thank you so much Jadifyfe! Figured someone had to build it eventually! (Even though I'm in for the long haul and needing to build pretty much everything. ;) )
I'm loving being able to get down and dirty with building. As well as really being one of the first people to research the costume itself as a whole and having to problem solve what needs to go where and how.
 
The forms in the boots highly suggest them to be a flexible leather. It'll give you a tighter, more svelte look as indicated by the art, and also be a nice departure from the usual movie Vader look. It's worth a thought! Otherwise you're going to want to cut out space near the back of the knee to allow movement.

What's extra curious is that the Kutobokiya statue seems to have inverted the actual forms of the boot designs. Areas in the model recess in where in the art, they extrude out. Think of it like the Dark Knight version of the batsuit. I've marked out the "plates" in red here
View attachment 557685

So using your turn-around, it'd basically end up looking something like this.
View attachment 557686

Hope that helps and makes sense!


First of all, a huge thank you to you sir. This is the kind of quality thinking/feedback I was looking for here on etc RPF!

The the idea of the leather detailing certainly isn't something that I have looked at before! So I'll have to have a think about it.


What's extra curious is that the Kutobokiya statue seems to have inverted the actual forms of the boot designs. Areas in the model recess in where in the art, they extrude out. Think of it like the Dark Knight version of the batsuit.

I guess that this would be up for interpretation. From the database of reference photos of the Koto (most of which have't posted yet since they weren't relevant to my build progress) and the original art, I have some ideas.

So this is what I am seeing in terms of raised and recessed areas:
- The front knee portion that you so kindly highlighted red in your diagram, I see as raised (same as you)
- But rear areas you highlighted I think are recessed (you can see the drop in level in some of the Koto images if you look at etc lighting closely)
 
Anytime! That's what this forum is here for!

I agree they look that way in the Kotos, but I don't think the art reflects that. (Like you said, though. Totally open to interpretation!)

What's making me see the (let's call it the dark lower-case "r" design) as being recessed has to do with the way McQuarrie uses the light blue highlights to create raised lips in the armor. This is most likely coming from his lightsaber up top.

The ribs on the strip above Vader's knees have the same blue highlights, and the warm rim-lighting on the left reinforces that these features do in fact pop out.
The shin strip down the front of the boots is the same deal, which you agree with. But if the dark lowercase r shape were raised, there wouldn't be a blue highlight on both sides.

It would look like this, casting a shadow on the light grey area to the right. The lightsaber would be casting light to all the raised areas
raisedleg.jpg

Maybe he just goofed though. Who knows!

Anyway, if you prefer to go with a raised version, you could try this.
alternative.png
Have the red areas armored and the rest be a soft bendable boot. It would definitely be less plastic to have to worry about. Plus you wouldn't have to worry about having to make mirrored versions for both legs since you'd be basically making shin guards.
 
Update 19:


Just finished my RMQ Helemt Stand with my gloss black base screwed to the mannequin head


Photo%2022-11-2015%2011%2056%2004%20AM_zpsz8kk9k8i.jpg


Photo%2022-11-2015%2011%2056%2013%20AM_zpsja426mfc.jpg


Photo%2022-11-2015%2011%2056%2004%20AM_zpsz8kk9k8i.jpg


Photo%2022-11-2015%2011%2056%2013%20AM_zpsja426mfc.jpg
 
Last edited by a moderator:
Cool update. Can't wait to see what you do on the saber front!

Thank you Panaflex, I'm just stoked that others are enjoying the thread as I go!

Now I have the stand I have to finish the dome now so I can complete the display.


I have also just finished preparing the 3D models for laser cutting and 3D Printing in 2-3 weeks when I get workshop access

So in terms of the Saber, I'm going to 3D print it in sections that are divided into the colour of paint so I can paint each section individually then assemble it.
The hilt that I have designed should also accommodate a static blade which will just fit into the emitter with friction. For that I'm just going to buy a blue daytime static blade from the TCSS

I would love if one day in the future I could get one CNC machined, it would be awesome! It's just a matter of finding a shop willing to do it for me...
 
Update 20:


Not sure if I posted about this before but I had to strip the paint back to primer because I had a faulty spray can. Just can't catch at break with the dome can I!
So After much sanding and filling I was finally able to apply the first coat of Rustoleum which is already far superior! Hoping to get all the painting wrapped up in the next week so fingers crossed


Photo is of a freshly applied coast of Rustoleum drying
13_zpskcpxt2do.jpg


13_zpskcpxt2do.jpg
 
Last edited by a moderator:
So what's the difference between high gloss black and rustoleum spraypaint?

Chaim

Not entirely sure but from the spray paint I can get around here the Rustoleum is doing a way bette job than any of the other ones I've used.

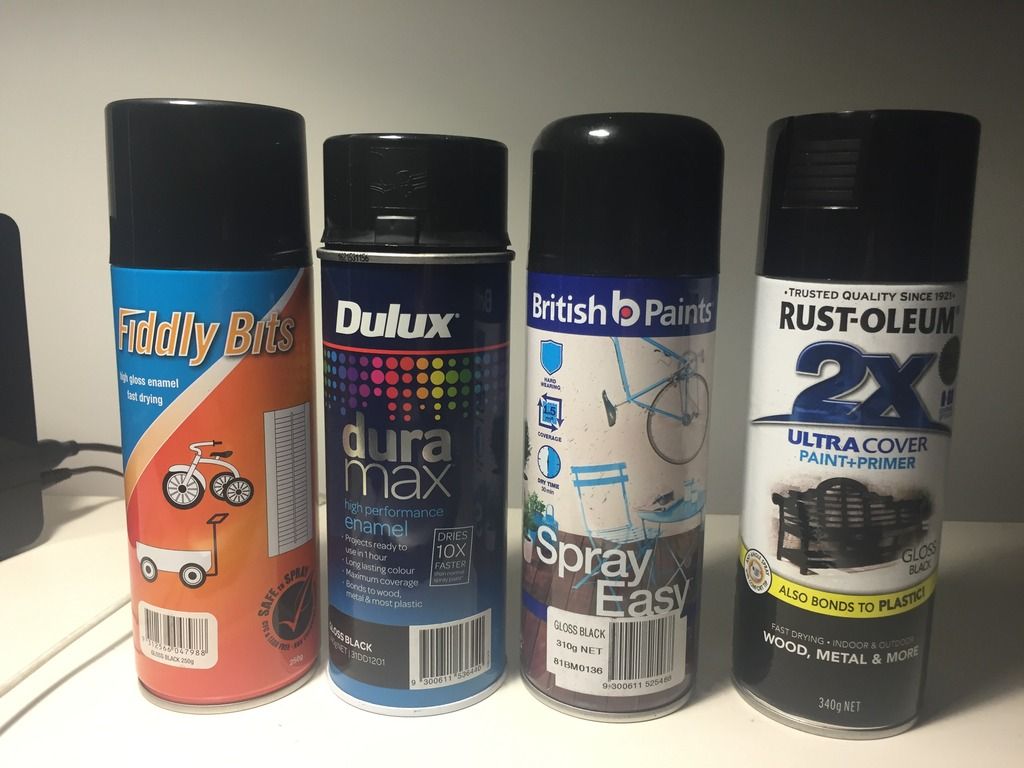
I've used a whole bunch through my Vader projects:
- Fiddly bits (you basic budget can, but surprising good)
- Dulux (the worst by far, I've had way to many faulty cans and for $10 it's just not worth my time or money)
- British Paints (Consistant spray, nice even from first coat. Nicest by far)
- White Knight (did a nice job but a local forum member who's been in the factory and seen what goes into recommend Rustoleum to me instead)
- Rustoleum (Consistant spray initially then had some issues)

I hope that answers your question I think?

Photo%201-12-2015%209%2034%2018%20PM_zps0013qnhk.jpg
 
Last edited:
Update 21:


Alright, now we're cooking with gas!

I was able to get into the workshop today and pump out a heap of parts for me to work on.
I was able to get all the parts for the Saber Hilt printed, half the buckle printed and laser cut the entire chest box. All ready for filling painting and gluing!


Any way here's some pictures of where I'm at after this afternoon:


The acrylic in the laser cutter
4A_zpsh18nodsb.jpg


The 3D printers I was lucky enough to have at my disposal
4B_zpsbc59gtz0.jpg


My parts so far. I have a heap of clean up and prep ahead. So bring it on!
4C_zpso5bub0o1.jpg


I had a bit of a laugh at saber since it looks a little like a kids toy trumpet or torch! Hopefully that won't be the case soon enough...
4D_zpsogfhiabg.jpg


Half a belt buckle and chestbox
4E_zpsgwa5dowy.jpg


4F_zpsq2rflt6e.jpg


2 Extra chest boxes...
wink.gif

4G_zpso9cn943d.jpg


4A_zpsh18nodsb.jpg


4B_zpsbc59gtz0.jpg


4C_zpso5bub0o1.jpg


4D_zpsogfhiabg.jpg


4E_zpsgwa5dowy.jpg


4F_zpsq2rflt6e.jpg


wink.gif


4G_zpso9cn943d.jpg
 
Last edited by a moderator:
Wow, great progress! That shot of the printers working is cool.
Love the saber parts! Looking forward to seeing the finished piece.
 
Wow this is an impressive and ambitious build! I look forward to seeing how it progresses!
Yep you're not wrong there and that's why it's so enjoyable!


Wow, great progress! That shot of the printers working is cool.
Love the saber parts! Looking forward to seeing the finished piece.
Thanks mate, I've just started the sanding, filling and paint process this morning. Going down to the hardware store to get some more cans of paint.
And I also love the shot of the 3 printers going since it's like I've got my own little printer army and it's so satisfying when I am able to get into the workshop there and use them!
 
Update 22:

First coats of primer on the chest box and saber hilt and almost ready for black and silver coats now.

5_zpsimp0sozh.jpg


2_zps709hi51l.jpg


5_zpsimp0sozh.jpg


2_zps709hi51l.jpg
 
Last edited by a moderator:
Update 23:


Finally almost finished the dome of the helmet and it's looking good! Only one or two coats left for me to do then I'll not touch it for a few weeks so I don't wreck my work.
I just have to resist the urge to put on the finished, glossy helmet... Oh boy I already know this is going to be quit the wait!


14A_zpszmouqo6m.jpg


14B_zpsj0kfsrnv.jpg


14C_zps4beiiqxc.jpg


The Lightsaber is also coming along nicely, still got some ways to go but it's getting there
6A_zpsvxizpxwe.jpg


6B_zpsjyha592e.jpg


And for the Chestbox I've pretty much finished the painting minus the final coat. I'm paint the main box and the little insert separately so that the indented line deal on the front is crisp and not rounded out by paint.
3_zpskuavqj7o.jpg


14A_zpszmouqo6m.jpg


14B_zpsj0kfsrnv.jpg


14C_zps4beiiqxc.jpg


6A_zpsvxizpxwe.jpg


6B_zpsjyha592e.jpg


3_zpskuavqj7o.jpg
 
Last edited by a moderator:
Update 24:


So today I had a go at the silver inlay/ridges in the main hilt.
I'll the the first to admit that I'm still very much learning the tricks of taping thing up to paint and considering that it went alright.
I had to use the painters tape that we had laying around, probably wasn't as higher quality it should've been.
This afternoon I removed the tape and as I expected there as some bleeding, but nothing i can't fix at least, just need to do a bit of problem solving
biggrin.png


Also did a quick mock up with the body + switch + the switch. (Both 3D printed parts still need some clean up by the way)


7A_zpsmrz6mqoi.jpg


7B_zpsdevzojcz.jpg


7C_zpsqmlp23lh.jpg


Still much more clean up ahead, oh well thats half the fun
biggrin.png


7D_zpsvc3sgvn5.jpg


biggrin.png


7A_zpsmrz6mqoi.jpg


7B_zpsdevzojcz.jpg


7C_zpsqmlp23lh.jpg


biggrin.png


7D_zpsvc3sgvn5.jpg
 
Last edited by a moderator:
Thanks Panaflex

And also looks like one of the photos didn't embed properly.
Here's a quick mock up with the body + switch + the switch. (Both 3D printed parts still need some clean up by the way)


7D_zpsyyttlenz.jpg


7D_zpsyyttlenz.jpg
 
Last edited by a moderator:

Your message may be considered spam for the following reasons:

If you wish to reply despite these issues, check the box below before replying.
Be aware that malicious compliance may result in more severe penalties.
Back
Top