Sorry all, it's been slow going. I took time out to write a cosplay contest judging and management web site right after FanX (Salt Lake). Now that that's over I can get back to cosplay and this is a test of an arm for Yellowjacket. I need to work on that middle joint, probably a floating link or put it in parallel with the short arm it attaches to to make double duty of the actuator.
My current predicament is the texture on the black rubber collar. The left shot is of a honeycomb texture. On the right it almost looks like a carbon fiber-ish grid. I can't decide which is easier to model and/or correct. So frustrating.
Yes, I had that same epiphany last night when a follower on facebook suggested triaxial weave carbon fiber. It looks pretty good and saves a huge chunk of 3D modeling that I'd have to do. But I still have to see how big these hexagons are in this pattern.
So I found the ultimate thing for my YellowJacket build. The VFX breakdown reel from the company that generated the effects, CineSite. I can't believe that I didn't stumble upon this video sooner, would have saved SO MUCH angst and confusion. Full video here: https://vimeo.com/149412685
Wow I have been neglecting this thread. This project is still active and I've been making progress on making the robotic arms a practical effect.
Functional diagram in CAD via Fusion360. This assembly is what lets the arms splay out from the backpack and drape at the right angle. I hope that this along with rotating the that girder 90º will let me "grab" or pin a person standing in front of me (in theory). Video at the bottom to see it in action.
The green crank from above that I test printed in ABS and then printed in stainless steel via Shapeways, about $20 for two cranks.
New arm hinges. Building upon my cardboard and string test piece I have developed this hinge which uses Dubro flex cables with solder on clevises that will daisychain the bi-directional motion between the three joins above the girder in the top picture.
Test fitting all the pieces. I still have to add the actuator that goes inside the girder that pulls on the pylon thing under the gears. This actuator lets the arms rock back/forth.
Sorry All, I've been negligent in posting my work here. It's been really slow going with life stuff, works stuff, convention stuff and it's eaten most of my time. That and I have been kinda of in a building funk. Back on track now though. Look for more updates.
Bracer modeling is done. Not pictured are the filets around the cuff.
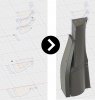
I've modeled most of the arm now.
Tip and the rest of the arm. Kind of an old screenshot but it's 99%.
This is that black decorative detail on the chest and it wraps around the the arms and down between the legs and is also the outside collar (there are two collars). This is a negative that will be CNC'd out of some wood by my prop building friend and then I will 3D print the hexagon lattice and trim it to fit in the pockets. This will then be molded with some Dragonskin NV.
Knees plates took a few tries, you can see the original at the right.
Robotic arm test for Yellowjacket. Sorry I haven't been posting. A lot of this project as been under redesign and honestly I'm just tired but I'm plugging along with it. This test was very successful and I am very encouraged now. There is a light at the end of the tunnel!
Also did some more arduino programming to get the "shooting" effect more or less blocked out.
As someone who's trying to design moving parts for their own cosplay, I absolutely love seeing other people's designs and implementations. It's one thing to make a suit look like a movie suit, it's quite another to breathe life into it and make it feel like the movies. GJ and GL!
Lots of stuff in progress. Worked on applying the arms to the master backpack plate instead of my wood Test plate. Also printed the gauntlets and installed magnets.
Two part mold underway. These are the tips of the arms that I have to make crazy light. They’ll be cast in a urethane foam with an insert of 3D printed translucent plastic where you see the grooves so the LEDs can shine out (in theory).


")