Game of Thrones: Jorah Mormont Leather Armor Build

Photo Oct 01, 10 57 06 PM.jpgPhoto Oct 01, 11 55 37 PM.jpg
attachment.php


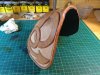
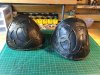
This totally killed me. After some experimenting I scrapped my plan and just tooled and cut out the dragon pattern, glued it on to the pauldron and called it a day. I also glued on the rim I made out of 1/4" strip I stamped the scale pattern on and burnished up the edges. And as per Gator Fett's suggestion trimmed the upper edges of the pauldron ever so slightly but enough to replicate the armor overlap in the reference photos. Now I just have to do it again for the other shoulder and paint 'em up.


Sorry for the roughly drawn line, but this is what I was trying to describe. You're right about the initial shapes an how that translates to the final product, but you should be able to trim off a 1/4" or so if you want. Not that I'm 100% sure I'm correct, but based on the reference photo, that's what I see.

Either way, the armor is awesome!

View attachment 535641
 

Attachments

  • Photo Oct 01, 11 55 46 PM.jpg
    Photo Oct 01, 11 55 46 PM.jpg
    2.1 MB · Views: 3,675
attachment.php


Got them pretty much finished up. Started with a metallic gold paint, then went over that with black, and rubbed or sanded off some highlights before the black dried. Lastly sealed it all up with a leather finish.

Might be a week or so before I can get pictures of the whole ensemble, but I'm looking forward to putting together all the pieces.
 

Attachments

  • Photo Oct 06, 5 30 24 PM.jpg
    Photo Oct 06, 5 30 24 PM.jpg
    2.6 MB · Views: 3,403
attachment.php


A few last details coming together. I ran some of the leather lace through some black shoe polish to make them appear darker and worn like on some places on the actual armor. I finally found a good piece of woven fabric to use for the Jorah's neck tie or whatever it is. It started much more blue but I bleached and dyed it to the turquoise color. I also found a nice little fancy safety pin to secure it. Next up is some of the fabric I used to wrap to the sword hilt weathered up. He wraps this around his right hand. Lastly, I have several woven cotton straps that will wrap around the left arm and both boots. Only thing left that I may or may not get is a big ring for the right hand.

I'll be putting everything together for the first time this weekend at the Ren Fest so I'll get some pictures of then.

And bonus, above the Jorah stuff on my bench I've got a Han Solo belt in progress for someone through my Etsy site.
 

Attachments

  • Photo Oct 13, 3 02 31 PM.jpg
    Photo Oct 13, 3 02 31 PM.jpg
    840.3 KB · Views: 106
  • Photo Oct 13, 3 02 31 PM.jpg
    Photo Oct 13, 3 02 31 PM.jpg
    1.7 MB · Views: 1,898
Very nice! Excellent work. For maximum authenticity you should back the cuirass and pauldrons with metal sheets since leather by itself makes for crap armor. Regardless, everything turned out really nice and look like it came straight off the set.
 
attachment.jpg
attachment.jpg
attachment.jpg


Got a couple shots and one to compare. Everything came together great and it was more comfortable and easier to move around that I thought it was going to be. Got some nice feedback too and I'm looking forward to Halloween to break it out again though I might not wear the full armor depending on the parties I go to as it might be tough in tight indoor spaces and I can't lace up the cuirass without a hand.

As always thanks to everyone on the RPF, it's always an inspiration checking out what people are up to here.
 

Attachments

  • ren 2015 profile.jpeg
    ren 2015 profile.jpeg
    36.7 KB · Views: 1,442
  • 12111952_10102641567239949_3584093896907786899_n.jpg
    12111952_10102641567239949_3584093896907786899_n.jpg
    171.8 KB · Views: 1,457
  • 24.jpg
    24.jpg
    490 KB · Views: 1,461
So if I'm seeing this correctly, I'm new to leather, you tool it, then oil it, then dye it and then wax it? And that's when it gets it's leather shine?
 
So if I'm seeing this correctly, I'm new to leather, you tool it, then oil it, then dye it and then wax it? And that's when it gets it's leather shine?


It depends on exactly what you're going for. On the breastplate, cased it with water to allow it to be tooled, tooled it, dyed it, then rubbed on a light coat of neatsfoot oil. From that point there's a few options. On the tooled part I finished it with a gloss acrylic leather finish called Resolene to give it a slight shine and harder protection. On other parts I used a wax-based finisher/water-proofer to leave it a bit more natural feeling.
 
Would you by any chance sell some
Silicon molds for the embrossing tools? I'm planning to make this armour too somewhere in the future but I'm starting on the bracers this summer. But this post will be very helpful in the future for me!
 
Would you by any chance sell some
Silicon molds for the embrossing tools? I'm planning to make this armour too somewhere in the future but I'm starting on the bracers this summer. But this post will be very helpful in the future for me!

Hi - I don't think I even have them anymore. They weren't too hard to make (I don't even have a lot of experience working with molds and casting) especially if you use my pictures as reference. I started with the design made from sculpy and made a silicon mold from that.
 
Hi - I don't think I even have them anymore. They weren't too hard to make (I don't even have a lot of experience working with molds and casting) especially if you use my pictures as reference. I started with the design made from sculpy and made a silicon mold from that.

Ah that sounds easy enough! I'll have a go at that!
 
This thread is more than 5 years old.

Your message may be considered spam for the following reasons:

  1. This thread hasn't been active in some time. A new post in this thread might not contribute constructively to this discussion after so long.
If you wish to reply despite these issues, check the box below before replying.
Be aware that malicious compliance may result in more severe penalties.
Back
Top