Functional Pip-boy 3000 Mk IV from Fallout 4

Inquisitor Peregrinus:

Regarding the aluminum SLS prints: I say less precise just because the aluminum prints have to go through a process in a kiln which can shrink the part. They surface texture is also somewhat rougher. So to compensate you often have to make your part a bit bigger (unless shapeways already does this automatically), and if you want a smooth finish, you have to add a small amount of material to sand or machine away. It it very similar to designing for a cast metal part.

I can't say how I will approach the Pip-Boy 2000 Mk VI until I have the kit in hand.
 
Last edited by a moderator:
one question i have right now is how large is the space for the arm? I know you havent figured out how to keep it from shifting and moving about, but i was curious as to how wide it is and if that has changed at all.

also when it comes to the software side of things, will the select button and scroll wheel be functioning like we see on the bluetooth edition? i dont remember if i asked that already. in the fallout 4 bluetooth pipboy they have it where you scroll horizontally with the wheel and then press the select button on the sub-menu u want to scroll through and then you vertically in that menu. It really makes sense as to why they have less knobs and buttons that way. more complex but it works. In that version it has it so u can go back to horizontal scrolling by going to the bottom and selecting a "return to top" button. Perhaps in the software have it where if the select button is held down it goes back to top? makes it alittle more smooth. I dunno if that would be able to be done but programming is magic i suppose?
 
Last edited:
The larger opening is 100mm in diameter, and that drops to 77mm for most of the Pip-Boy. That is without the padding.
I made a rough CAD model of my own arm and used that to ensure it would fit. With padding it will probably be a bit tight.

Changing the scale at this juncture may be next to impossible, due to all the electronics inside that can't change scale.

I am not 100% sure on how I will handle the software GUI yet. I will have the four-way nav joystick also to use.
The reality is I am not a software programmer. I can muddle through but only after lots of though and lots of trial and error.
At this point, I may be happy just to display a few different screens with a few live pieces of information. I no longer plan on integrating it with any game functions.
 
I'm not asking you to change it at all. i was just curious as to the scale. the foam for the pipboy replica is very firm and when taken out the pipboy is loose my arm filled that up and firmly stayed in place with that foam but it didnt breathe nor did it have much give.

Perhaps once done someone could program the software? I'm seeing it's alot of work just to get the pipboy itself to realistically function and have (almost) all of its features. All the button work, all the switches function. with that someone could take the platform and then program the rest? If you just finished all the electronics no one would blame you if you stopped there.

could someone program it to run the app and have it interact via wifi? or was the wifi feature removed?
 
The padding is still very much in the air. I believe for the replica they used a flexible expanding foam which developed a skin for the surface. In-game the material looks to be leather or some soft brown cloth. The pillow-like pads imply that it was stitched together with batting behind it. So I may have to find an upholstery shop.

At this point, I am leaning towards making the padding game-accurate, and no adding any extra features to secure it to my arm. A second "secure" design could be swapped out for cosplay. One idea there is to directly secure it to a leather arm cuff that was already attached to a vault suit sleeve. Allowing you to hide the mechanism that locks it in place. It also would be more comfortable than any clamp/belt system.

---

Once the electronics and mechanics are complete, this will be a very powerful tool, and a proper programmer could run with adding all sorts of things.
I am still using the Dragonboard 410c, as a Arduino or Pi simply can't drive the high resolution display. The Dragonboard has all the same features and power as a good cell phone from a few years ago. So in-game integration could be added in software, I just won't be doing it myself.
 
My plan is to use a moldable splint to establish my own arm dimensions, trim to indicate the halves of the Pip-Boy, tape them together, make a hydrocal cast (including the thickness of the splint), and use that to shape a perforated metal substrate around. The padded, quilted lambskin liner would be anchored to that on the inside. Using a bit more of the splint material to wrap around the substrate piece, I'll shape another, non-perforated piece around. This will be the piece that fits inside the Pip-Boy housing to protect the internals, with the eighth-inch gap between them and the padding substrates allowing some airflow. What I'll be fiddling with with test-prints is anchor points for the backer pieces, including spacers for the padding pieces -- possibly spring-loaded to help hold it in place on the arm.
 
Please forgive me for any missed forum etiquette for the RPF as I'm new here, although I've been following this for a couple years now. Let's get the obligatory homage out of the way. Impeccable detail and care poured into this project! You should be proud Zap. Both your engineering and CAD skills and your passion show very much in this project. I'm so glad you've got renewed zeal for this one. I had stopped following this thread for a while but upon the announcement of 76, I found myself back here and very pleasantly surprised that you too were inspired by 76 (regardless of the game itself) to continue this project.

I know you're leaning towards what looks game accurate as far as the padding goes, but have you considered using some kind of inflatable fabric? I believe someone in the thread mentioned inflating a few years ago. You could use a hand pump like for a sphygmomanometer and possibly hide the connection in the housing of the Pip-boy somewhere. Maybe access to the connection hidden by one of the other assemblies. I'd have to do some rereading to see where you may have room for such a thing. As far as the fabric is concerned, I'm not sure if blood pressure cuffs typically have stitching within the inflatable part of the cuff or not, but maybe drop stitching it so that you can get more detail into the fabric and get it closer to the in-game Pip-boy would work. They use inflatable drop stitching for all sorts of commodities, such as inflatable rafts/pontoons, inflatable standing paddle boards, etc. I doubt any inflatable fabric would be very breathable, but it would allow for anyone with a forearm the same size as yours or smaller to inflate the padding to be secure and comfortable for their own use. I'm no expert in fabrics or sewing (I can mend clothes and create basic sewn objects), but I figure it's an option to consider if you haven't already.

Cheers!
 
AdmrlNelson, Welcome to the RPF fellow central Texan. Don't worry I am a lurker in at least a dozen other forums.

Note: At this point my primary goal is to design the Pip-Boy to be a beautiful desk prop, and not a wearable cosplay prop.

I have been working on the arm-rest padding a lot this week. In fact I completely re-did the CAD design on the padding it to make it accurate to the game model. At this time my plan is to design two different padding options:

The first will be a game-accurate look and feel. The padding will be made by casting FlexFoam. A product I re-found recently, even though it was suggested a few years ago in this very thread. I will build a mold for the FlexFoam, that will allow it to both take the game-accurate shape, and also to bond it to a flexible 3D printed substrate. The substrate would act as a solid backer, secure any cloth added over the foam, and finally contain magnets to attach to the inside of the Pip-Boy. The goal is to make the interior easy to remove to show of the all the guts inside.

The second, low-priority, design would make it more wearable for cosplay. Here the plan is to add strap anchors inside the Pip-Boy that would allow you to wrap stretchable webbing around your arm in a crisscross pattern. The padding for this option could be a more breathable material.

An inflatable cuff has been suggested a few times, but there are issues with that idea. The first is the constant pressure would cut off blood in your wrist. The structure surrounding the cuff has to be very stiff, and no plastic is going to be tough enough for this task.

I am trying to figure out a way to 3D model my own arm with more accuracy, so I can ensure the Pip-Boy will at least fit my own arm. I am no longer trying to make this design work for the masses, so those with larger arms won't be able to wear it anyways.

In the end, this is going to be pretty heavy. I am using real metal pins, hinges, and screws. I don't have an estimate yet. But considering the Pip-Boy edition was made of hair thin plastic, and it was heavy, my design will be at least a few pounds. It will have that "If it's heavy, than it's expensive" type of feel to it.

-------------

Other updates:

I finally got the fully textured model working well in NifScope. So now I can examine every detail up close more than I could do in-game.This has resulted in dozens of new tweaks to the model on almost every component. (With images to follow)

Things I am working on currently:
• Putting those rectangular batteries I said I removed last week back in. I just don't feel like 800mAh@4.8V is going to be enough.I already crammed a 2Ah@3.2V into the back of the Pip-Boy, and maybe even another 2aH below the Holotape.
• Game-accurate arm bands
• Seeing if I am going to change the rad guage motor. The current motor will probably dig into your arm as it is the one component which is long enough to protrude into the arm-band space.
 
Last edited by a moderator:
I wasn't aware you were aiming for a desktop prop at this time. I was going to suggest you get a little Donald Gennaro action figure to sit beside your Pip-boy, but wouldn't you know it, he wasn't popular enough to be a Jurassic Park toy! Your FlexFoam option seems like a great solution to game accurate padding.

I'm not sure if you modeled your arm from scratch or what, but as far as 3D scanning I can offer a few solutions. The easiest and cheapest would be to get a Kinect for the Xbox 360 (~$15 at any GameStop) and use any of the various 3D scanning software for Kinect out there on the net to scan your arm (Skanect, Shapify, ReconstructMe). Skanect is a popular one that gives pretty decent results. The developer of Skanect, Occipital, also has their own peripheral called Structure for scanning that gives higher resolution scans but it's a bit pricey at ~$380 (you also need an iPad). Now if you really wanna do it big and utilize that workshop square footage, you could work on a set up like this project I saw a few years ago. I don't know if you would ever use it for anything else, but it would be an interesting project to undertake and might provide you some new challenges. There's actually quite a few variants of the multi-camera set up. I suppose you could always scale it down to fit just a limb as well. Not sure if all this is worth it to ensure your dimensions, but I thought I'd give you solutions of all sizes and let you decide which one, if any, works for you.

Thanks for the update! I'll be keeping an eye out for future ones. Stay cool out there.
 
I definitely think leaving arm padding to the end-user is the best way to go. For fit and materials and personal preference. I'm still planning to do what I posted just above. The splint thickness will mean the mold and substrate will have a uniform centimeter or so of gap all along. A nice, squishy foam padding inside the tacked-down lambskin will keep things tight, but not too, with even pressure. And I went with the lambskin because it's light and flexible and has enough texture it doesn't slip easily.

I'm looking forward to having some test units printed so I can experiment and show -- but it'll be its own thread (though I'll post links).
 
I haven't looked in on this project for quite a while, good to see your still going forward with it Zap, RL throws in a monkey wrench from time to time keep up the good work.

Sent from my Z982 using Tapatalk


Progress!!! My back hurts from sitting in my office chair, but hey that's what the chiropractor is for.
Above is the arbitrary overview image. There are so many tiny tweaks for the design, you could have to play spot the differences with an old image. Lets just say this is at least 95% game accurate now. I tweaked lots of small curves, added the odd less rounded corner near the light button, etc...

---------------


Here is the new game-accurate foam 3D model. Do you have any idea how difficult is it to 3D model this type of shape in a parametric program? It required lots and lots of 3D lofting functions. The foam is only about 3-6mm thick, placed over a plastic substrate which will act as a mount and stiff backer.

---------------


It is what is behind that foam that is exciting! I am finally getting around to doing those electronics I keep talking about. Seriously, my college education was all electronics, I just been doing mechanical engineering for the past fifteen years. (Granted all for stuff with electronics inside)

Inside the back is a 3.7V 1Ah LIthium Ion battery. I don't know how long that will last exactly yet, but it is really all the space I can spare. I also removed the odd "hidden" cord from the inside as it wasn't actually hidden enough. For now it will be a battery powered device, with external power available only via the link cable.

The link cable will connect to the charging dock I designed two years ago... (Damn this project is taking a while)

---------------


I am designing the printed circuit boards using CircuitMaker. I actually own a copy of Eagle Maker Edition, but I really finding that Eagle is stuck in the past. I really don't like the way it handles components and libraries, as well as cross-linking between PCB and Schematic. I was spending way too much time building very simple components.

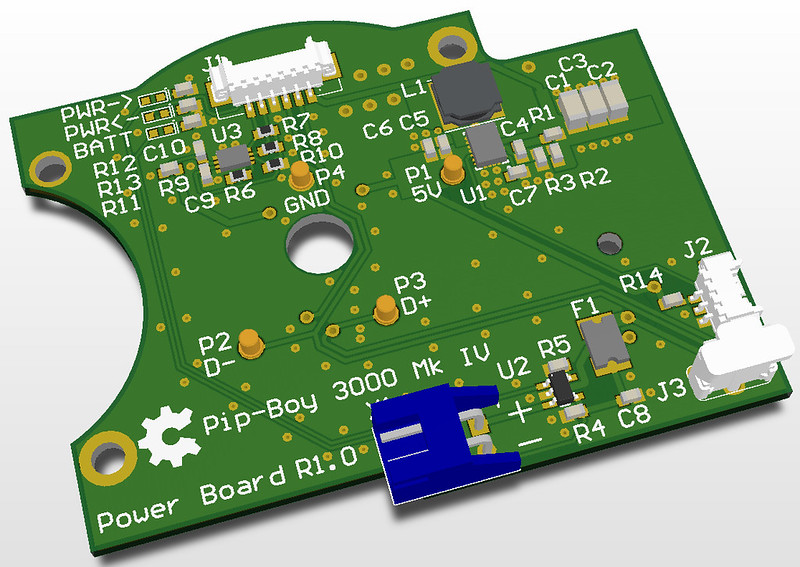
Aslo CircuitMaker also has these cool 3D previews. And all the source file will be public.
I did find their 3D export function to be totally neutered, so I will build up the boards inside SolidEdge later.

---------------


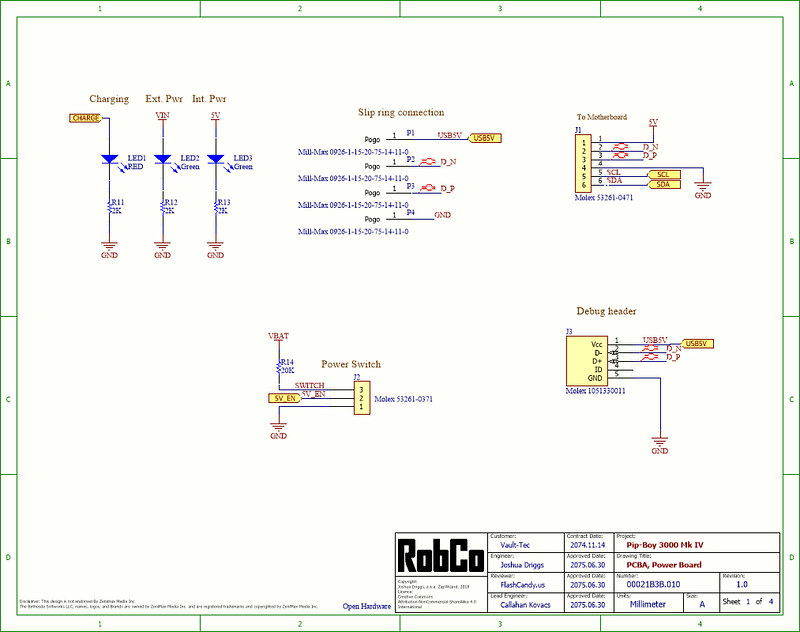
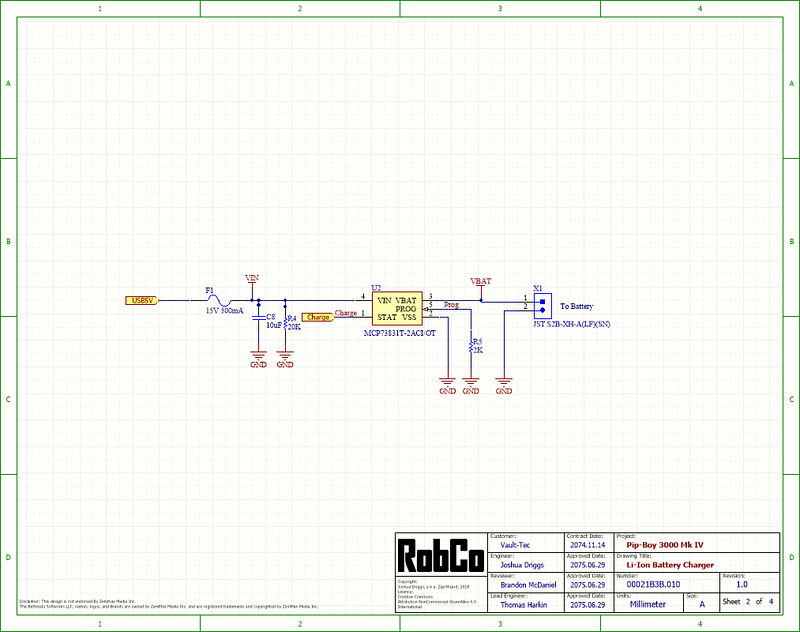
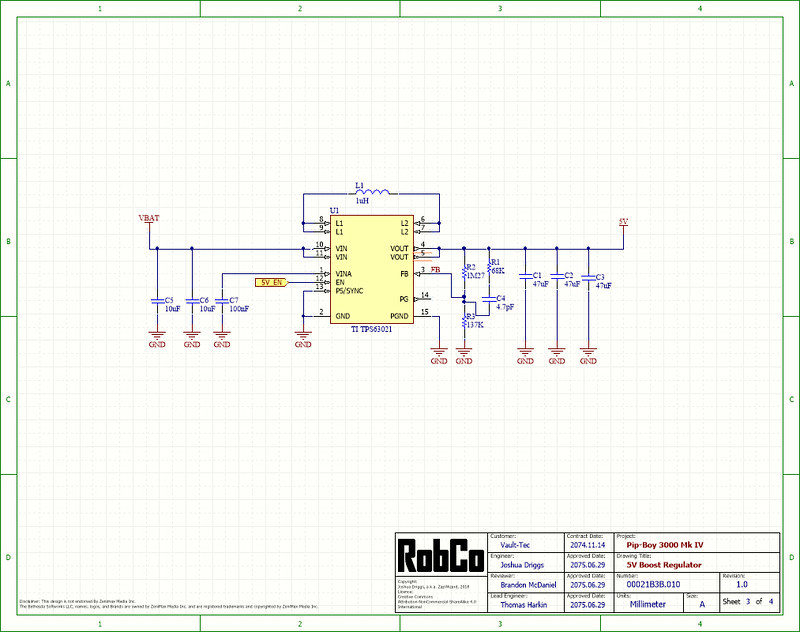
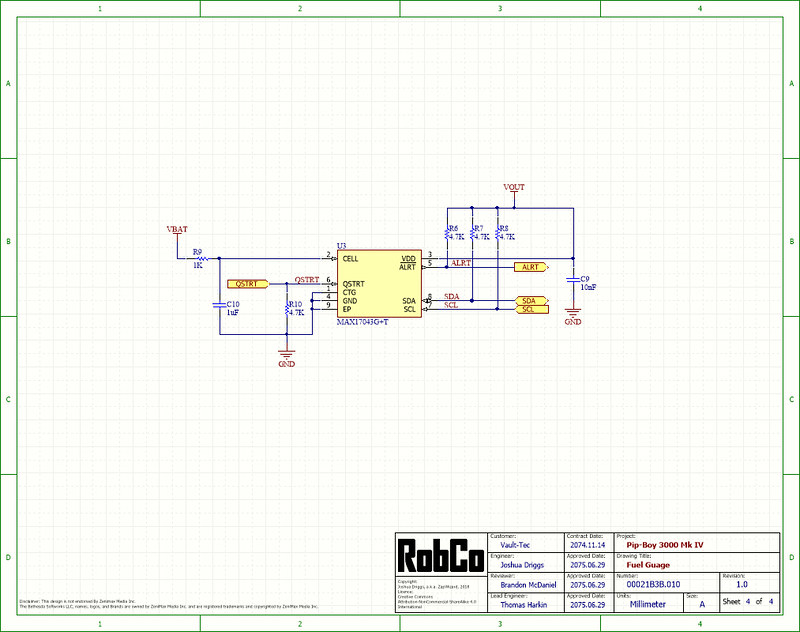
These four sheets make up the schematic for the above "Power Board". (Note the lore-friendly title blocks)

The board consists of a battery charger, a 5V boost regulator, and a battery fuel gauge. Along with the pogo-pins that link up to the slip-ring, which then links up to the link cable.

Most of the schematic blocks were taken from other open-source projects available on CircuitMaker. And most of these are really just re-creations of reference designs from the various chip makers.

---------------


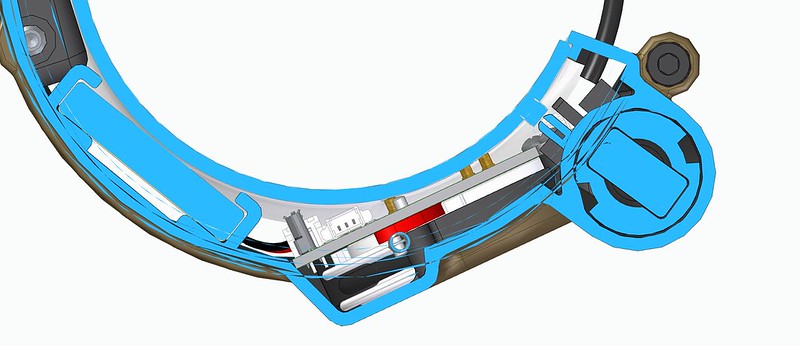
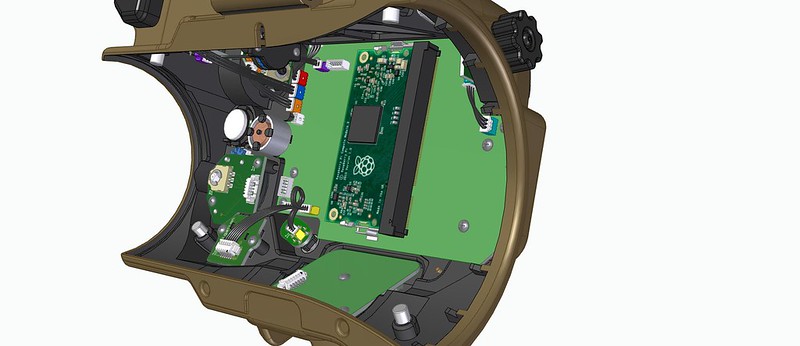
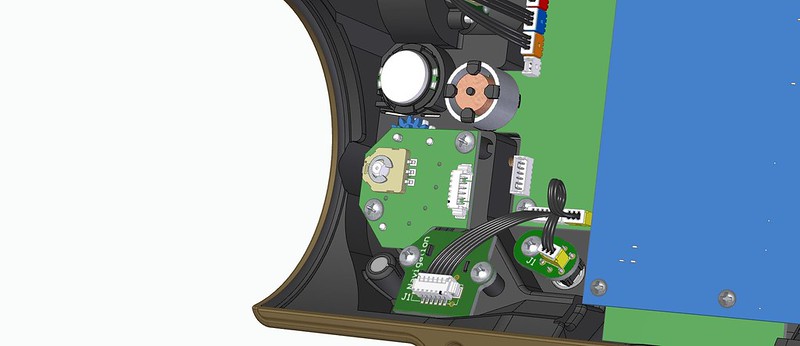
Many people think because the Pip-Boy looks so bulky, there must be lots of space inside.
But as this cutaway image shows, I have very little space in the back-half. Even the tiny pogo pins will still have to have clearance holes cut into the foam support bracket. If you look at that three pin connect near the middle of the image, it has a pitch of just 1.25mm.

---------------


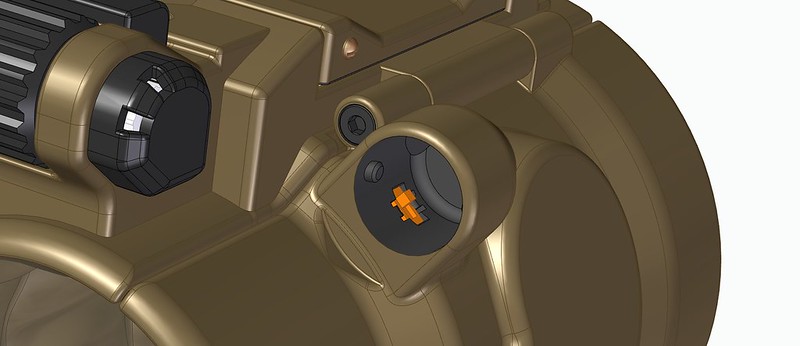
That little three pin connector will be wired to a hidden toggle switch inside the retainer for the link cable.
This will be the power-off switch to save battery. The "Power button" on the front will instead be wired up via software and simulate a power-up like you see in-game. It will sort of work more like a standby switch.

---------------


The front-half has also received lots of updates. I switched from the small square board-mounted speaker to a pre-wired round speaker. By separating it from the PCB allowed me to do some other tweaks that had been bothering me.

The rad meter actuator has moved to the motherboard. This makes it clear of the inside padding. (Before it was protruding a little bit.) This change means I will have to dremel the shaft to length. All these changes also means the radio knob is connected via a six pin cable, instead of requiring a large header.

---------------

More on the electronics:
I am debating swapping to a Raspberry Pi Zero W to the main board. (I know, I think this is the fourth time I have changed the main processor board.)

The DragonBoard 410c is turning out to have few issues that are giving me a headache.
1) It requires 8V to operate. There are hacks to make it work off of 3.3V or 5V, but both have limitations.
2) I am not sure it will actually be able to drive the 1920x1200 screen resolution. (It may be limited to 720p, or 1080p)
3) It was designed to be low-power, but relative to a larger computer. On battery it won't last very long.

I am also now looking at adding a SPI-to-DSI/MIPI frame buffer chip. What it would do is make it so the host process no longer has to be something super-fast, or even capable of driving a normal display. Instead, images would be sent to the frame buffer in a serial fashion. Sort of like writing a file to a SD card. This would be slower, but the Pip-Boy never had a fast interface anyways.

Another option it to use a DPI-to-DSI (Parallel to serial) convertor chip. This can be used since the Pi is actually capable of driving a DSI display natively.

Both boards can drive HDMI outputs. However before you say: "Here I found this HDMI screen you might be able to use" All of those use large convertor boards to go from HDMI to DPI,DSI,MIPI, or LVDS. They just won't fit inside.
 
There isn't enough "like" to convey how happy this update makes me. Not just for me, but it's wonderful to see you inspired by the muse again.

Ironically, I had just been about to ask if there were an updated version of the Dragonboard. Is the screen you're going with the one you linked to in post #347? And risking making you pull your hair out, had you run across this rad sensor?

Sometime in the next week or so, I'm going to be printing the power-switch area of the front half to check the fit of that joystick I found way back when. That portion's bumped out and the base of the stick is only 5/8" high. I am hopeful...
 
Inquisitor Peregrinus:
There are other SOMs (System on module) out there with faster processors that can handle more resolution. But as I am not a embedded software or FPGA expert, integrating those is over my head. Chips with pre-programmed "This goes in, that comes out" type of effects are more my speed.

The screen I am talking about is the one from the Razer VR headset (HDK2) This particular display has been latched onto by all the other low-cost VR headsets around, so the good news is it can now be easily ordered from Alibaba. The bad news is that once the copycats lock onto a display, it sort of becomes the ONLY option. The more unique, and sometimes useful, displays quickly drop off the market.

This type of thing occurs whenever any product becomes popular. For example: This 4.3" display. It was originally designed for the popular PlayStation Portable. This particular display should have books written about it as it is probably in a few tens of thousands if different products by now. At a previous job I designed one of the very first in-wall home-automation touch-screens using it. (And it seems they still offer it for sale a decade later!)

Geiger counters:

Short answer: I have looked at almost every small geiger counter I can find, including that one.

Long answer:

There are hundreds of easily findable circuits for geiger tubes out there. They are all basically the same. A high-gain amplifier, and a 500V booster to energize the tube.
Now, the dielectric strength of 1.5mm of Nylon should be in the neighborhood of 20kV, so that will cover keeping the nearby human safe. What I don't want to fry is all the nearby electronics. So until I can find a way to have that 500V very isolated, I am not going to consider it.

I have been looking more into how these various PIN diode radiation detector operate. They basically work like a single pixel Charged Coupled Device (CCD). The circuit just sort of accumulates a charge until there is enough signal to detect.

This one is the best and most tested, it is also open source. The sensor is a huge 100 square millimeter diode specifically made for detecting Beta and Gamma rays. However, even that diode, designed for detection doesn't work like you might expect. It only works by placing the sensor right up against a object, and leaving it for two minutes. Oh and during those two minutes you can't move it, or even allow any vibration or the reading is off. On top of that, basically if you get any sort of actual reading on this thing then your probably in danger. My dilemma is that almost any actual radiation sensor I put inside won't actually detect anything! If I showed it off to anyone I could only say: "Yes, it has a gamma ray detector, and no I can't show it working unless you have some uranium in your pocket."

Now, a real geiger tube, (as best I can tell from my research) is sensitive enough to pick up stray particles. An they will go of with small clicks from just background radiation. Making the rad gauge needle jump every few seconds due to real detected radiation is really about all I am hoping for here.

I am currently leaning towards trying to build a "bad" PIN diode circuit. Something you can still claim is a "gamma ray detector", but also something that is intentionally noisy enough that it still "clicks" randomly. I may look at hacking a hardware random number generator as a noise source.
 
Last edited by a moderator:
I'm even less of an expert at these boards, and am going to be outsourcing to local friends who are. Just amused you announced the switch away from the DB right before I was going to ask about new versions. *heh*

Thanks for the long answer on the geiger counter. I didn't know if you thought there might be enough space in the white probe for the guts of the one I linked to. That thing is isolated enough, I think. Assuming it wouldn't interfere with the signal through the USB. Depending, of course, on whether that one was any good anyway. So thanks for taking the time to share your thinking.

My dilemma is that almost any actual radiation sensor I put inside won't actually detect anything! If I showed it off to anyone I could only say: "Yes, it has a gamma ray detector, and no I can't show it working unless you have some uranium in your pocket."

The thought of that makes me smile. "...And it has a working geiger counter." "But it's not doing anything." "That should make you very relieved."

The other thing I forgot to mention. I'm leaning more toward having bio sensors on a wristband linked to the PipBoy via Bluetooth. I've seen a variety of blood-oxygen sensors, galvanic skin response, heartrate monitor, surface body temperature sensor, and other related equipment that can be easily concealed in a jumpsuit cuff, or under the sleeve, or whatever. That was something that had niggled for a while -- the fact that all the biosensors I'd run across require direct skin contact. So unless one is wearing the PipBoy over a bare forearm, mounting them directly in the unit wouldn't work. So I want to have sufficient sensor spread that a decent subroutine can track when I'm tired, or stressed, or tipsy, and and put up the appropriate Vault-Boy graphic.

...If it ever shows me with a limb in outline only, I'm going to worry...
 
Wow! I was looking for cosplay level Pipboys, and here I find THE REAL THING :)

I'm going to Burning Man in a month (long story, I'll be there way early), and have about 30 days to get all my costumes ready. Not sure I could swing this :) but I do have the skilz to drive a working display from inputs, using Arduino Teensy's, Pi Zero's, or other boards. I think this has been discussed, I'll go back through the thread and check it out.

Overall though, I think the answer is that I couldn't swing this, fully built, in 30 days, so I'll just keep track on the progress.

The Pipboy kit from ThinkGeek looks tempting too ... my guess is the cost would be similar to a Shapeways 3D print anyway.

== John ==
 
@JGwinner, The display I am using is a 3.81 AMOLED made for VR. Google "H381DLN01" to find the datasheet. It requires a 4-lane MIPI DSI interface.

This whole week I have been researching the best way to drive it. There are a few FPGA based convertors for DSI output. They they seem to all require software licencing. Plus the only FPGA expert I know left his electronics career to be a hot headed city councilman.

Currently I am learning towards using the TC358870XBG HDMI to DSI Bridge. It is used in the CV1, HTC Vive, and Razer OSVR HDK2. Buy using the HDMI on a Raspberry Pi Zero W, it means I save all the GPIO for the rest of the Pip-Boy. But it does mean I need to find the world's shortest Mini-HDMI cable.

/Edit: I may use the Raspberry Pi Compute module which has the HDMI pins on a header already. It also has a 4-lane DSI connection, but like all open-source companies they have gone closed source and that connector only works with their closed-source 7" display and firmware. (Not even a hint of documentation to allow working it out yourself)

/Edit 2: This page gives me some hope that perhaps I can directly use the 4-lane DSI port on the compute module.

Note: This is really the only display that is physically correct. I can put in a easy to drive 3.5" SPI display, but the image on it will only fill about 75% of the screen.

If your talking about the "Bluetooth Edition" Pip-Boy 3000 Mk IV, note they have major electrical issues, making them nice paperweights. Note, I looked up the display they used, and it was a 5" 4:3 traditional parallel TFT display. Since they didn't have any functional RAD meter, they just crammed the oversize display inside. I can't do that.

If your talking about the "Fallout 76 Pip-Boy 2000 Construction Kit", I can't wait to get mine and see how hackable it really is.

Oh, and no: This project is now going on three years, I am not completing it a month from now. It is my magnum opus. I won't build it until the design is perfected.

/Edit: @inquisitor Peregrinus:
My plan is to also use external bio sensors. This is buried somewhere in this thread. I already have development sensors from ST Micro for the task.
 
Last edited:


Above you can see an image showing the Rasberry Pi CM3 (Compute Module). It is the same size as a stick of DDR2 SODIMM RAM, and uses the same size socket. The thinner overall profile means I can move the PCB away from the LCD a few millimeters, as well as have space under the board for more circuitry. Overall it freed up a lot of space inside.

The CM3 has a 4-lane MIPI DSI connection. However, the only display the Pi foundation supports is their own, according to this post it may just be a matter of getting the correct settings and writing a driver. (I need to find someone who knows how to do this)

In theory, that means that it can drive the display directly, with no bridge/converter chips. From what I have read, the HDMI on-board all Pi's is actually going from DSI to HDMI. It seems just plain stupid to convert DSI to HDMI then HDMI back to DSI.

-------------------------------------------------------

Good news everybody!:
The Pip-Boy is getting a real Geiger–Müller tube counter!

The Geiger Counter board (placeholder) can be seen at the bottom of the image above.
I scoured all over the internet, trying to find the perfect geiger counter circuit. I wanted something compact, with no huge audio transformers, and no extraneous software stack.

I narrowed it down to three circuits:

1) uRADMonitor:
This is available in a few different flavors. I was tempted to integrate the Model D. It used mostly SMT parts, and also has Temperature, Pressure, Humidity, VOC and Particulate sensors!. Plus a full Geiger counter! I may still add some extra sensors, but for now I just want a Geiger counter circuit. The reason I passed on this is that it requires software to be loaded onto a seperate Atmel co-processor. I want everything, if possible to run on the Raspberry Pi.

2) MightyOhm Geiger Kit:
What I liked about this design was that it used a 555 timer to generate the voltage needed for the geiger tube. but it used all through-hole parts which I would have to replace, and it still required the software on a Atmel to filter and process the signal. I do like that it has adjustable voltage to allow the use of other Geiger–Müller tubes.

3) PiGi:
This is the type of thing that frustrates me. Over the past few years I have searched everywhere for a compact geiger counter circuit. Not once had I come across this circuit. Not until I started looking for Raspberry Pi specific circuits. This is the simplest and most compact geiger counter I have ever seen.
Like the MightlyOhm it uses a 555 timer for the boost circuit, and is adjustable. It uses very small SMT parts, in a compact circuit arrangement. The whole thing will fit perfectly onto the space I have left for one more PCB.

For the actual Geiger–Müller tube, I have ordered the world's smallest tube from eBay. The SBM-21. It is just 6x20mm, or about the size of a glass cylindrical fuse. Actually I even plan on using a clip-style fuse holder to attach it to the PCB. While it won't be as sensitive as the larger tubes on the market, it will be far more sensitive than the Pin Diode detector I was thinking about using, as well as about 1/10th the cost. And besides, the Pip-Boy must have a real geiger counter, otherwise what is the point.
 
The Geiger–Müller tube will be underneath the lower PCB. If you were looking at the front of the Pip-Boy, it will be just behind the heatsinks. All the high voltage signals, save one single pin, will be on the backside of this PCB, making it also very safe.
 

Your message may be considered spam for the following reasons:

If you wish to reply despite these issues, check the box below before replying.
Be aware that malicious compliance may result in more severe penalties.
Back
Top