You are using an out of date browser. It may not display this or other websites correctly.
You should upgrade or use an alternative browser.
You should upgrade or use an alternative browser.
Commander Cody Helmet build thread
- Thread starter merkava74
- Start date
Get it, mugatu! It's a beauty!
Update:
Couldn't sleep, so I did the one thing that won't wake the neighbours. Stuck on the decals for the cheek stripes! The essence of Cody is beginning to show!
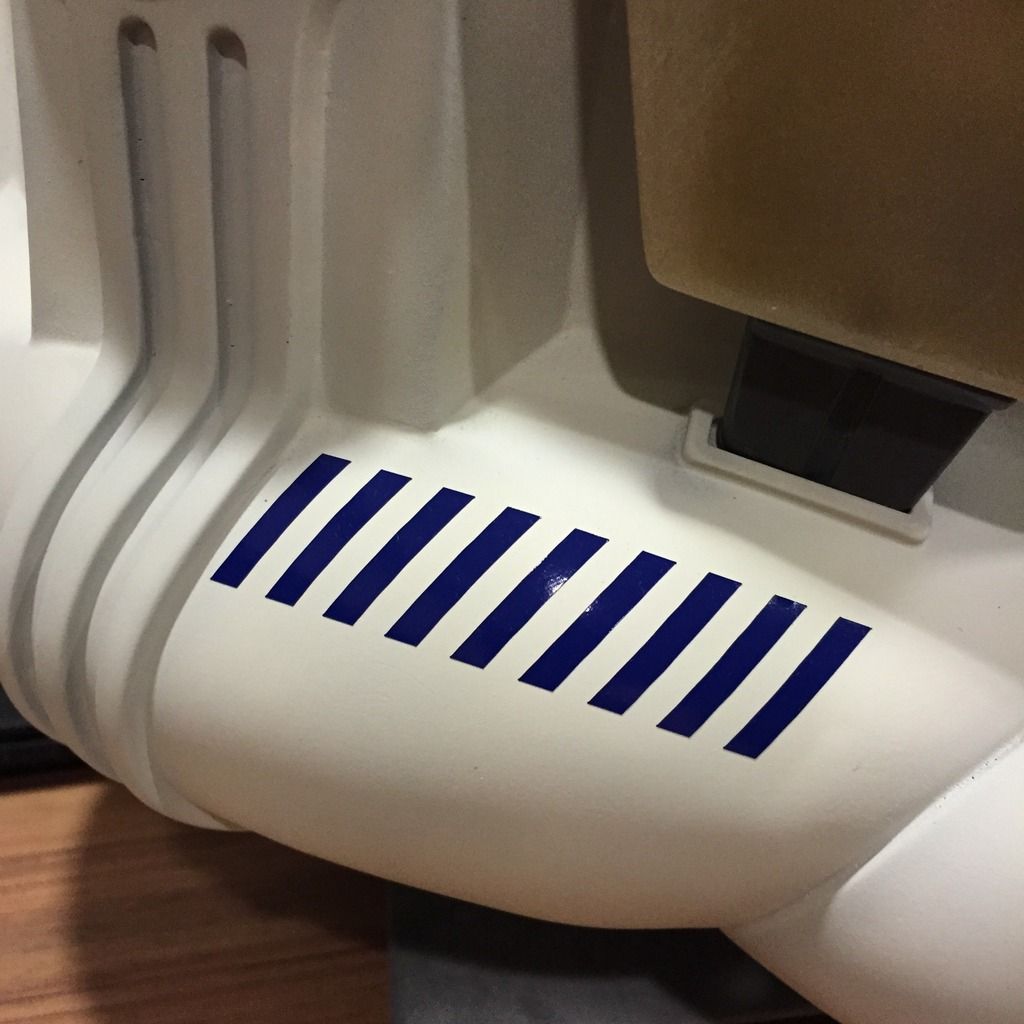
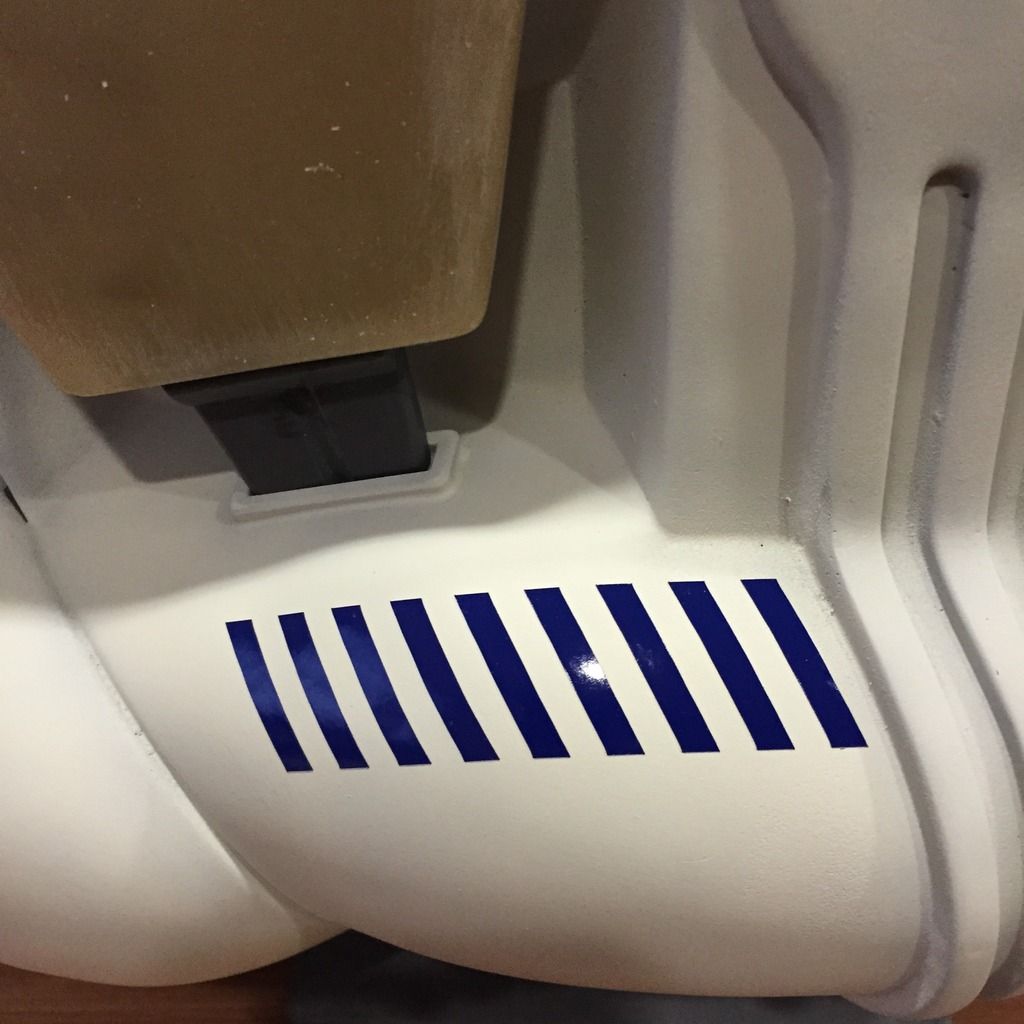
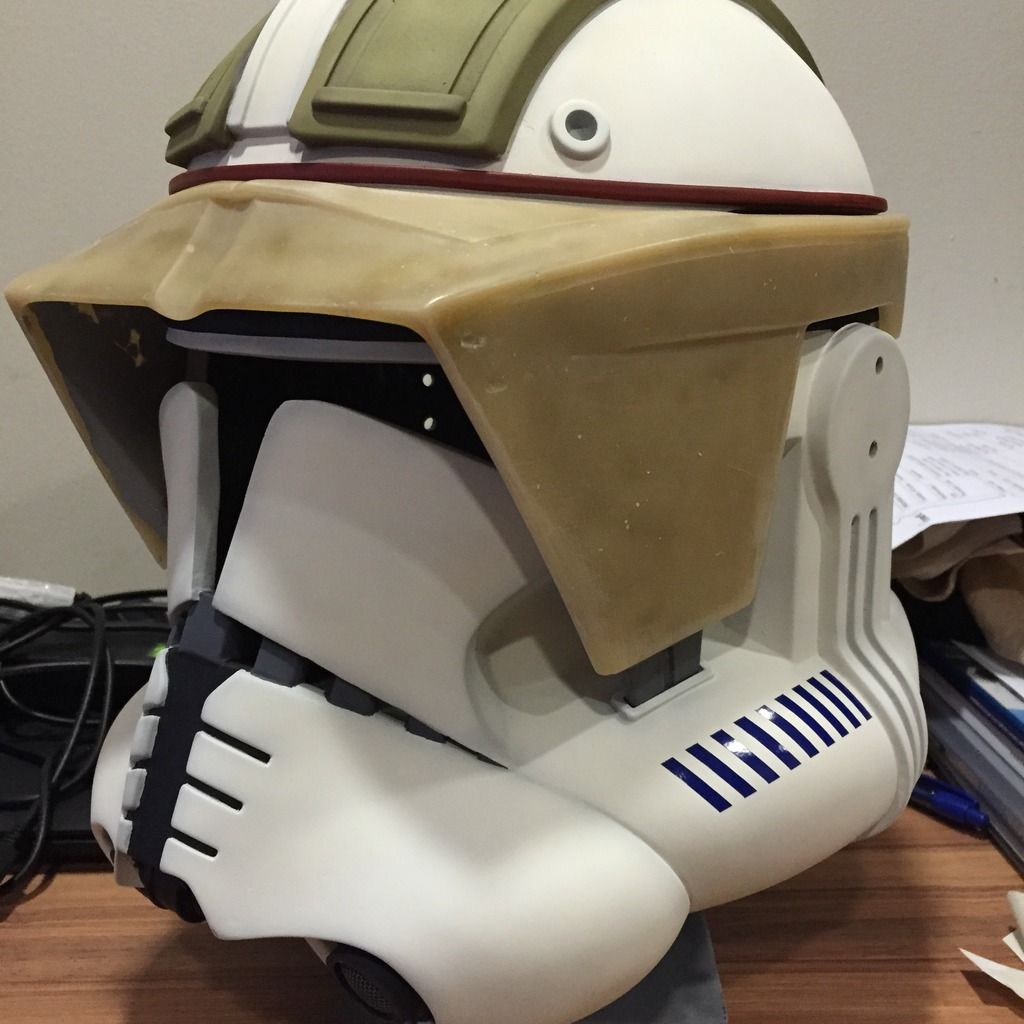
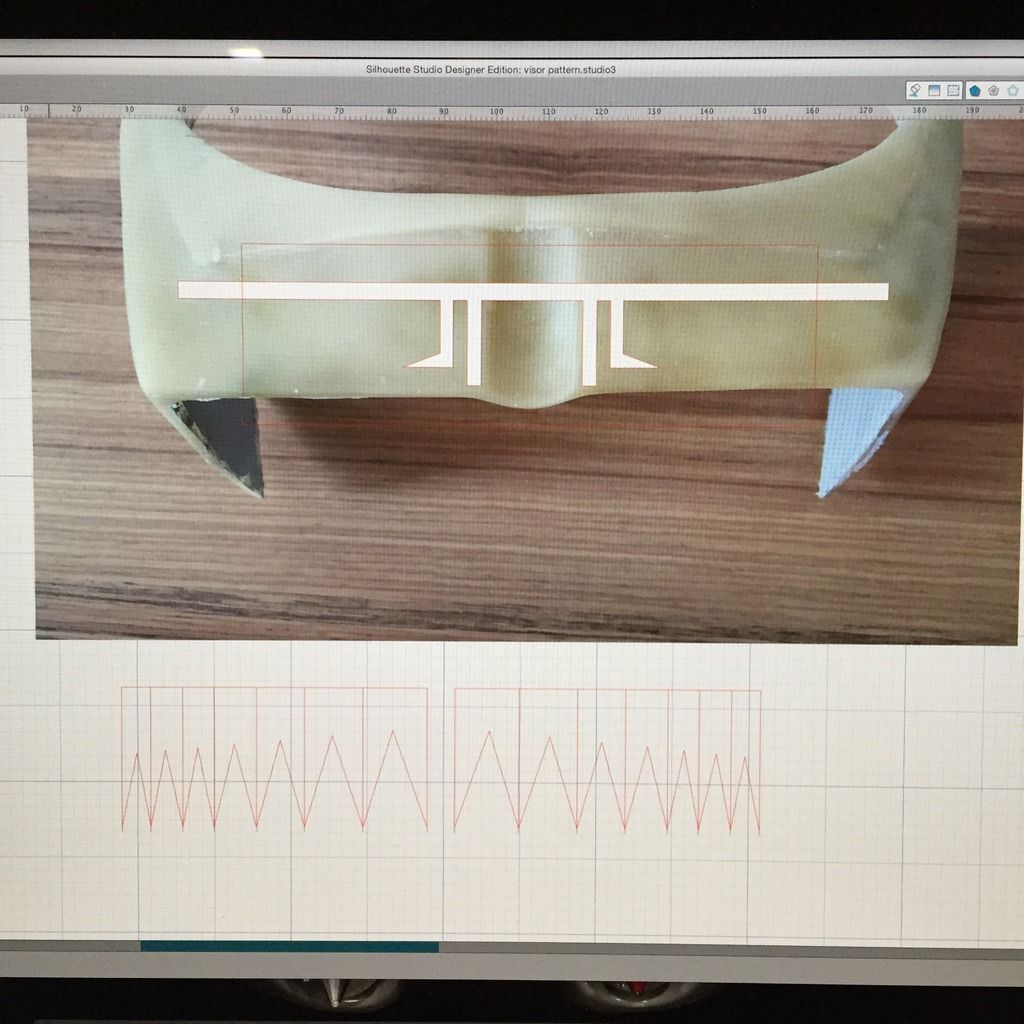
Also finalised the stencil for the visor markings and the orange triangles at the mic tips. Ready to send to the cutter!
Update:
Couldn't sleep, so I did the one thing that won't wake the neighbours. Stuck on the decals for the cheek stripes! The essence of Cody is beginning to show!
Also finalised the stencil for the visor markings and the orange triangles at the mic tips. Ready to send to the cutter!
alienbuilder
Well-Known Member
great progress. cant wait to see the paintjob completed.
Thanks, alienbuilder!
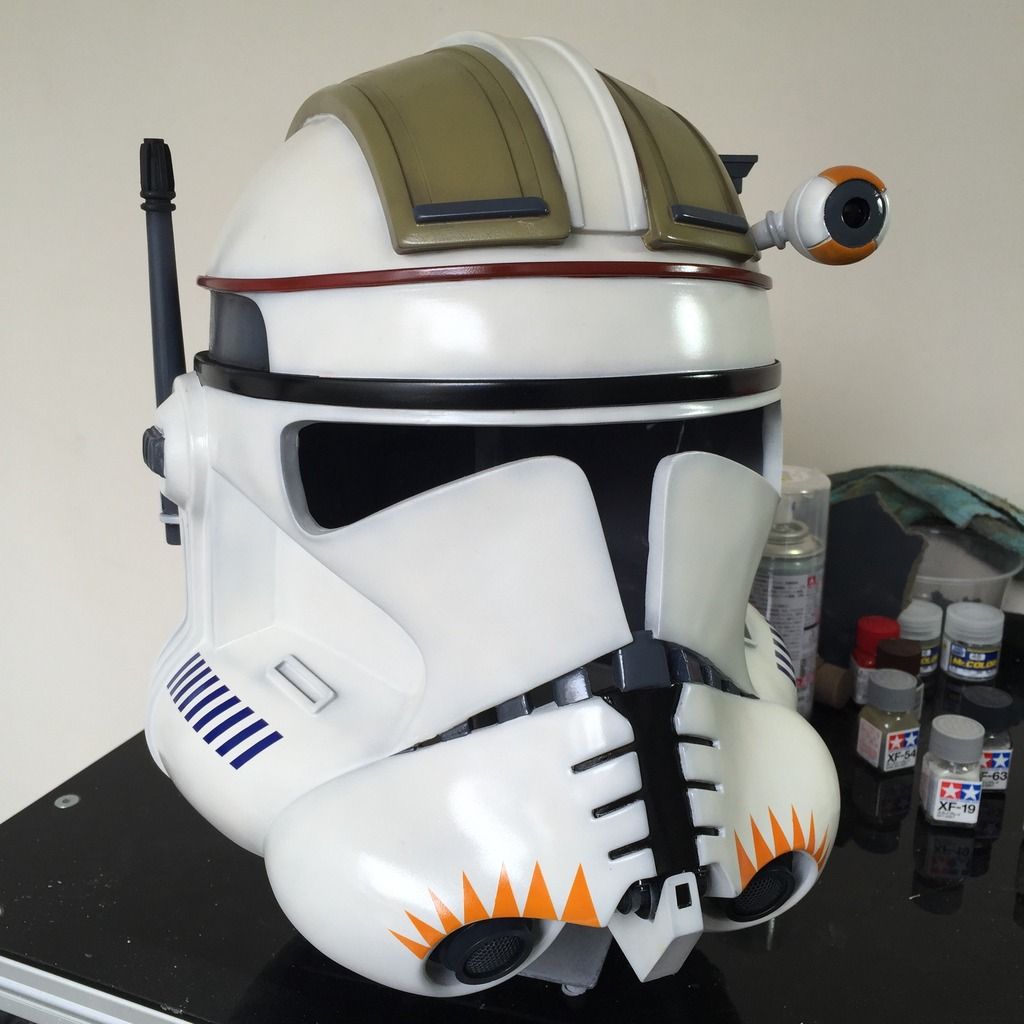
Here's the update for today:
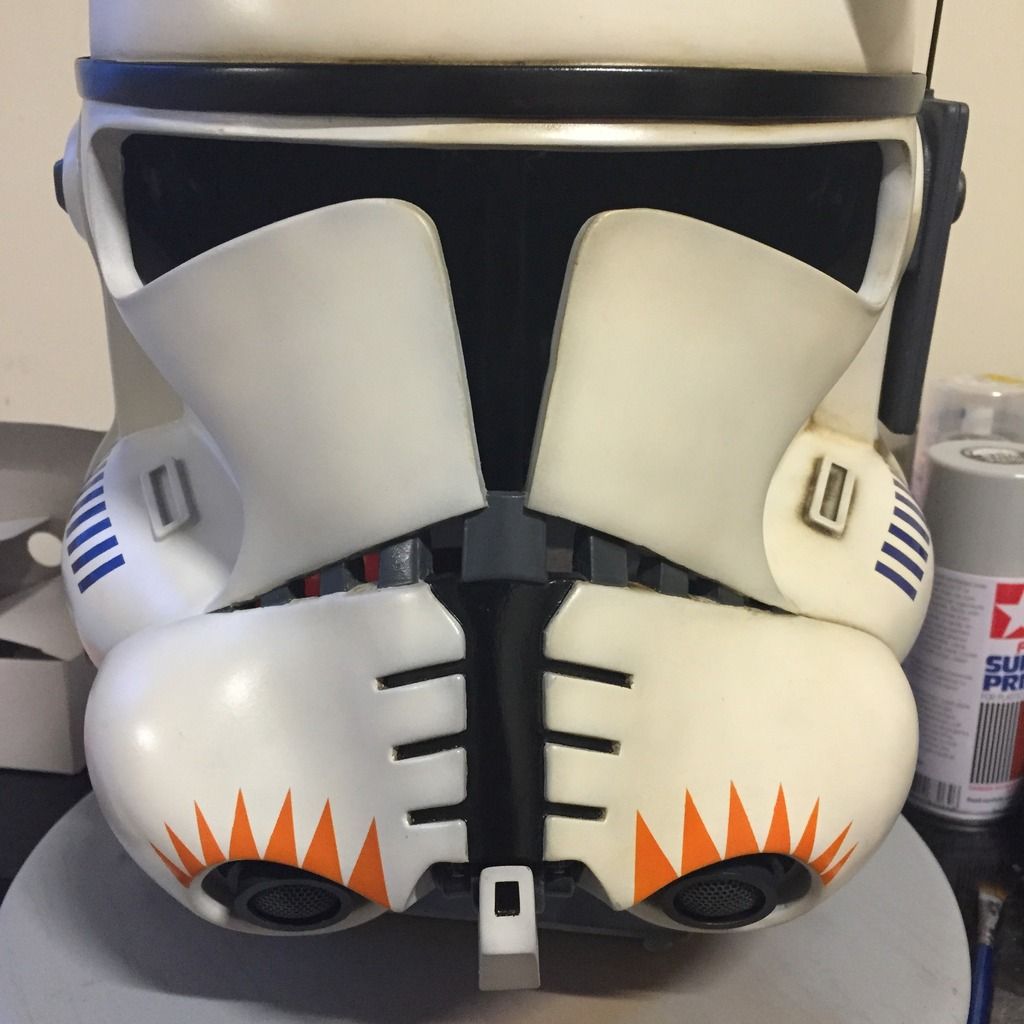
Masked and sprayed the 4 strips on the helmet with Dark Grey:
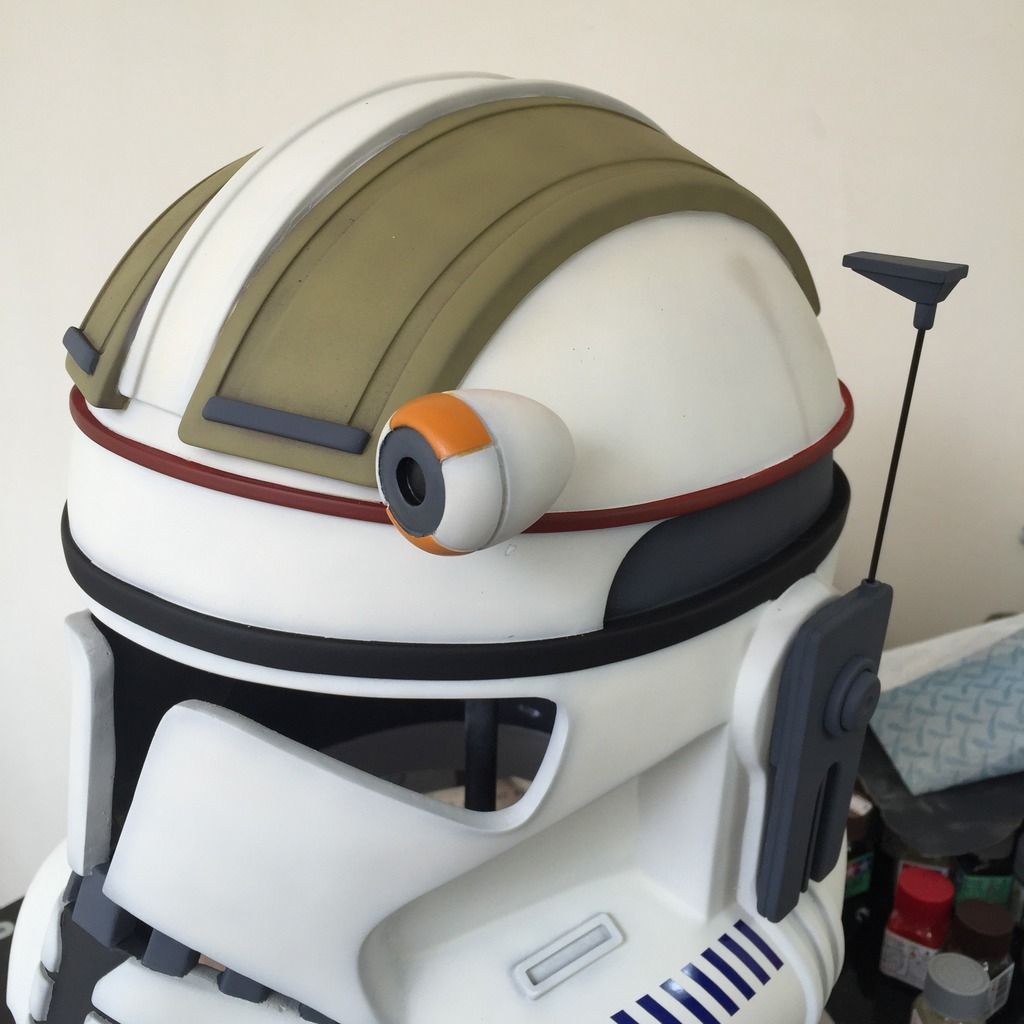
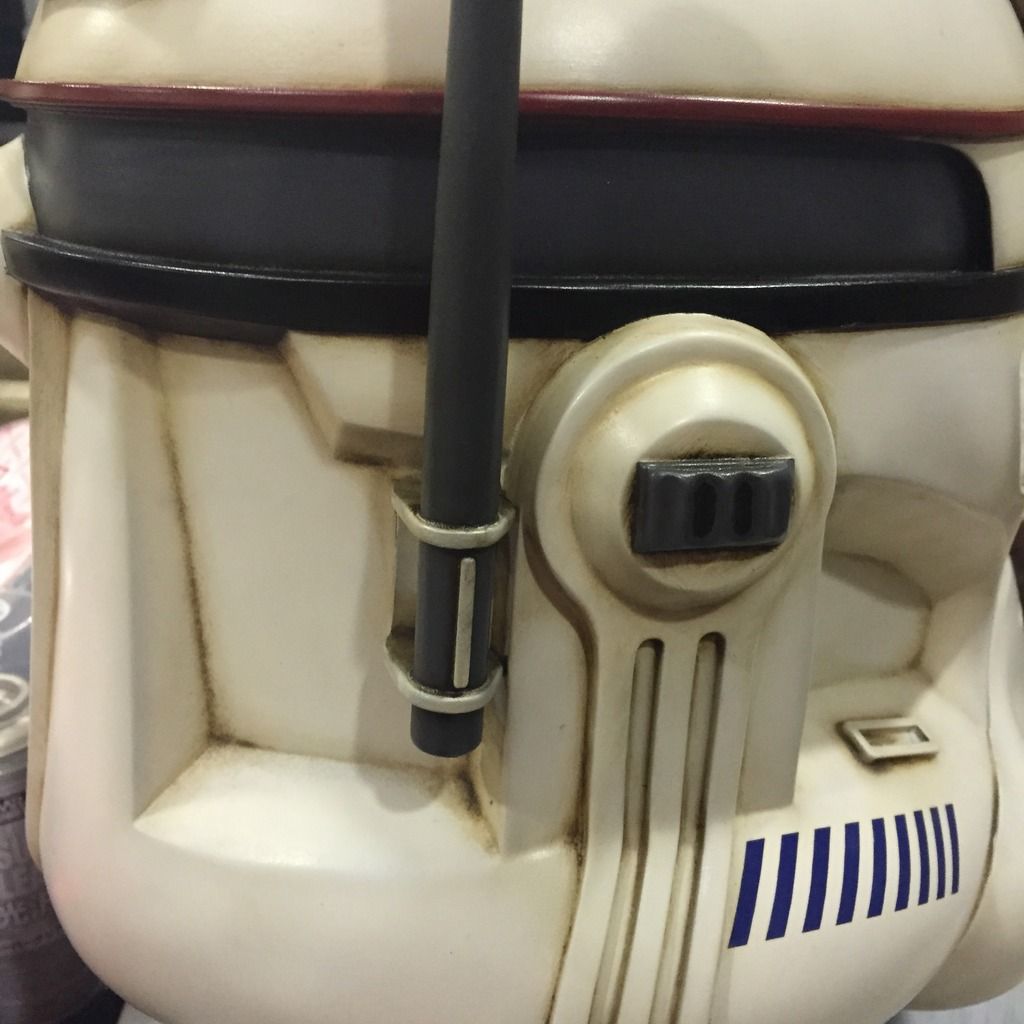
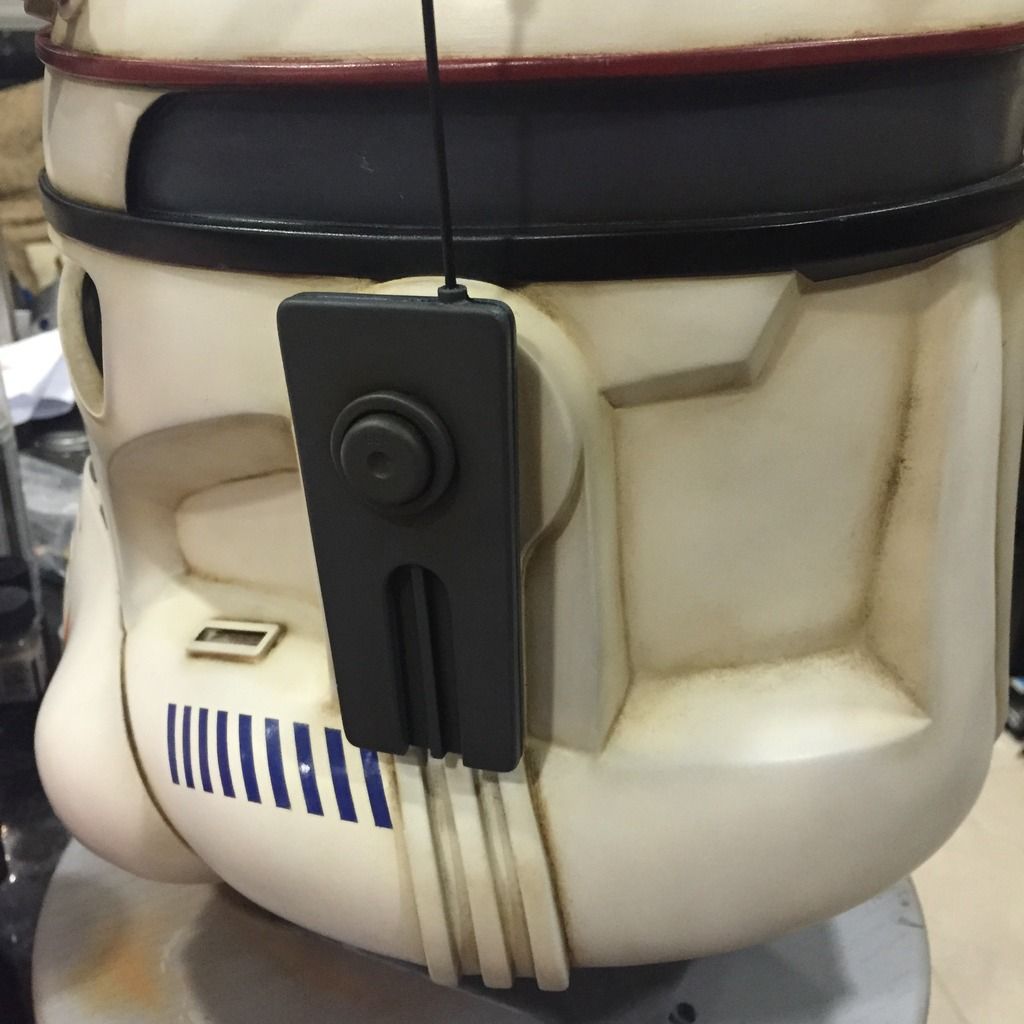
Completed and glued the comunicator thingy on the left ear:
Did the same for the antenna thingy on the right:
Finished up the detail for the mouth piece and glued it on:
Masked and sprayed the camera thingy on the head and glued it on:
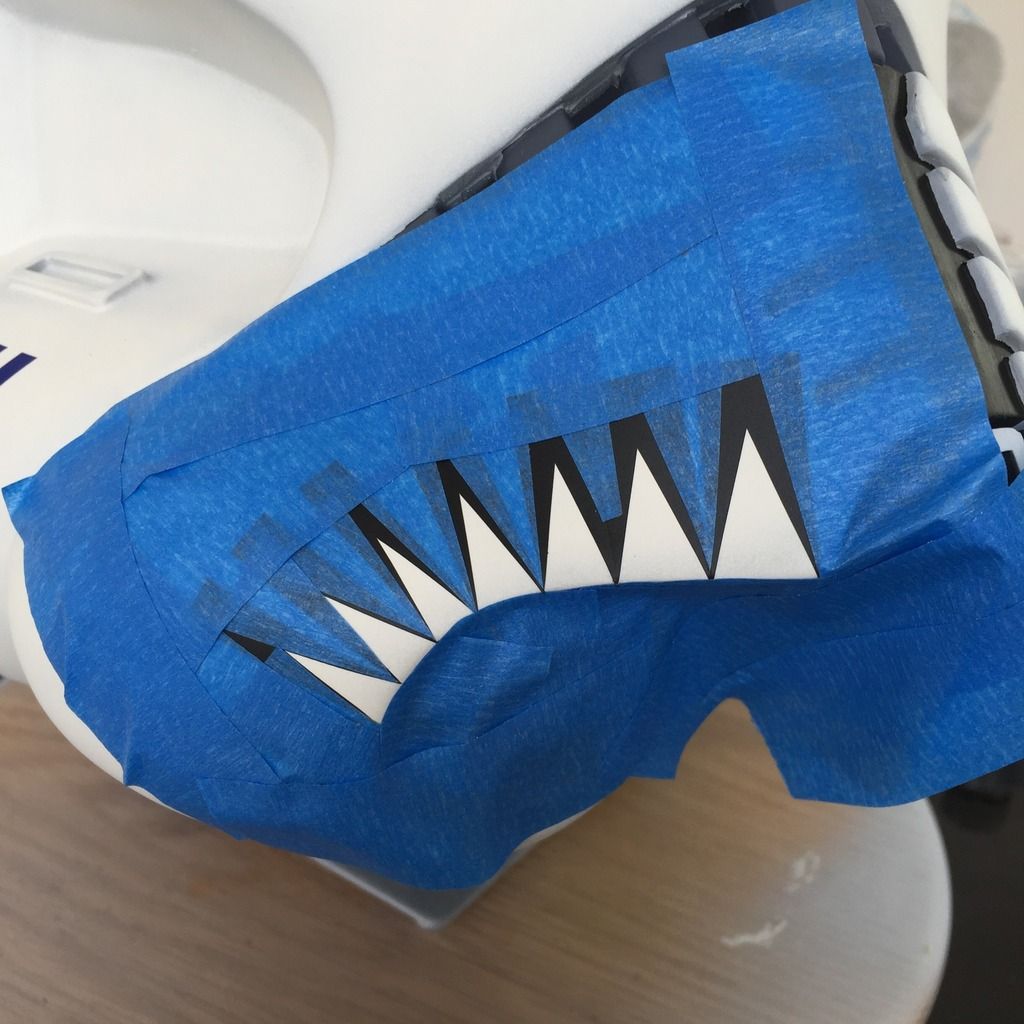
Masked the orange triangles using my custom stencils:
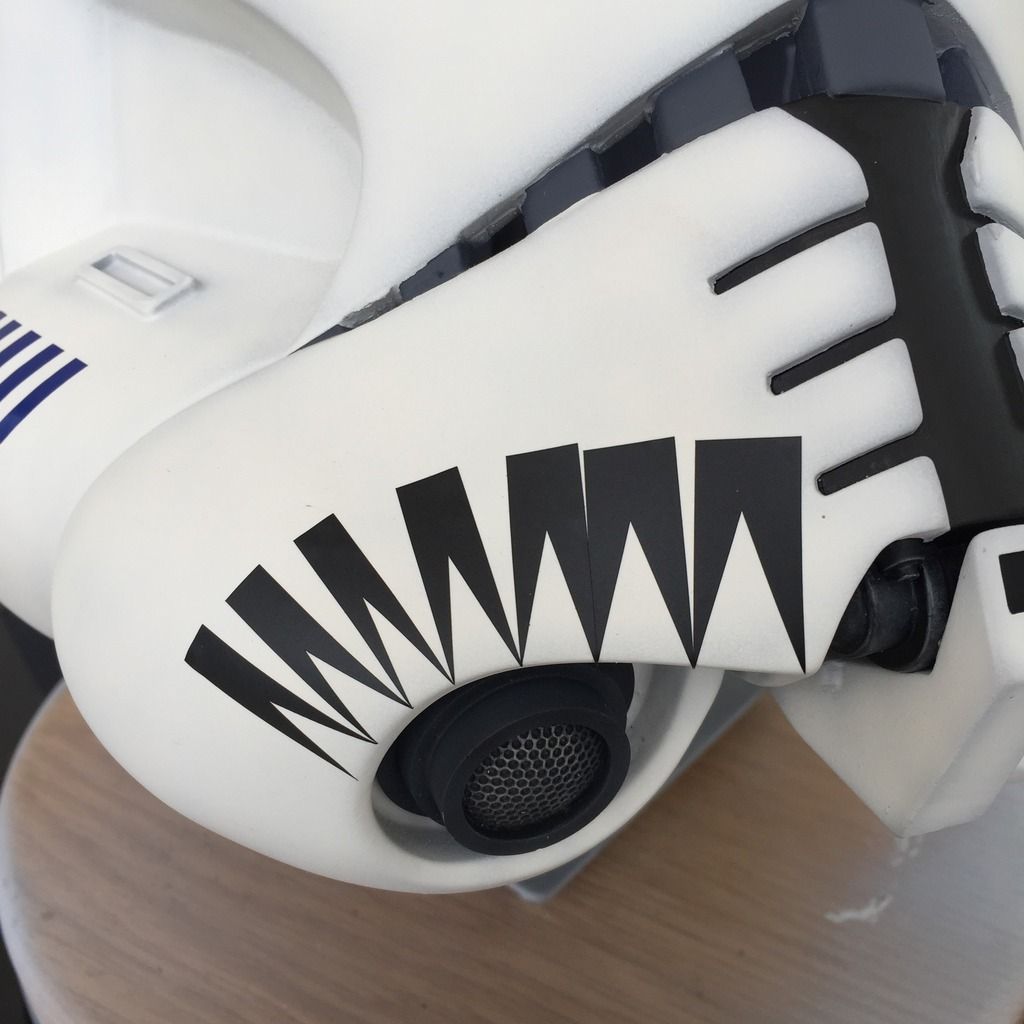
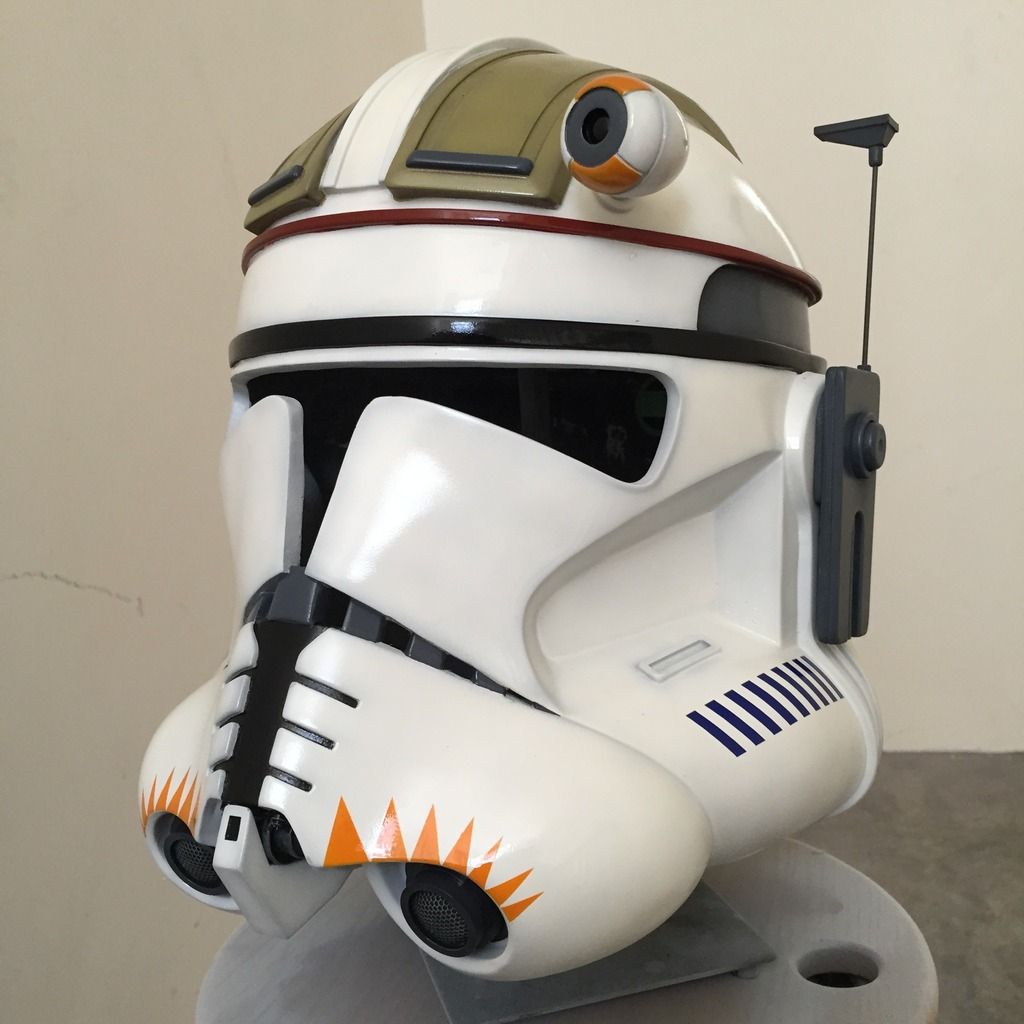
Both sides done! The iconic orange is on Cody!
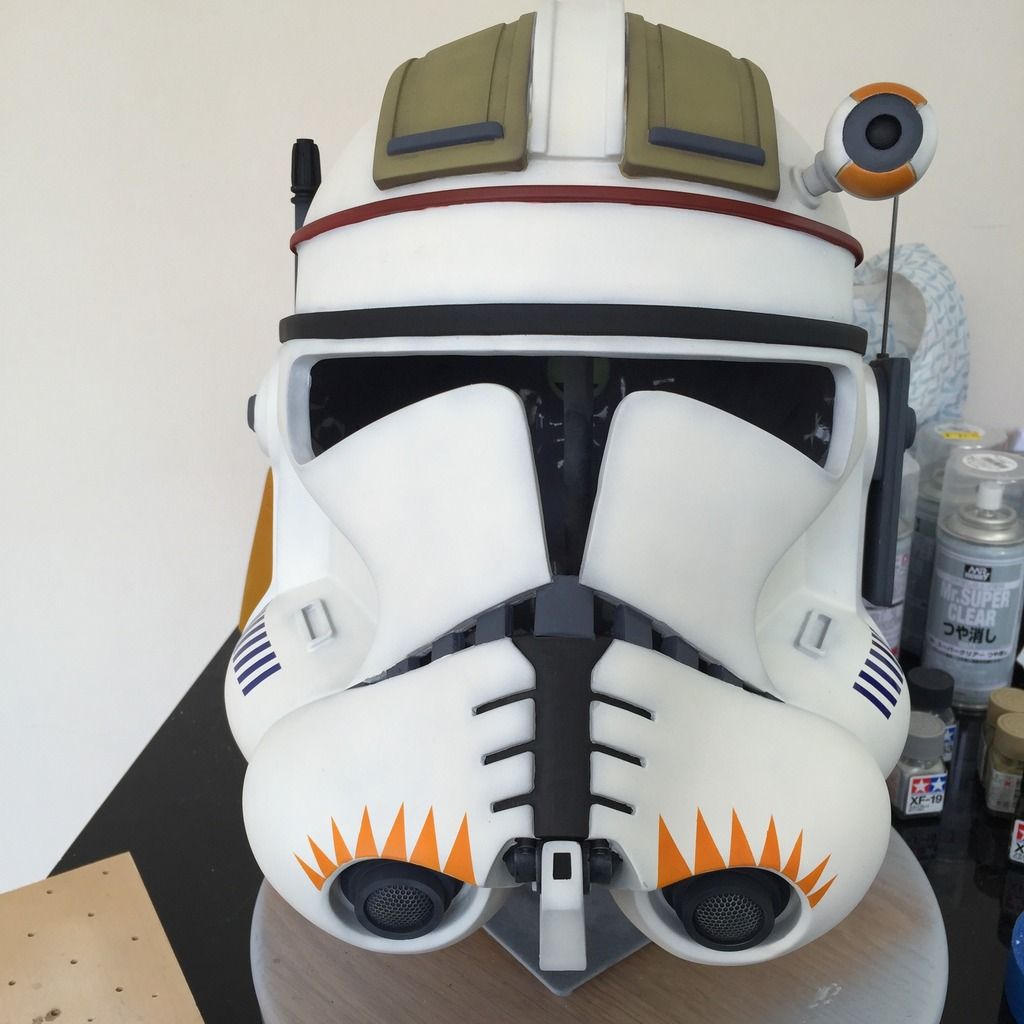
Sprayed and toned the visor with a base-coat of Orange with Black, and toned with Orange with Dark Yellow as the final orange colour:
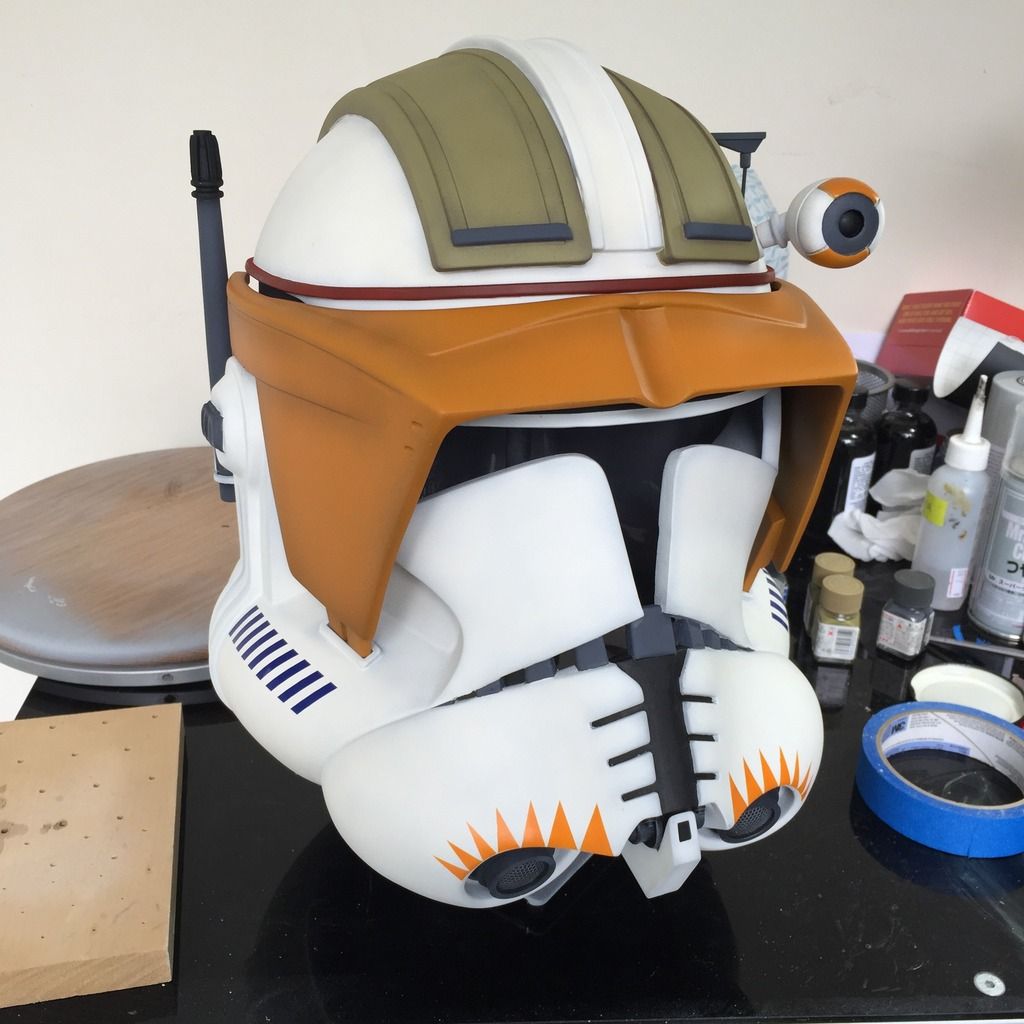
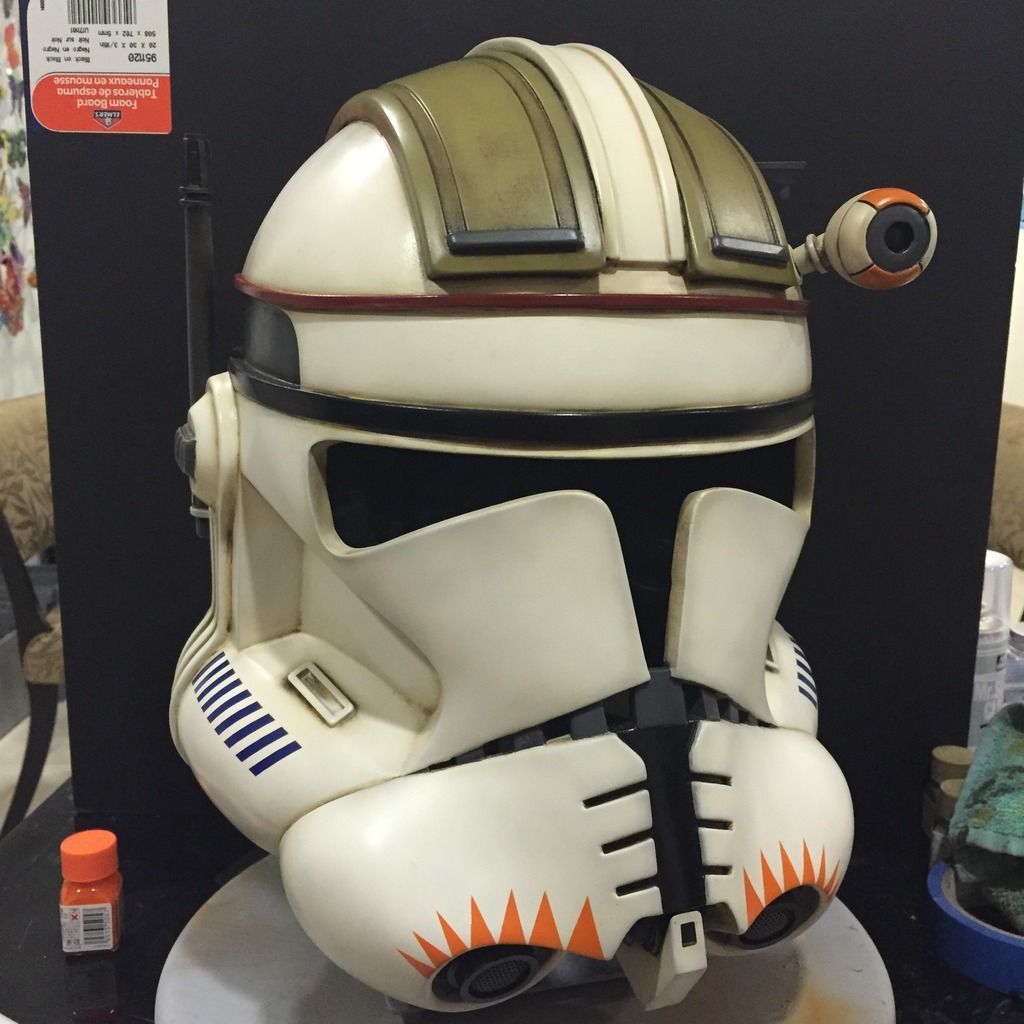
Couldn't resist putting it on just to see how it looks!")

LO AND BEHOLD!!! One of those days when your primer decides not to bite!!!! This happened after I peeled the masking off....
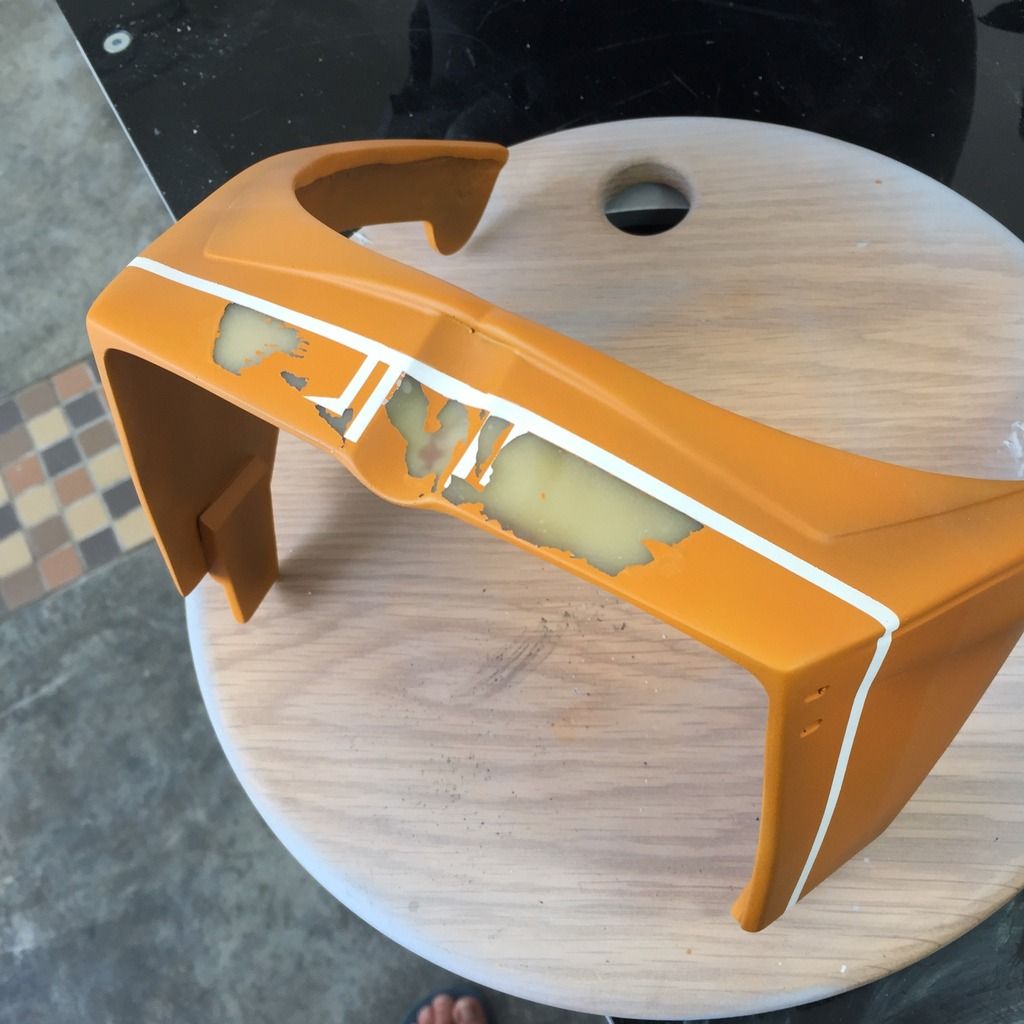
It happens, I guess.... So, start all over for the visor again. Strip the paint with thinner, and start over.
Hello again, fibreglass:

Hello again, Primer:
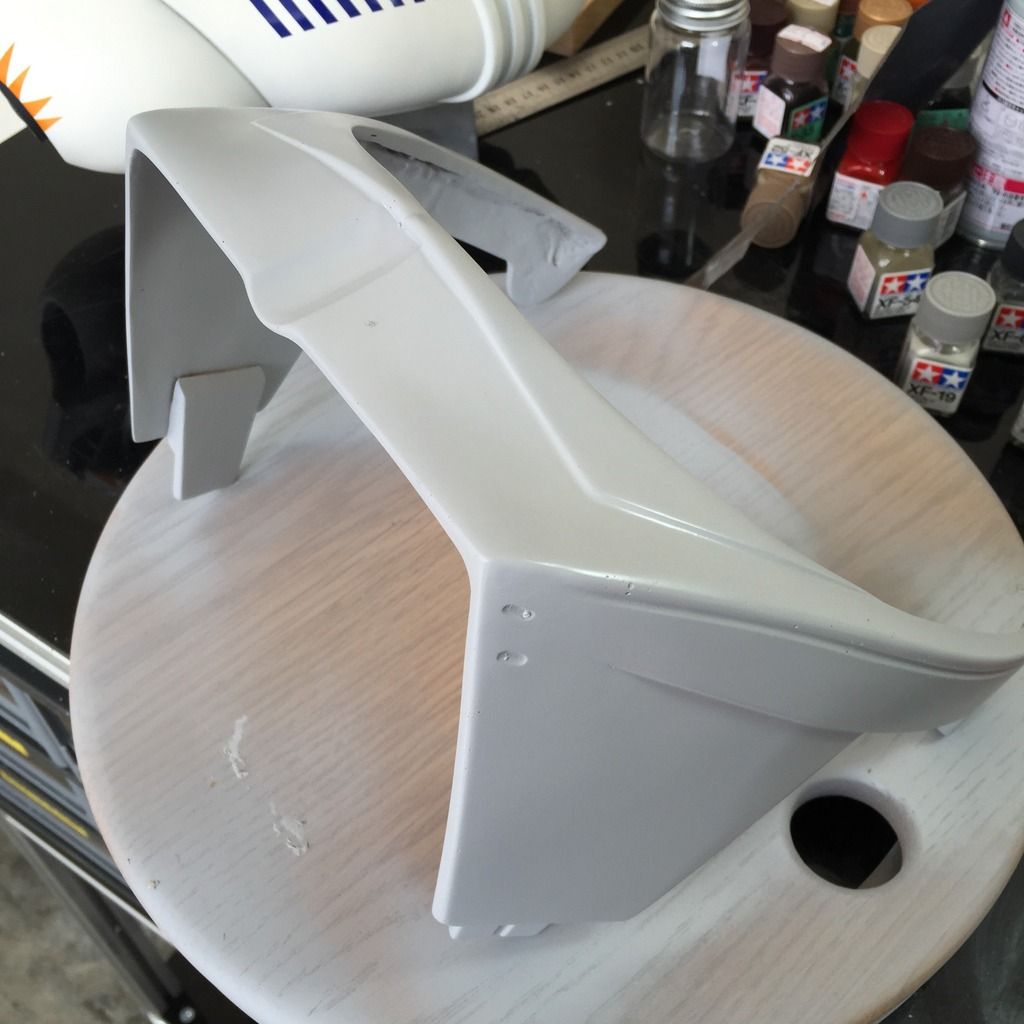
The thinner stripped off my fillings too. Gonna wait till it dries and then apply putty again. Sigh...
In the meantime, the rest of the helmet has been given 2 coats of clear gloss, in preparation for weathering.
Gonna have to call it a day. Since the accident with the visor means I have to go to the shop to get more orange.
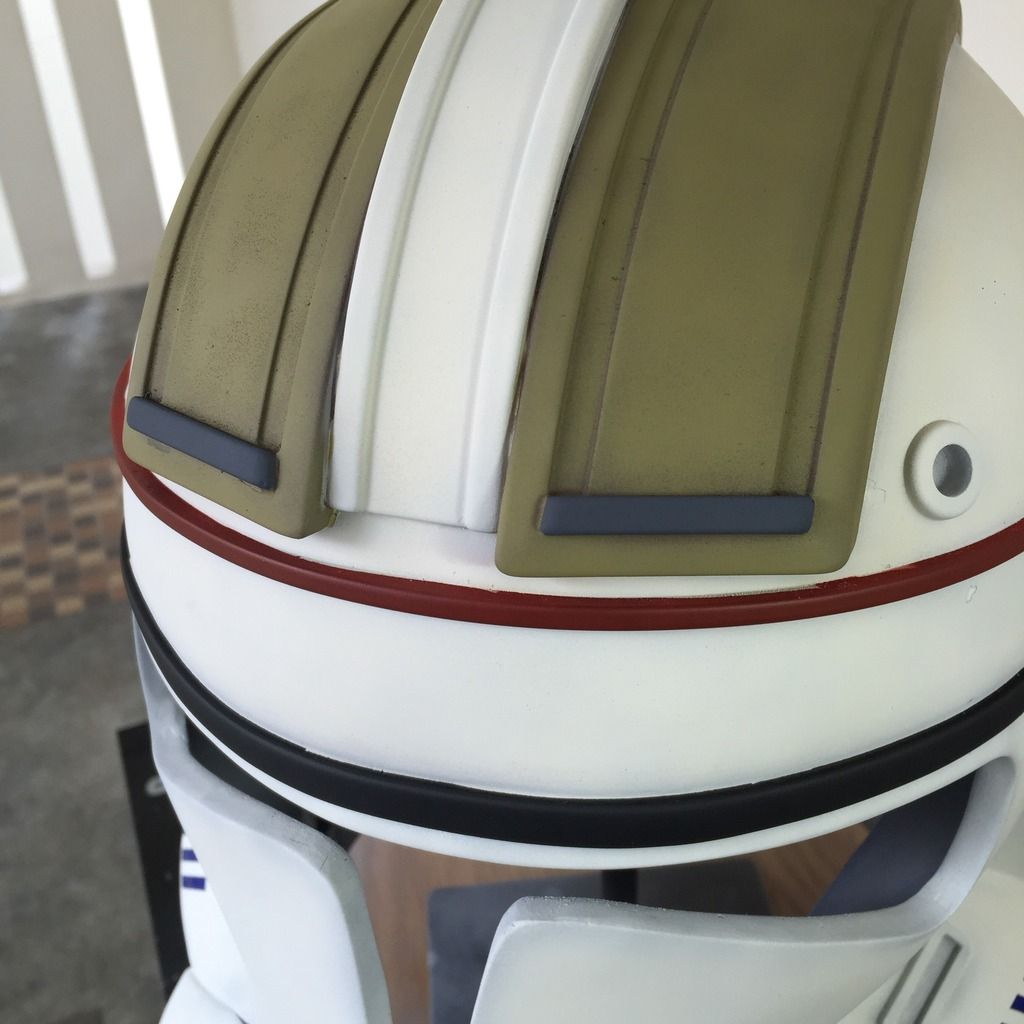
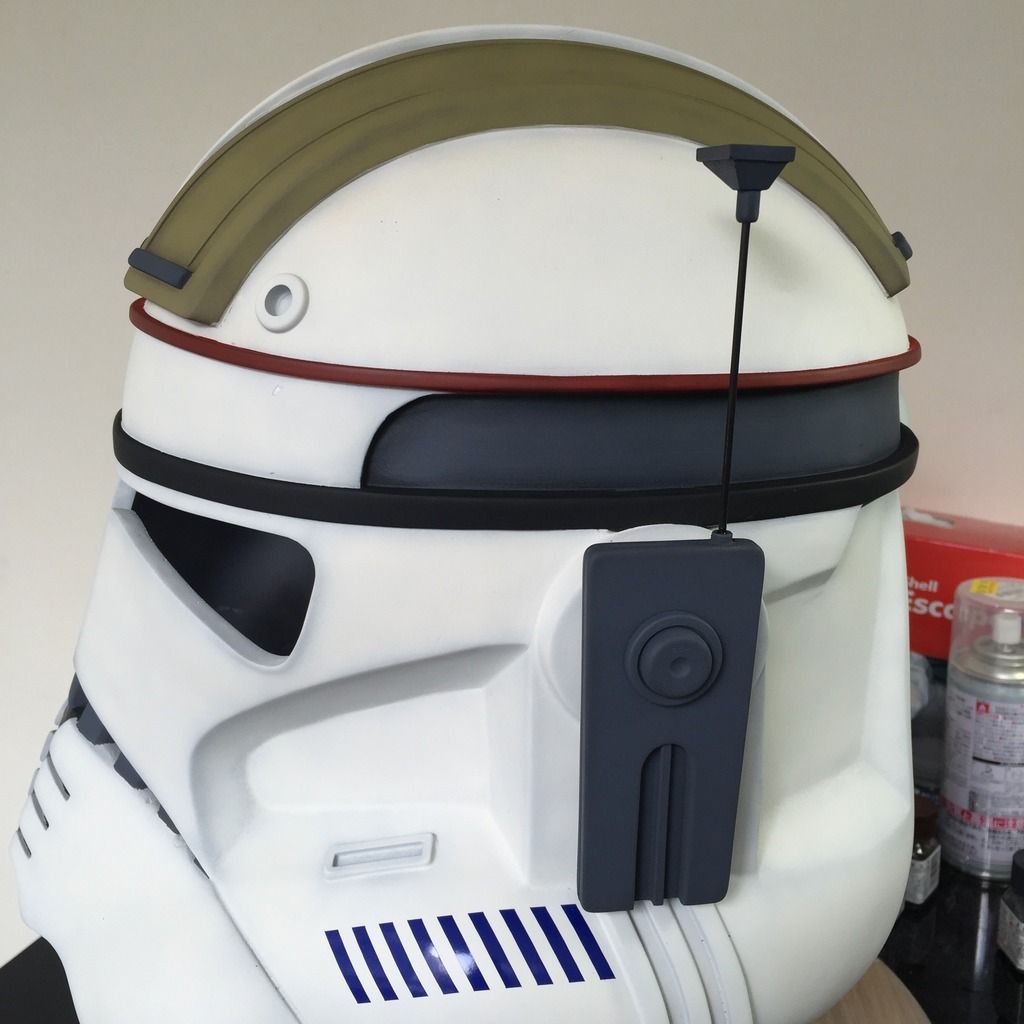
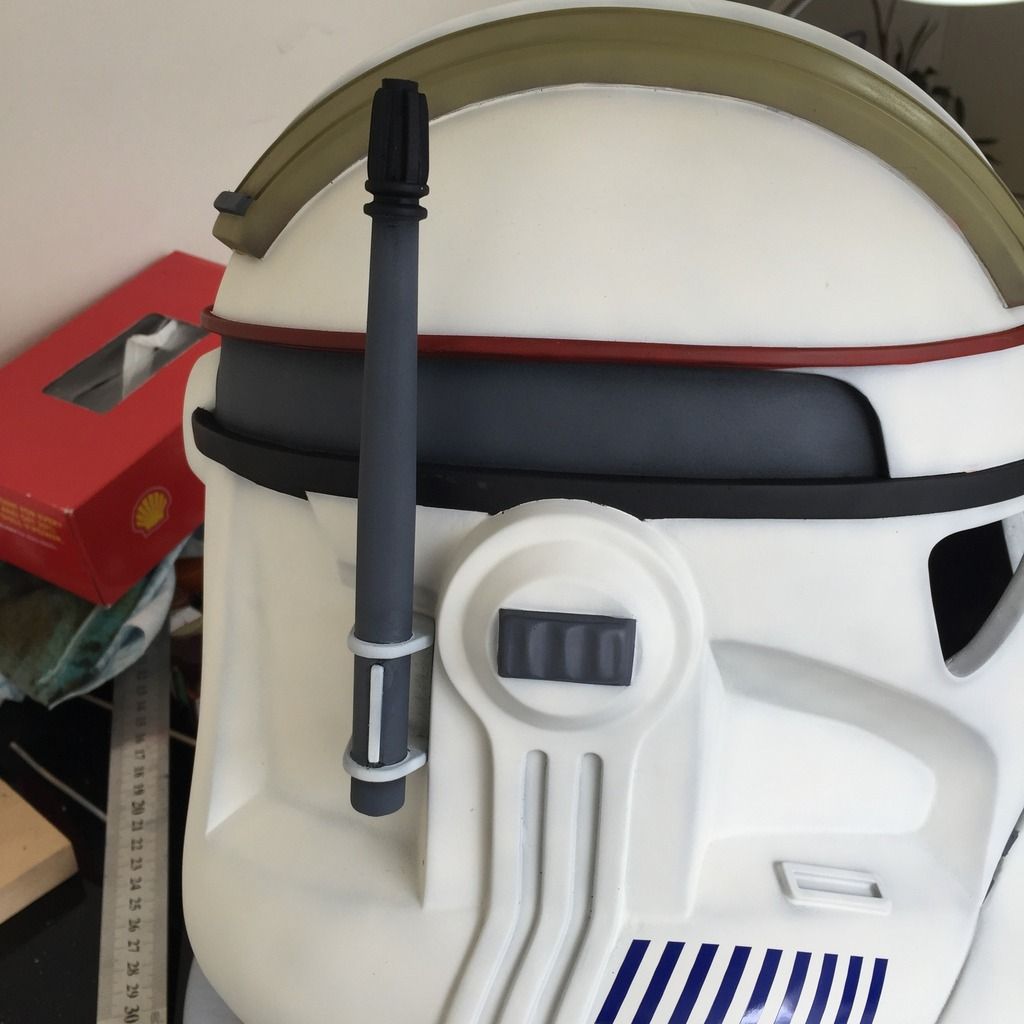
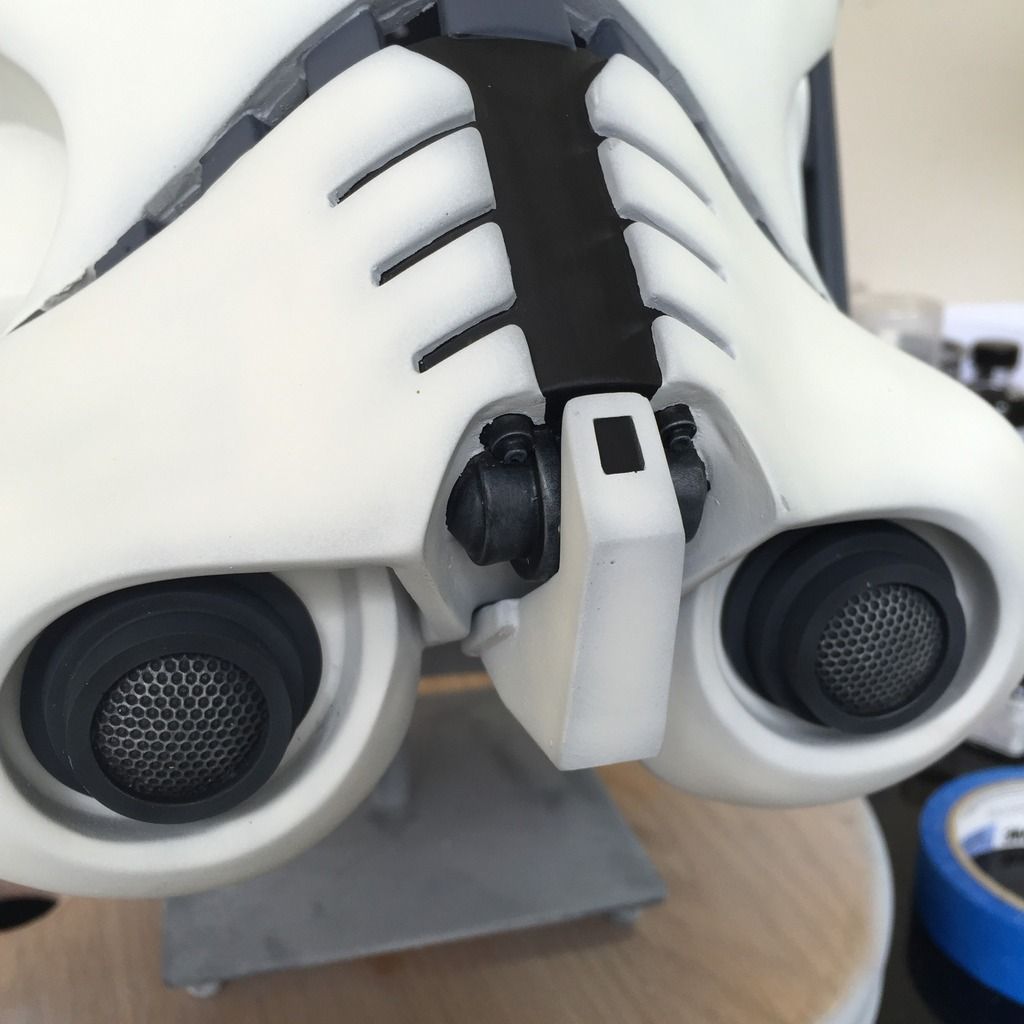
Here's the update for today:
Masked and sprayed the 4 strips on the helmet with Dark Grey:
Completed and glued the comunicator thingy on the left ear:
Did the same for the antenna thingy on the right:
Finished up the detail for the mouth piece and glued it on:
Masked and sprayed the camera thingy on the head and glued it on:
Masked the orange triangles using my custom stencils:
Both sides done! The iconic orange is on Cody!
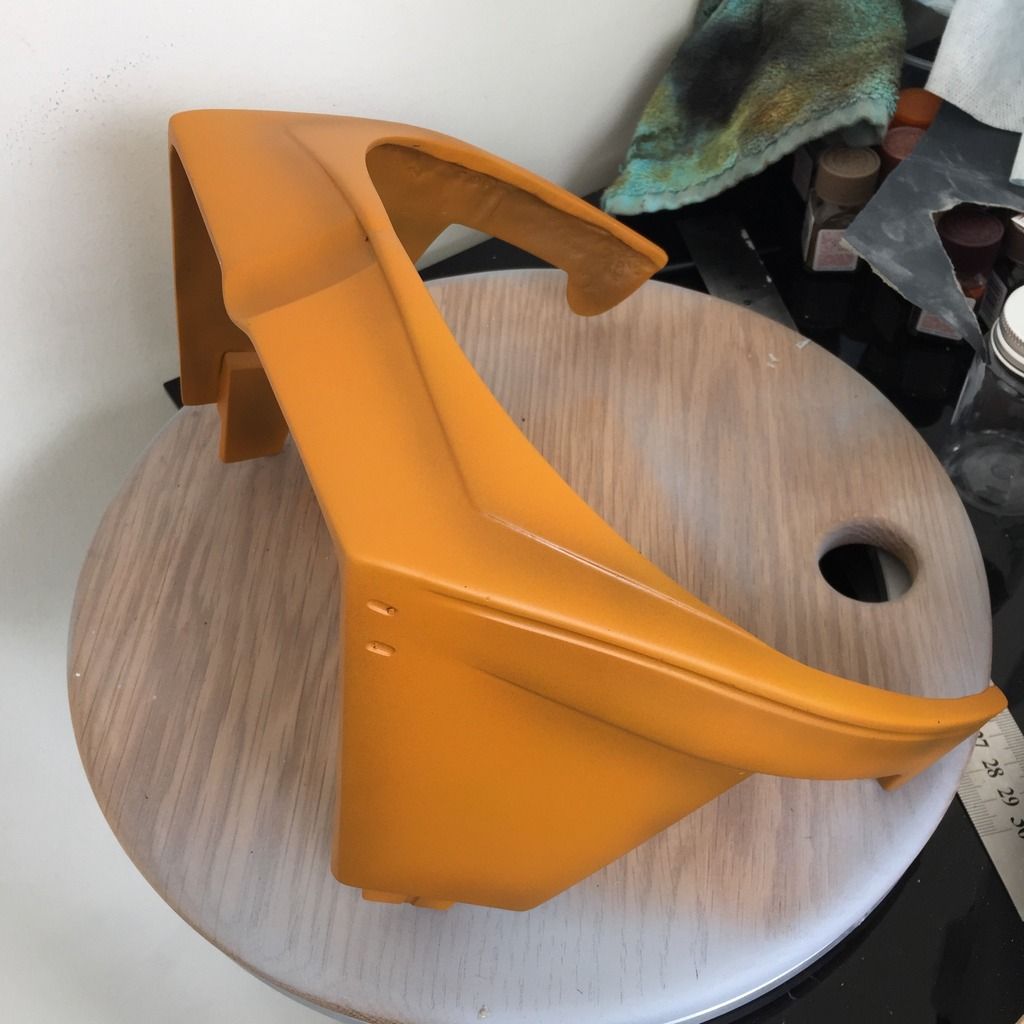
Sprayed and toned the visor with a base-coat of Orange with Black, and toned with Orange with Dark Yellow as the final orange colour:
Couldn't resist putting it on just to see how it looks!
LO AND BEHOLD!!! One of those days when your primer decides not to bite!!!! This happened after I peeled the masking off....
It happens, I guess.... So, start all over for the visor again. Strip the paint with thinner, and start over.
Hello again, fibreglass:
Hello again, Primer:
The thinner stripped off my fillings too. Gonna wait till it dries and then apply putty again. Sigh...
In the meantime, the rest of the helmet has been given 2 coats of clear gloss, in preparation for weathering.
Gonna have to call it a day. Since the accident with the visor means I have to go to the shop to get more orange.
Superb! Thanks for including the photos. This just looks spectacular. Shame about the primer, but this helmet is right off the screen.
Thanks for your kind words! This is probably how it looked like fresh out of the Kamino factory! Hahaha!
alienbuilder
Well-Known Member
very nice with the orange zick zack mouth piece. sometimes these primer problems can make you crazy, I know that. fortunately it was "just" the visor, when it happens at the absolutely last step you can do everything again. well, its always tricky with resin or fiberglas. I remember when a friend of mine did the filler for the aluminium helmets. the primer was not as good as expected then and next day we were able to pull up the whole layer and start over again. 6 hours for nothing
anyway, this helmet looks already great.
anyway, this helmet looks already great.
very nice with the orange zick zack mouth piece. sometimes these primer problems can make you crazy, I know that. fortunately it was "just" the visor, when it happens at the absolutely last step you can do everything again. well, its always tricky with resin or fiberglas. I remember when a friend of mine did the filler for the aluminium helmets. the primer was not as good as expected then and next day we were able to pull up the whole layer and start over again. 6 hours for nothing
anyway, this helmet looks already great.
Thanks. You're right. The problem was contained only on the visor, which was not such a pain since I have spare stencils which I cut from my cutting machine. So it's just the pain of having to start over, and weathering of the helmet would just have to wait for the visor to catch up.
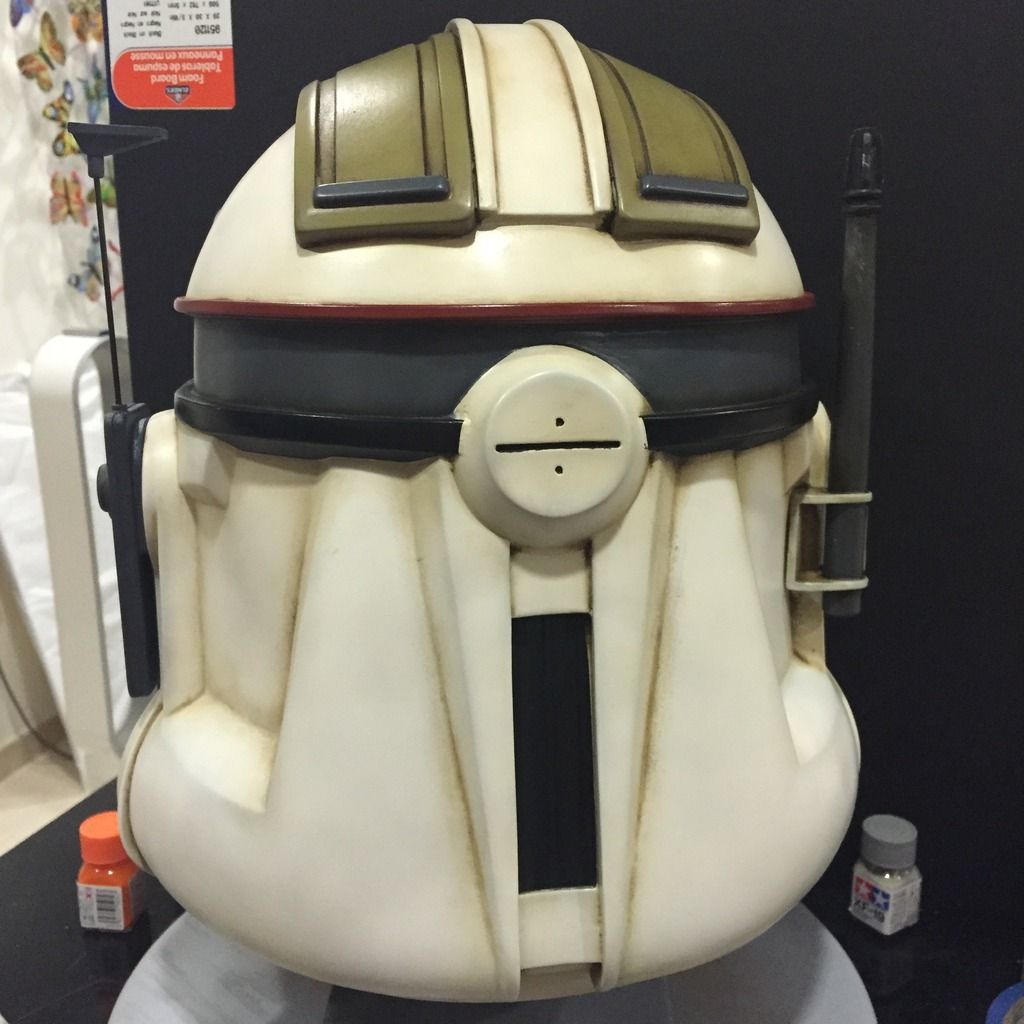
Started on the weathering of the helmet today.
The method that I use is staining, which is essentially applying Raw Umber oil paint directly onto the helmet. This is why the helmet had to be glossed in the previous step. If you tried to stain on a matt helmet, the oil paint will stick into the paintwork of the helmet, and you would get a real mess. Having it gloss allows you to wipe off the excess paint easily without affecting the paintwork below.
The process is very simple: apply the oil paint directly onto the corners of the helmet, wipe off the excess, and blend using a soft cloth. If you want it darker, remove less, and vice versa. Also, if it gets too dark, you can easily use white oil paint to lighten it back up.
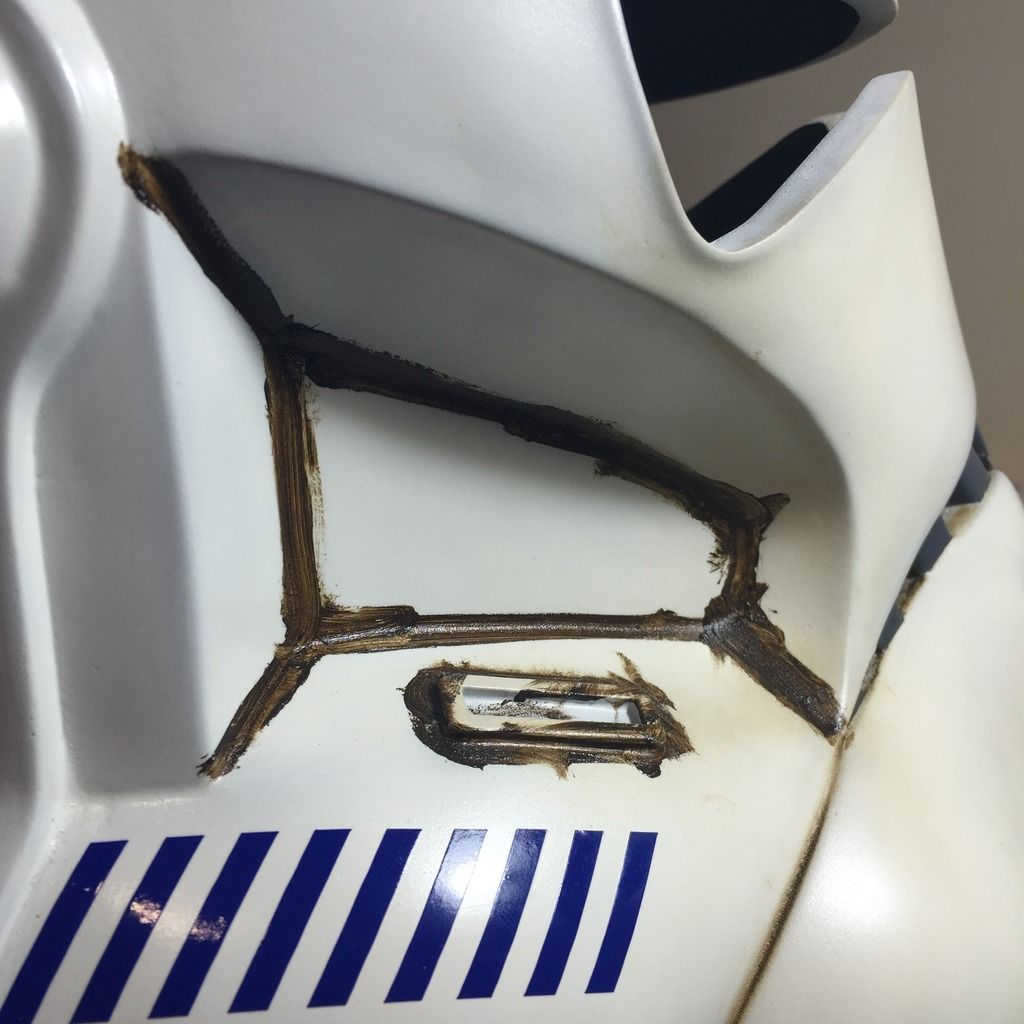
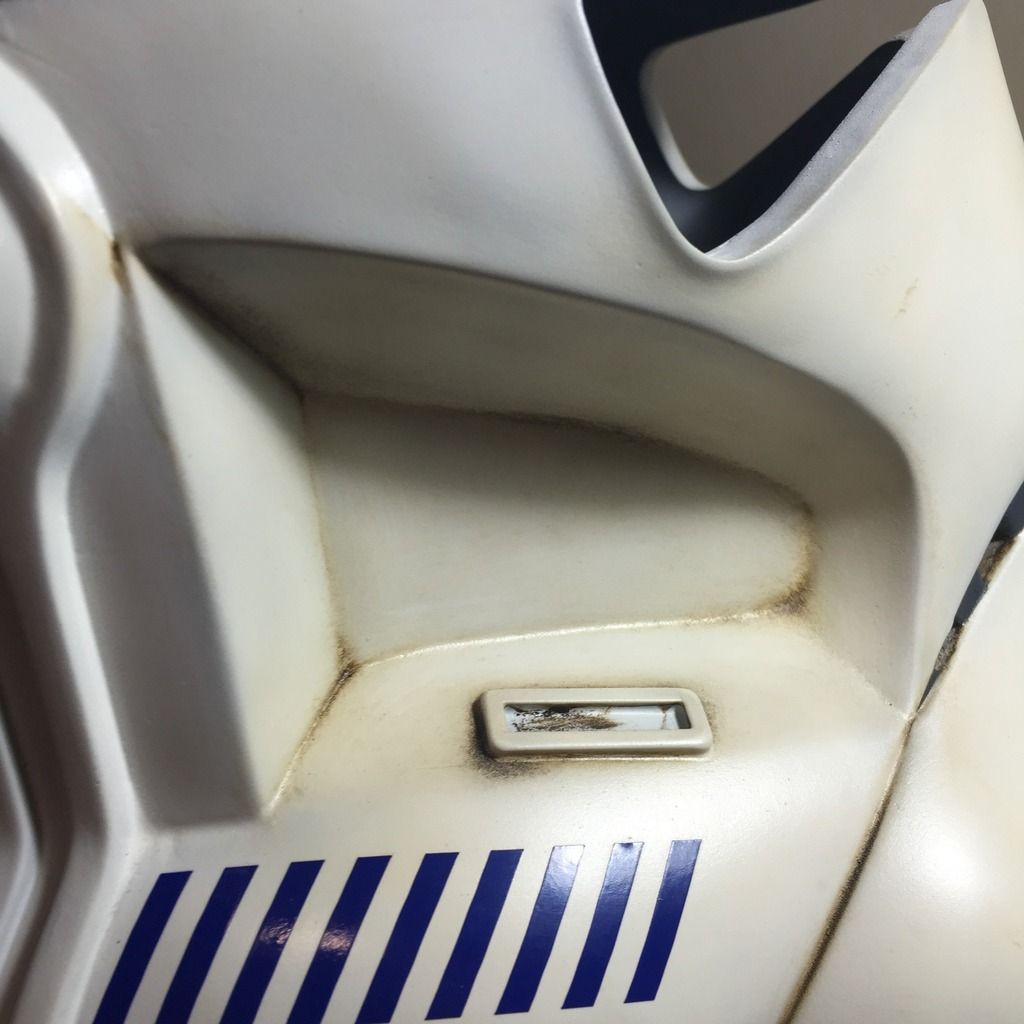
Here you can compare the difference between the side that is stained and the side that is not. Raw Umber has the added benefit that it makes the white truly off-white.
Hope you like the result.
Some closeups:
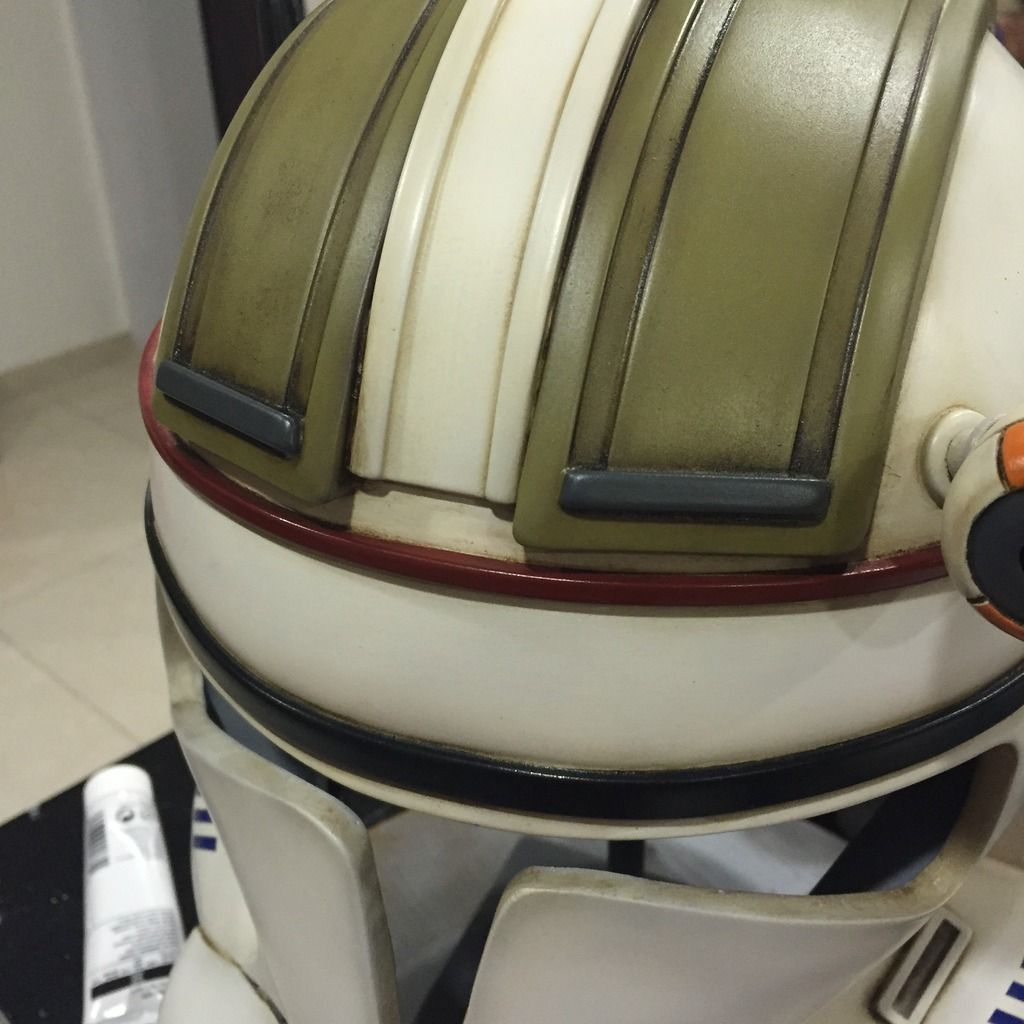

Staining also has the benefit of softening the transitions between colours, like between the red brow and white, making it look natural and not show a stark edge.
The method that I use is staining, which is essentially applying Raw Umber oil paint directly onto the helmet. This is why the helmet had to be glossed in the previous step. If you tried to stain on a matt helmet, the oil paint will stick into the paintwork of the helmet, and you would get a real mess. Having it gloss allows you to wipe off the excess paint easily without affecting the paintwork below.
The process is very simple: apply the oil paint directly onto the corners of the helmet, wipe off the excess, and blend using a soft cloth. If you want it darker, remove less, and vice versa. Also, if it gets too dark, you can easily use white oil paint to lighten it back up.
Here you can compare the difference between the side that is stained and the side that is not. Raw Umber has the added benefit that it makes the white truly off-white.
Hope you like the result.
Some closeups:
Staining also has the benefit of softening the transitions between colours, like between the red brow and white, making it look natural and not show a stark edge.
Vacformedhero
Sr Member
Very nice, thank you for sharing your techniques with clear photos
WOW buddy Im really enjoying your build threads and your paintwork is AMAZING.
Thanks mate!
Very nice, thank you for sharing your techniques with clear photos
Thanks Vacformedhero. I guess this is what this forums is about, enjoying builds and sharing. That's how I learnt too, from the many talented people here!
BobasBounty
Sr Member
This is spectacular! I love how this is coming along.
This is spectacular! I love how this is coming along.
Thanks for your kind words man! I'm enjoying the build too!
Sent from my iPhone using Tapatalk
Your painting skills are awesome!
It looks hyper real to me, which is dumb sounding since it is real. But the weathering and the rest of it is just amazing.
Thanks man! It is ironic that I am trying to be "realistic", when the "real" helmet is actually CGX trying to be real itself! Hahaha!
Sent from my iPhone using Tapatalk
LorduDesign
Sr Member
Really good job on assembling helmet!
Really good job on assembling helmet!
Thanks! Have not been able to continue this until the end of this week due to my work... arggghh! I can't wait to get back to it!!
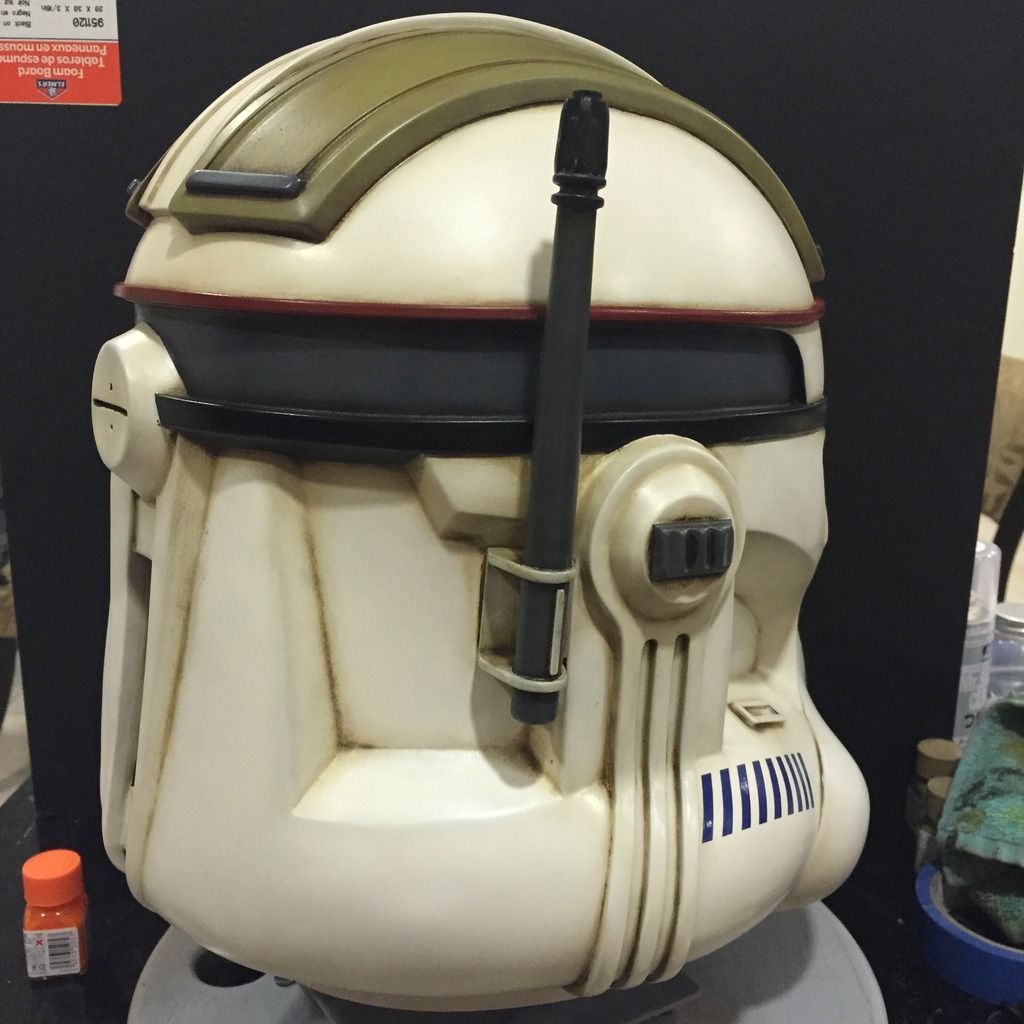
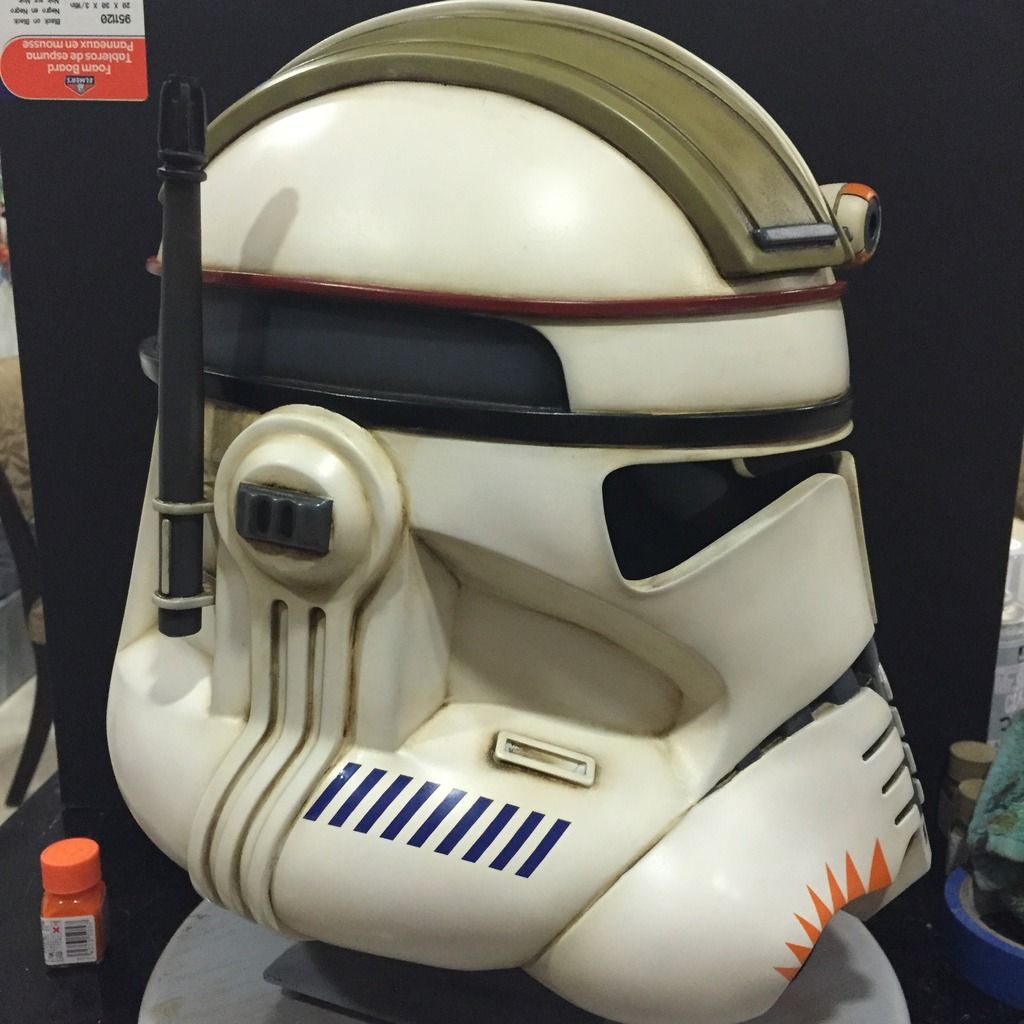
So folks!
After 2 weeks away from my workbench, I finally could get back to finishing Cody, and finish him I did!
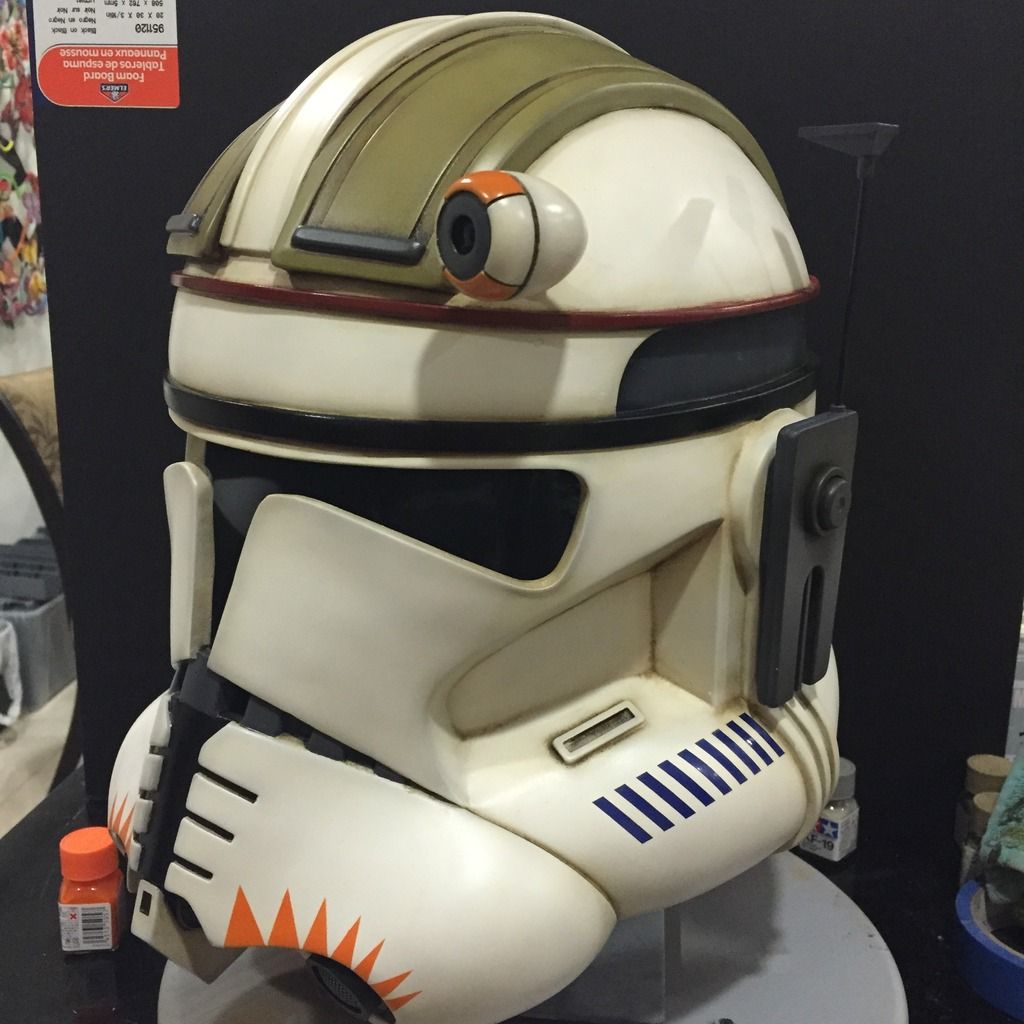
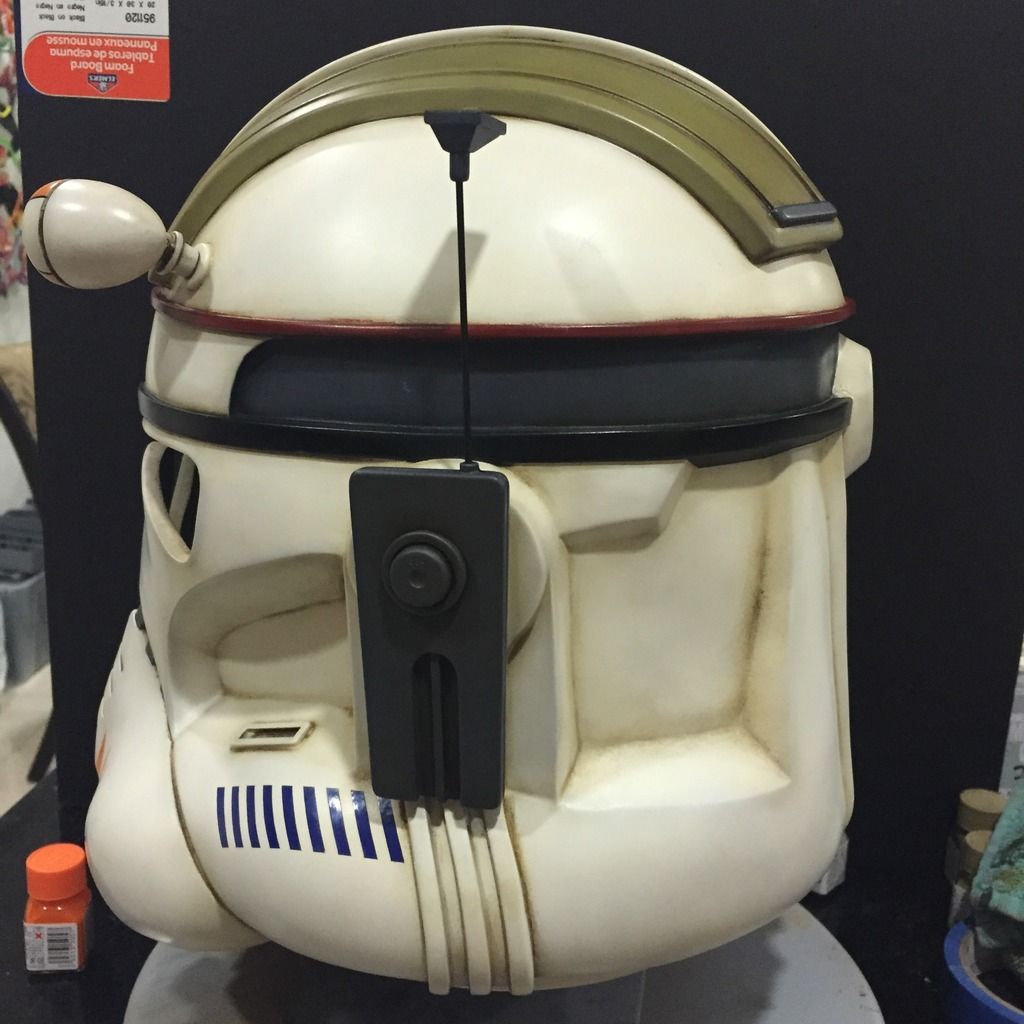
Picking up from where I left off, the next step was to finish up the visor. Here you see it painted with orange and waiting to be toned with a darker shade:

Then the markings were stenciled on. As you would recall, this was the step that ended in a disaster the last time round. Well, this time it came out perfectly!


Next, I had to add the blaster damages and more weathering. Essentially, using Ivory Black oil paints, I dry brushed the parts that I wanted to have the damage or weathering, and then blended with a soft cloth:


This is how it looks like with the weathering complete.


The last thing is to spray the helmet with a matt coat, and fix on the clear visor, and we're done!
Hope you like the final product!


Thanks for viewing!
After 2 weeks away from my workbench, I finally could get back to finishing Cody, and finish him I did!
Picking up from where I left off, the next step was to finish up the visor. Here you see it painted with orange and waiting to be toned with a darker shade:
Then the markings were stenciled on. As you would recall, this was the step that ended in a disaster the last time round. Well, this time it came out perfectly!
Next, I had to add the blaster damages and more weathering. Essentially, using Ivory Black oil paints, I dry brushed the parts that I wanted to have the damage or weathering, and then blended with a soft cloth:
This is how it looks like with the weathering complete.
The last thing is to spray the helmet with a matt coat, and fix on the clear visor, and we're done!
Hope you like the final product!
Thanks for viewing!
Similar threads
- Replies
- 7
- Views
- 520
- Replies
- 1
- Views
- 551
- Replies
- 11
- Views
- 1,177
- Replies
- 10
- Views
- 2,367
- Replies
- 1
- Views
- 1,196