Steampunk HEV mark zero - Half Life/Gordon Freeman - pic heavy

starboardsky

New Member
Hello all, a friend recommended I join the RPF to show off some of my work. My current big project is a steampunk version of the hazardous environment suit, made completely out of hand tooled leather and soldered brass. I am taking a few creative liberties with the build because I wanted the "mark zero" version to look more like something unrefined, asymmetrical and experimental.
I have over 200 hours and a thousand dollars in this project so far, luckily I only have the chestpiece and boots left to go. Right now I am on a huge money constraint so the project is just sitting until I can move some product. I started a gofundme site to collect donations but I felt it's unfair to ask for handouts when so many other people need money for much better purposes.

concept sketches for the bracer
1.jpg
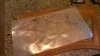
template applied to leather and cut out
2.jpg3.jpg3 (2).jpg
measuring and cutout for brass inlay:
4.jpg5.jpg
tooling!
6.jpg6 (2).jpg6 (4).jpg6 (5).jpg
adding resists and antique stain:
7.jpg8.jpg
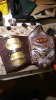
adding shotshell loops and brass inlay:
9.jpg13 (2).jpg
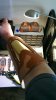
adding lighting effect:
12.jpg13.jpg13 (3).jpg
foam inserts and completion:
10.jpg14 (4).jpg14 (2).jpg
 

Attachments

  • 5 (2).jpg
    5 (2).jpg
    354.1 KB · Views: 152
Last edited:
Re: Steampunk HEV mark zero - pic heavy

other bracer, cutout and brass:
15.jpg15 (2).jpg
transfer film for world map:
15 (14).jpg
world map transfer after swivel knifing:
15 (7).jpg
gear transfers for background:
15 (6).jpg
8 hours of tooling later:
15 (9).jpg15 (5).jpg15 (4).jpg15 (11).jpg
resists and stain applied:
15 (13).jpg15 (8).jpg
gold paint pen applied:
15 (16).jpg15 (3).jpg
lighting inserted to brass:
15 (17).jpg
final products:
15 (22).jpg15 (21).jpg15 (20).jpg15 (23).jpg
 

Attachments

  • 15 (10).jpg
    15 (10).jpg
    295.6 KB · Views: 152
Last edited:
Re: Steampunk HEV mark zero - pic heavy

arm guards template, cutout, brass:
16.jpg16 (2).jpg16 (3).jpg16 (4).jpg
some detail work and tooling:
16 (9).jpg16 (7).jpg16 (6).jpg16 (5).jpg
application of resists, stains, and paints:
16 (10).jpg16 (8).jpg16 (11).jpg

- - - Updated - - -

belt blanks cutout:
17.jpg17 (2).jpg
brass insets and soldering:
17 (5).jpg17 (4).jpg
tooling for sides:
17 (3).jpg17 (6).jpg
resists, stains, and paints applied:
17 (7).jpg
bracers, arm guards, and belt completed!
17 (8).jpg

after some consideration, i found the orange bits to be too distracting and cheesy. i've since changed them to brown to match the suit.
 
Last edited:
Re: Steampunk HEV mark zero - pic heavy

templates and blanks for the leg armor:
18 (12).jpg
tooling the right leg piece:
18 (7).jpg18 (8).jpg
resists, stains, and metallic paint added:
18 (9).jpg
the back part of the right leg plate:
18 (11).jpg18 (10).jpg18 (3).jpg
front part of the right leg plate, brass inset soldered and applied:
18 (6).jpg18 (2).jpg18 (4).jpg
minimalist holster for 1861 colt navy revolver:
18 (5).jpg
right legplate complete!
18.jpg
 
Last edited:
Re: Steampunk HEV mark zero - pic heavy

left legplate after tooling, resists, and stain:
19.jpg
metallic paint applied (TOO MUCH, lol)
19 (2).jpg
front of left legplate, cutouts and tooling:
19 (3).jpg19 (4).jpg
rear of left legplate, tooling and stain:
19 (6).jpg19 (8).jpg
brass insets attached and soldered, straps applied:
19 (9).jpg19 (10).jpg
additional metallic paint applied. again, too much.

19 (13).jpg19 (11).jpg

i have since muted the silver and added more dark brown tones
 

Attachments

  • 19 (5).jpg
    19 (5).jpg
    2.2 MB · Views: 133
Last edited:
Re: Steampunk HEV mark zero - pic heavy

abdominal section concept sketch:
IMAG1265.jpg
templates applied and cut out:
IMAG1266.jpgIMAG1291.jpgIMAG1267.jpg
accent straps:
IMAG1272.jpg
central pieces cut and tooled, brass cut and brazed:
IMAG1280.jpg
one section complete:
IMAG1273.jpg
rinse, repeat:
IMAG1274.jpg
underarm cuts made:
IMAG1275.jpg
closure straps applied:
IMAG1277.jpg
spine guard/back plates:
IMAG1292.jpgIMAG1293.jpg
attached to abdominal plate:
IMAG1294.jpg
with legplates attached:
IMAG1289.jpg

- - - Updated - - -

that's all for now. need more supplies for the chest piece and the boot covers. i'm shooting to have the finished product have functional light and sound.
thanks for looking! i'll post more updates as i complete more stuff.
 

Attachments

  • IMAG1271.jpg
    IMAG1271.jpg
    3 MB · Views: 121
Last edited:
Hey, that's an idea! What's a greeblie?

Hi S,

Greeblie:

A greeblie is a detail added to the surface of an object that makes it appear more complex and more visually interesting. In some cases (such as scale models), it usually gives the viewer an impression of increased scale.

For example, if you created a pipe wrench / crowbar combo with a Steampunk flair, you would add some steampunk inspired details such as vintage typewriter parts, nuts, bolts, gears and copper related parts lending to the overall SP look but you would still be able to tell what the object is.

Like taking a Nerf Gun and doing this...

http://www.mikestuff.co.uk/communities/9/004/008/652/439//images/4541053597_611x406.jpg
 
Maybe a traditional walking cane with greeblies like sofa king said, with leather grip sections, but at the end of the cane it's crowbar shaped?

Really nice work so far, I would like to see a hand-tooling walk through.
 
This thread is more than 8 years old.

Your message may be considered spam for the following reasons:

  1. This thread hasn't been active in some time. A new post in this thread might not contribute constructively to this discussion after so long.
If you wish to reply despite these issues, check the box below before replying.
Be aware that malicious compliance may result in more severe penalties.
Back
Top