My Early Disasters pt 2 - A Biker Scout Helmet - How hard can it be?

Ok, so that didn't work. After two coats of paint and a lot of sanding, things weren't looking much different. Then I got out the electric sander and a whole patch on the top of the helmet ripped away, just like Snowbuilder warned me it would. Unwilling to face the prospect of applying more paint and trying to make good, I reverted to slathering the helmet in filler. Backward step, I know. But maybe I can be persistent enough to make this one work?
WP_20170522_005.jpg
 
Like a bad doctor, I have no patience. (That's a joke.)
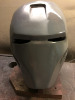
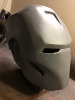
I bought this colour-change filler because I thought it would prevent premature sanding (It's pink until it dries, when it turns white.) However, "dry" is a relative term, and the filler still feels a little soft, especially if the layer is more than a millimeter thick. And ALL my layers are more than a millimeter thick.
Thus, sanding off yesterday's podging was only semi-successful.
WP_20170523_003.jpg
Another disadvantage of the method I'm using is that the dome itself is soft - there's no hard structure involved, so when leaning on it to sand away, the surface dents, and the filler cracks. I found myself surfing car supplies websites, looking for some miraculous material that's easy to apply, easy to sand and dries hard and shiny. Also, it needs to be free because Mrs Dim just took a job for 30K a year less, and then her car died on the way to work. Big repair bill coming in. Sigh.
Luckily, the money I'm making from my two books on building helmets should enable me to buy a Tim Horton's coffee. Sometime next year. If I can borrow a dollar from someone.
Anyway, there's a new layer of filler on the surface, I've done a high-density scan of the cover of "True Colours" to get the detail for finishing up (assuming I ever do), and then I have to spend the rest of this week doing school Fun Fair prep and going to work.
Did you ever think Bruce Wayne was a bit of a twit? I mean, if I was a billionaire, I'd have a smashing workshop and make crappy helmets all the livelong day. Why muck about fighting crime? Nobody says thanks.
Scan_20170523.jpg
 
Sorry to hear about the setback. Have you tried to reinforce the interior of the dome so it doesn't collapse? When I did my Republic Commando helmet I used standard printer paper which deformed when I added water based wood glue. To reinforce it I used mesh drywall tape embedded in even more wood glue. It's not pretty, but it definitely stiffened the whole thing. I wonder if even wadding up a bunch of newspaper and stuffing it in the dome would help stabilize it so you can sand.

I'm not sure what filler you're using so I'm not sure if it's bondo or something else. I use drywall putty which I can "sand" with a damp sponge to clean up some of the fine (and even some large) cracks. I wonder if it might be worth a try to use a damp sponge.
 
Your every post brings me joy -your helmet's current "configuration" looks like pretty much like all my projects at a certain point.

If you have an open area to work you may want to think about trying fiberglass resin/strands. Here's one of my earlier attempts:


...and after the first round of sanding and priming:

19866150501_a9c28ce468_z.jpg


19673204780_47c71d7461_z.jpg
 

Attachments

  • 19866150501_a9c28ce468_z.jpg
    19866150501_a9c28ce468_z.jpg
    80.6 KB · Views: 100
  • 19673204780_47c71d7461_z.jpg
    19673204780_47c71d7461_z.jpg
    78.7 KB · Views: 81
Last edited by a moderator:
Oh, that is SO pretty! Open air is becoming more likely now the weather is improving, but fibre glass will have to wait until the finances improve. Know anyone who needs a kidney?

- - - Updated - - -

Yep, reinforcing the inside is the sensible thing to do. I will certainly look at doing that.
 
Taking Wedge86's advice (at least until the fiber glass option becomes available), I have been delicately sanding but also using a wet paintbrush to redirect and smooth. Progress is slow, even for me, but I think it's a definite improvement.
WP_20170526_002.jpg
The front of the dome, where I've done the majority of the sanding, is coming together nicely. The sides I have barely touched yet. Still a long way to go, but the general plan is this:
Get a good smooth dome, and a better surface on the rest of the helmet.
Spray everything with many light coats of gloss white.
Use a dremel to carve the recesses and lines from my reference picture.
Spray again.
Fit the lights and visor.
Look cool.
 
Got a day off. Spent too much of it staring at Twitter and despairing about the state of the world, but I pulled myself together and went downstairs to add in the neck pieces I've been thinking about for a week or so. Except, of course, I didn't. I decided to fix the t-slit, making the edge rounded instead of pointed.
WP_20170601_001.jpg
Not much difference, admittedly, but it's more in line with the reference picture. Since I had the dremel out, I switched to a cutting tool and put the lines in.
WP_20170601_002.jpg
As always, I'm bashing on before the surfacing is done properly. Sometimes I'm picking up a sheet of sandpaper and making determined attempts to smooth stuff out while I'm taking a break from cutting, but it's not the intensive, patient effort I should be making. Also, the filler is still soft, even though it's dry. I should modpodge or something over the top to prevent damage.
WP_20170601_003.jpg
 
Having finally replaced the cartridges in the printer (two months after the first "low ink" warnings, naturally) I can now print off some reference pictures to take down stairs. Here's the ones I'm using:
Big ref pics.jpg
I think they show that I didn't get the dome right - it rises too steeply from the brow. There's not much I want to try doing about that now, though. I'm going to use them for placement of the various holes and lines, plus the arrangement of greeblies on the ears.
I've got that "Coasting down the home strait" feeling, which means there's something huge and important I've forgotten about. Probably that piece on the back that isn't shown in any of these reference pictures...
 
Last edited:
WP_20170602_001.jpg
Still avoiding doing the obvious work, I cut a slot for the row of lights to go in.
WP_20170602_002.jpg
Once I tried this, I cut away some more of the interior so they fit better, then held them in place temporarily with some duct tape. Still not sure exactly where the battery pack will sit - at the back? That makes sense, rather than offsetting the balance by having it on one side or the other.
Things look ok from the outside.
WP_20170602_003.jpg
But it's still too soon to try it on.
WP_20170602_004.jpg
 
No pictures today, but I'm adding lacquer to the list of things I have painted on my helmet. Hoping it will add the strength that has been missing. Also, three or four coats might be sandable. Want to move on now. Don't have another project in mind, but this one has been going on long enough!
 
Got a couple of photos to add to what I did yesterday. I'm plating certain areas of the helmet with plastic to cut short the problems I'm having with surfacing (the same cheat I used with the beak of the First Order Stormie bucket.) The lacquer has been an improvement, adding a little strength and smoothing out some of the areas, as well as being sandable where there were ridges. Right now I'm trying to figure out which part of the household budget to raid for a new can of white spray paint.
Anyway, photo number one:
WP_20170607_002.jpg
After a day or so of fiddling with the front, I took a look at the left ear, and fitted a semi-dome that I had lying around in my greeblies box. I also marked up where the next series of cuts need to be made.
WP_20170609_003.jpg
The next step is going to be a bit left field - I have to make ten 8ft tall tree trunks, some monsters, some unicorns, a bunch of leaves and a garden arbour arch. Not for this, obviously, for my kids' Grade 7 grad. (The theme is "Enchanted Forest", whatever the heck THAT means...) It might be that I don't make much helmet progress in the next few weeks.
 
Mrs Dim bought some materials for the Grad today. It included two cans of white spray paint. It would be very wrong of me to use that paint for a helmet.

Very, very wrong.
 
WP_20170612_001.jpg
Owch. A little too enthusiastic with the sanding, and a chunk of filler broke away. I'm getting impatient, which is always bad. Today I watched the video for "Battlefront 2" and decided I liked the look of the Imperial Special Forces helmet, which seems to be a TIE Pilot variant, but thinking about what a mess I would make of that was quite depressing. I repaired this damage and added a little more paint here and there, a little more sanding in other areas.

I still have more sanding to do overall, have to finish figuring out how the lights fit in properly and what I need to do to the ear on the right hand side. I have a light for it, but need to figure out the shapes.
 
Someone - and I'm not admitting anything here, but it MIGHT have been me - thought that the solution to the orange peel effect could be to use a different type of spray paint. And they sprayed my damn helmet blue.
WP_20170619_005.jpg
Not even doing a very thorough job, you'll notice. My guess is that they were overcome by guilt about the things they were supposed to be doing instead of hiding in the workshop and spraying helmets.

Anyway, look, it worked.
WP_20170619_006.jpg
Still have other surfacing issues, but this small patch on the chin is fine. And blue.
WP_20170619_007.jpg
I'm blue all over.... Except for a few patches here and there. Lucky my wife bought that white spray paint...
WP_20170619_008.jpg
One day I'll have time to finish this, right? And then... Then I can get to work ruining this beautiful thing:
WP_20170619_002.jpg
 
DT. I'd get the police to check that can of red paint next to the helmet for fingerprintsI I expect they might belong to someone you know?
BTW have you had a discussion with you Doctor about the possibility that you might suffer from 'sleep painting', it's a condition that we prop makers suffer from apparently, LOL! :lol

Roughneckone:cool
 

Your message may be considered spam for the following reasons:

If you wish to reply despite these issues, check the box below before replying.
Be aware that malicious compliance may result in more severe penalties.
Back
Top