My Early Disasters pt 2 - A Biker Scout Helmet - How hard can it be?

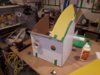
Thank you Snow Builder! Yes, came out much better than I deserve.
And now there's going to be a pause for the three-month run of birthdays, so let's recap on what I've learned during this project:

1. Nothing.

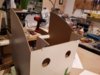
Well, that's not quite true. Comparing this build to the previous two shows that best results are gained by working from a solid base - in this case, a decent pep model, rather than a kluge of my own design (see DeathTrooper and Republic Commando errors). I've learned that the RPF has a great array of experts who are generous with their advice, and it would be foolish in the extreme to ignore it. Thus, next time the bondo goes on in smaller amounts and thinner layers.

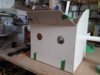
I'd like to say I've finally learned that "I'll fix it in post" is a mantra for those who like to leave their problems til later, but that's a step too far. I'm never going to have the blocks of time available for this that it needs. Each stage of building is going to be accomplished (or botched) in the time I can grab out of a regular day, or a day off already heavy with other commitments. I'm always going to believe that cosmetic fixes down the line will compensate for underlying errors, even though my past experiences have shown that to be false. The best I can hope for is taking longer over producing the base model, and building it with the bondo layers in mind. With a better base, there's less to wreck later, perhaps.

As to what the next project is, that's still up in the air.I have some nice ref shots of a Shore Trooper helm, and there's the exotic Krennic costume I want to wear in November. I also have to build the Hound's Helmet from Game of Thrones, because that's the prize for the House Cup this year (My home discipline plan involves everyone in the house having points awarded or taken away for bad behaviour. Parents included. This year it's Game of Thrones themed, so the prize is the Hound's Helmet, not a cup. But it still has to be filled with Smarties for the presentation, or there'll be a riot. Please tell me other people live like this.)

I think I'll be back in March with whatever the crazy plan is. Thanks for sticking with this build and saying the kind things that stopped me dropping it and walking away. You lot are the inspiration here. Sincerely, thank you.
 
If you think you haven't learned $^&*, you're wrong! You did learn a lot and it shows in the final build!

As for the helmet itself, trust me, sometime it's just better to at least output something that you learned doing, maybe it's not up to what you'd like but at least, you DID output something you can be proud of!

It's already better than my dozens of "perfect" projects that I never finish because I'm too anal and I end up being blocked!

Keep at it man! I've been more silent this time around but I kept to the updates with a smile anyway! :)
 
Latest plan seems to be building a life-size dalek.

Yeah.

So, that won't be on this thread, I'll probably stick it on to the Cyberman Helmet thing I did last year. I have blueprints from The Project Dalek Forum, but it seems insanely complicated, even if we make a manual one (ie, not power train driven, and with only basic lights and voice changer.) I hope to come back with a Phasma build or a Shoretrooper build in a few months. After all, how long will it take to knock together an interstellar killing machine?
 
As well as resurrecting Derek the Dalek for the Vancouver Fan Expo, I thought I'd put together a cosplay of Beckett, from "Solo". It's an odd choice for me because he doesn't have a helmet, but to be honest I just fancy the coat. And the double blaster rig. Anyway, to make life even more complicated, I decided it would be cool to have a cylinder of refined Coaxium to carry around. After all, my eldest kid got a map for Christmas, which came in a tube about the right size. I sprayed one end silver, and one black:
20190126_151625.jpg
Then I went out and bought some craft vials from the local dollar store:
20190126_151629.jpg
Next I drilled a hole halfway down four of the vials (trial first!) and inserted an LED from a string I had left over from Christmas (This is a lie. Around Christmas I bought at least 4 extra strings of battery powered LEDs just for these kinds of projects....)
20190126_153405.jpg
The single looked ok, so I assembled four and slid them into the tube.
20190126_154244.jpg
Not bad! I'll need some kind of spacer between each layer, but three layers of of vials should fill the tube, and there's room in the bottom for the battery pack! Finished pics later, if I get back to it!
 
Progress is slow but sure on the coat. I am (I kid you not) making up the pattern as I go. It's working better than my history would suggest.
20190127_134324.jpg
 
Part of the Beckett cosplay is the guns he carries. That sentence looks wrong, but it's grammatically correct, trust me, I'm a proofreader. So, I'm building a blaster based on some models created by someone here on the RPF who's done some insanely nice 3d printing (can't remember who, can't find them, but they're brilliant) Anyway, I started cutting the first basic shape out of wood. Not too bad.

628445-4aaa1e0c6bebc68bd6c0f9f3459b1d2a.jpg


Tried to construct the scope (which is the same as Han's DL44) out of some old tubes. It was...ok...ish.(You can just see it in the top of the picture there...Half steel tube, half plastic.)

BUT! The next day I only had a short time to work, so I ran in, and sprayed the scope black. Which it is not. As I realised I'd sprayed it the wrong colour, I watched it fall off the workbench and roll across the floor, picking up tons of sawdust etc in the still-wet, wrong colour paint. I picked it up and scraped off some of the muck, at which point the glue failed and it broke in half. Manfully, I glued it back together, then realised I had missed out a block shape in the middle of the scope. I pulled it apart again, added a block, glued it all together, set it down to dry. The glue leaked and glued the whole assembly to the workbench. Then I held the blaster next to it and realised this scope assembly was way, way too long.
628447-33e3648ae316417bb7b2f3902a977c4c.jpg

Fortunately, at this point I gave up, and swore off building forever.
The next day (Today) I remembered I had recently bought a Boba Fett blaster from a thrift store (not that I'm ever cosplaying a Mandalorian again, but it was CHEAP!) The scope is similar. And better than mine. So, I cut it off.

Naturally, I made a mess of attaching it, but at least the cockeyed angle of the scope matches the cockeyed angle of the barrel, and people will be too busy goggling at the wrongness of the coat I have made to worry about the idiocy of the gun I won't be able to remove from the holster* because the glue will still be wet when I put it in.....

*The holster that I haven't even made yet.
 
What I can't get over is the fact that all the basic elements from the picture are there in the model I've made, yet the model is STILL completely and totally WRONG.
633092-883e0682634127cbce64452e419c61a9.jpg

As for the other gun... Man, I thought simply building a front end (barrel, I guess) would be easy enough, but there's that issue with getting things straight again....
633093-d49b438c7dfe7916ae7d63e8a79e130f.jpg
 

Attachments

  • 20190216_084711.jpg
    20190216_084711.jpg
    528.9 KB · Views: 118
  • 20190216_084718.jpg
    20190216_084718.jpg
    1.1 MB · Views: 108
Ok, the FanExpo is tomorrow, and last night I added the nearly-finishing-touches to the gunbelt. I'll post the whole rig if I can get a family member to take a decent pic of me all dressed up, either tonight or tomorrow. Really nervous about going out in costume without a helmet.
637616-79ee6109178c8949f230a533fe54fa46.jpg
 

Attachments

  • 20190301_092911.jpg
    20190301_092911.jpg
    2.8 MB · Views: 92
We made it to the Fan Expo, and my costume held together for the whole trip. I was recognised (out loud, at least) by two people, one of whom was in this photoshoot with the local 501st.
638245-8ed504af86536b325c1c955e91903f7e.jpg
 

Attachments

  • 20190302_102859.jpg
    20190302_102859.jpg
    959.9 KB · Views: 110
So, a week ago, I made a start on a new project. I held off mentioning it here because I thought it might be a flash in the pan, or be swallowed up by real work, but no.
650713-8b6423b202bc869979144dc13df04665.jpg

I took a lego speeder bike and made some measurements. Then I drew out plans. Yes, PLANS!
650714-65b2d0e19e4b38c0702468682bcc86ac.jpg

"But what scale are you working to?" I hear you cry. Well, it's very simple and logical. it's one to twenty one point eight two. Why? Because I have two large tubes in my workshop that will be perfect for the the two long bits that stick out the front. When you calculate the ratio between the sticks on the model and the tubes, you get 1:21.82. Nice round number.
Anyway, I'm not making giant lego bricks and sticking them together. Here's the first few stages of construction on the front section:
650715-b693683a7e88290d5c992518e43405d7.jpg

650716-460210e9c174d5ff155d068bae78cf7a.jpg

650717-32a5b388e07d8aff1f01a67cfe69bc43.jpg

650718-cf36a2ee9523b249638be5378c1e56c3.jpg

It's going to be a few days before I get to the next bit, and it's already bigger than I expected. I also have to find a way to purchase more supplies in a time of economic scarcity. So, basically, situation normal.
 

Attachments

  • 20190401_074803.jpg
    20190401_074803.jpg
    1,008 KB · Views: 94
  • 20190403_183516.jpg
    20190403_183516.jpg
    332.1 KB · Views: 100
  • 20190406_175315.jpg
    20190406_175315.jpg
    428.3 KB · Views: 102
  • 20190406_175622.jpg
    20190406_175622.jpg
    385.4 KB · Views: 111
  • 20190406_220504.jpg
    20190406_220504.jpg
    753.2 KB · Views: 92
  • 20190407_174736.jpg
    20190407_174736.jpg
    1 MB · Views: 113
Still haven't got the additional supplies, but I have got some more construction done on this front section. I cut the holes in the front panel for the tubes:
652782-f2b58f4523b9e5afc13ef708c666aaaa.jpg

652783-98c8b309028a5228d6ce34b3f09b00bd.jpg

And I got the side pieces put in - they'll hold the ends of the steering arms, eventually. Coincidentally, they should also provide a way to secure the front section to the main body, when I have one.
652784-05c6f325e655183a249e977f09970cd5.jpg

Unfortunately, I have to put more structure on the inside to support the front tubes. Right now they don't stay straight with only their own weight to support, and eventually they'll have steering vanes on them too.
652785-7567c1b9521543565ed5ad7b6a1a8829.jpg

652786-d740a6bca6babbfa19b512a1ca6fef3a.jpg

Tomorrow I'm hoping to grab some time to try and get the curved top put on the front section, and maybe fit those steering vanes. I also have to make two collars to go at the point where the blue tubes reach the front section, which should help hold them in line.
 

Attachments

  • 20190413_115045.jpg
    20190413_115045.jpg
    691.6 KB · Views: 84
  • 20190413_122423.jpg
    20190413_122423.jpg
    586.1 KB · Views: 84
  • 20190413_125050.jpg
    20190413_125050.jpg
    731.4 KB · Views: 83
  • 20190413_164843.jpg
    20190413_164843.jpg
    1 MB · Views: 87
  • 20190413_164853.jpg
    20190413_164853.jpg
    1,003 KB · Views: 92
Hard to believe it's only been a week or so since my last update - the Easter long weekend felt like a month off work, because we built a greenhouse from scratch. Anyway, I have made some progress with the speeder, starting with figuring out a way to hold the tilted front:
655583-07b391e3fcdb811048ce7e8a7dbbe482.jpg

Glue in two pieces cut at the right angle (which is NOT a right angle) so you have something to glue the front plate to.
655584-ae7013d08d7fdb0f4c6198ca4f086f7b.jpg

Then I mangled a collar, gluing two thicknesses of wood together just before realising I couldn't jigsaw that thickness of wood. I had to drill a couple of holes and cut out the inner using a coping saw, and to do that I had to buy a coping saw.
655585-53d62e43902a1f7be9c6d2ac2a3d1344.jpg

The other collar will be sitting around uncut for quite a while. Anyway, after years of crazy attempts to measure stupid things, getting a measurement for the curved pieces was easy. Is it the RIGHT measurement? Who knows?
655587-6fd104c919329f10edd634181973c298.jpg

655586-81b5696bd0a438b5f4df2a20385d4780.jpg

Next step, check the tube still fits...
655588-6451126444a845b613c35d032c20d930.jpg

Next I started to cut out the rear unit using some very complex measuring techniques I developed...
655589-ec344581dfb432c0ceff0992fc56066a.jpg

And since all that was starting to look quite complicated, I skipped off and made the REALLY fun part of this build:
655592-40cb229500613d498bd3a32bbe30f1c1.jpg

655591-5fac8e02295222b9d55a20b3fc671abc.jpg

655590-2b4eaab03908d00681ee9045e226841a.jpg

The body is made from foamcore board, and the helmet is a flimsy plastic one from a kid's halloween costume we've had for years. I still have lots of repairs to do to the bucket, thanks to it being SO flimsy, but it would have been insanely complicated to try and build a helmet at the right scale (since none of the other helmets I've built have come out the right size either!)
Still to go: I have to make another arm, and tidy up the joints, then finish the paintwork on the lego trooper. I have to seal up the back of the front section of the speeder, now it's attached firmly (if a little askew) to the rear section:
655594-518fe73fde8c32476ba6a20011419083.jpg

655593-c0ccd1818ecf43d0fb85b6677c1c14c2.jpg

Once that's done, I have to do a lot more measuring and build some forms out of flooring foam, like the bit I think of as the "fuel tank", and the whole seating area, even though the trooper doesn't actually sit.
I am not getting this done by Star Wars Day, am I?
 

Attachments

  • 20190415_114822.jpg
    20190415_114822.jpg
    923.7 KB · Views: 90
  • 20190415_124926.jpg
    20190415_124926.jpg
    450.3 KB · Views: 92
  • 20190415_130940.jpg
    20190415_130940.jpg
    635.9 KB · Views: 103
  • 20190415_165355.jpg
    20190415_165355.jpg
    891.2 KB · Views: 95
  • 20190415_151531.jpg
    20190415_151531.jpg
    855 KB · Views: 100
  • 20190415_200152.jpg
    20190415_200152.jpg
    1 MB · Views: 92
  • 20190419_141708.jpg
    20190419_141708.jpg
    469.5 KB · Views: 96
  • 20190423_190838.jpg
    20190423_190838.jpg
    639.7 KB · Views: 94
  • 20190421_220147.jpg
    20190421_220147.jpg
    910 KB · Views: 94
  • 20190421_193855.jpg
    20190421_193855.jpg
    818 KB · Views: 97
  • 20190422_164117.jpg
    20190422_164117.jpg
    607.8 KB · Views: 87
  • 20190422_162741.jpg
    20190422_162741.jpg
    977.6 KB · Views: 84
Ugh. Real life is being a bit rubbish for a variety of reasons, but this weekend I got to spend a couple of hours doing consistent work on the speeder (as opposed to grabbing five minutes here and there).
I'd had to glue an extra bit of wood onto the seat end to make the whole thing the right length, and the first job was to add the end piece that supports the back piece.
659340-00f715c05fbd6f232b56b5ad3f1f3cf1.jpg

659341-95abcde4e1924b0fcaf7940f204e2ee7.jpg

Sitting right on top of that piece in the original model is a squarish lego piece that is half solid, half slats. I made it from a plate piece with separate pieces glued to the top.
659350-b5d7b1bf6eac525479385c17d2a443a6.jpg

All the work so far has been complicated, but the next bit was a real brain-melter. There's a flange to either side of the seat. If this was a bike, it would be the part that kept your trouser legs out of the chain. Anyway, I drew more plans, and thought hard about how to make it. The cross-piece at the back is where it ends, so I screwed a small piece of plank at the right angle where it starts. Then I measured the right (ish) shape and length of the flange out of hardboard, and glued both ends. It made a pleasing curve and I was very chuffed with myself.
659356-824982970ba974ee9f4a3c81468078c7.jpg

Yeah, right up until I looked at the original model again. Oh yeah, it doesn't go anything like that. Damn.
At this point I took a deep breath and walked away for a while. There was no getting away from the fact that I would have to cut that nice curve, and the hardboard wouldn't accept the bend that was SUPPOSED to be in the flange. So I'd have to cover the hardboard with something. Damn, damn, damn.
659359-cbbc22e3d0905b373446a4984938c6a3.jpg

I used flooring foam to make that curve, because the obvious choice for covering the flange is the camping mat foam. Obviously measuring it was tricky, cutting it was harder, and gluing it in place was insanely difficult, but hardest of all was clamping the damn thing while the glue dried. It's been two days, and I still don't know if it worked.
659361-71b563fbb5b127067e002ff8f496db46.jpg

659362-c21ad0de1b689d1e7e9a532302421203.jpg

I also got to fit the collars, and they seem secure enough to hold the tubes.
659363-431cb7940ab689e76b0cc461ff265c73.jpg

Although the tubes are still removable, the extra bits really made getting the thing back inside a headache. I have NOT thought this through. Still, the extra weight means the front end no longer needs supporting. I propped the lego guy up in place, and he seems happy enough. Sooooooooo much still to do, and I have no idea how I'm gonna make the flange on the other side.
659364-3ed886b2f07e8c24212afc74d25e1661.jpg
 

Attachments

  • 20190505_123127.jpg
    20190505_123127.jpg
    1.3 MB · Views: 90
  • 20190505_125251.jpg
    20190505_125251.jpg
    4.1 MB · Views: 108
  • 20190505_130718.jpg
    20190505_130718.jpg
    3 MB · Views: 85
  • 20190505_133612.jpg
    20190505_133612.jpg
    3 MB · Views: 102
  • 20190505_170644.jpg
    20190505_170644.jpg
    1.8 MB · Views: 94
  • 20190505_171239.jpg
    20190505_171239.jpg
    914.3 KB · Views: 83
  • 20190505_172527.jpg
    20190505_172527.jpg
    1.4 MB · Views: 93
  • 20190505_164207.jpg
    20190505_164207.jpg
    3.3 MB · Views: 102
  • 20190505_174150.jpg
    20190505_174150.jpg
    801 KB · Views: 86

Your message may be considered spam for the following reasons:

If you wish to reply despite these issues, check the box below before replying.
Be aware that malicious compliance may result in more severe penalties.
Back
Top