You are using an out of date browser. It may not display this or other websites correctly.
You should upgrade or use an alternative browser.
You should upgrade or use an alternative browser.
Immortan Joe costume from Mad Max, Fury Road
- Thread starter ahoudini
- Start date


eriksmask
Well-Known Member
An update on the Worbla armor, pretty pleased with the results. The regular style of worbla was used for the trim and will help with the armor's structure. I will be covering the trim with fabric as well. I ended up only doing one layer of the clear worbla. I did try two layers at first, but really didn't care for all the air bubbles that appeared sandwiched between the two layers. I also ended up sanding the armor a little so it wasn't so crystal clear.
 .
.
Took one shot with my mask resting on the form. The mask kit is from rpf's own insanely talented logan47k, paint job by me.

.Took one shot with my mask resting on the form. The mask kit is from rpf's own insanely talented logan47k, paint job by me.
Last edited:
Hamsterstyle
Well-Known Member
Ericksmask, did you hand mold that chest piece or mold it into the gladiator armor? I need to order some transparent worbla. This is the one part of the costume that looks nightmareish.
I highly recommend casting the castle nuts. When you do it, Imbed a short bolt in each one (As it's casting, just hold one in place) so you can just bolt them into the cod piece. That way they will be super light weight and won't come out.
I'm actually working on the ceremonial belt. Originally I just planned on making this as a piece of wall art. But now I'm building the whole costume for Dragoncon.


There are a few pictures of what I'm working on. I just got a 3d printer (Lulzbot Mini) and I've been sculpting and printing badges (Grinder, Athletic and 500 ones) done already. Plus I worked out a good way to 3d print chain links for his ceremonial belt. They take about 9 to 15 minutes per link set.
The smaller chain links still require a bit of glue, but the larger ones for the middle chain I'm able to assemble without any glue. They snap into place.
Also, as you can see I've made some camshaft holders that hold the chain links in place. Those are 4 part each. Those are the version 1s, I'm printing a new version that will make attaching to the chain links easier.
In addition I've been printing out large links with a flat back so that they can be easily riveted into the leather leggings. Might do a very similar version for the boot links.

If there is interest I can send along the .blend files or the .stl files for all of these. I can put up a dropbox link and keep it updated with my progress.
You can check out my facebook page below for more current updates or to ask direct questions.
I highly recommend casting the castle nuts. When you do it, Imbed a short bolt in each one (As it's casting, just hold one in place) so you can just bolt them into the cod piece. That way they will be super light weight and won't come out.
I'm actually working on the ceremonial belt. Originally I just planned on making this as a piece of wall art. But now I'm building the whole costume for Dragoncon.
There are a few pictures of what I'm working on. I just got a 3d printer (Lulzbot Mini) and I've been sculpting and printing badges (Grinder, Athletic and 500 ones) done already. Plus I worked out a good way to 3d print chain links for his ceremonial belt. They take about 9 to 15 minutes per link set.
The smaller chain links still require a bit of glue, but the larger ones for the middle chain I'm able to assemble without any glue. They snap into place.
Also, as you can see I've made some camshaft holders that hold the chain links in place. Those are 4 part each. Those are the version 1s, I'm printing a new version that will make attaching to the chain links easier.
In addition I've been printing out large links with a flat back so that they can be easily riveted into the leather leggings. Might do a very similar version for the boot links.
If there is interest I can send along the .blend files or the .stl files for all of these. I can put up a dropbox link and keep it updated with my progress.
You can check out my facebook page below for more current updates or to ask direct questions.
Ein
Sr Member
Do you have any idea how hard it is to use the transparent worbla versus something like PETG? The Worbla is like 3x the cost and I know I'm bound to screw up a bunch of times before I get anywhere near right.
- - - Updated - - -
I've been modelling the badges, but if you can share a link for the chainlinks in particular I'd find that super helpful, myself.
- - - Updated - - -
If there is interest I can send along the .blend files or the .stl files for all of these. I can put up a dropbox link and keep it updated with my progress.
You can check out my facebook page below for more current updates or to ask direct questions.
I've been modelling the badges, but if you can share a link for the chainlinks in particular I'd find that super helpful, myself.
Ein
Sr Member
I would only use Worbla if you are working it by hand. Use the PETG if you are vacuforming.
Sent from my iPhone using Tapatalk
Can you clarify the difference a bit here? I don't have a vacuform table (or the room for one!) so I figured I'd end up making a foam/fiberglass buck of the abdomen shape, laying the worbla/petg/whatever out overtop of it, and heatgunning the daylights out of it.

eriksmask
Well-Known Member
Beautiful stuff Hamsterstyle! So amazed by all the 3D printed pieces, it's pretty foreign to me. I'm very interested in files, and I think that you're route for the bike chain is the way to go! Also happy to see someone is doing the ceremonial belt! Is anyone going to tackle the scepter?
As for the transparent Worbla, it is not the most forgiving when working with it. One Jumbo sheet will be enough for the chest armor and maybe the biceps... You'll need another smaller sheet for the rest of the armor. To shape it the easiest way I found was to place it on the inside of the armor, trim to fit, and then tape the edges of the Worbla to the armor really tight with masking tape. I then used a heat gun on it's lower setting to slowly heat it. It took me three tries to get this, I would suggest using a cool damp cloth to press the warmed worbla into the more intricate spots. One thing nice is it can be reheated ,so if there are any bubbles or warping you can pop it back in the "mold" and reshape it. Be careful not to overheat it or it will bubble and become cloudy...
Also unlike PETG it's super flexible, almost like a really heavy vinyl.- but it has held it's shape well. This isn't going to crack on you when you sit down. Vacuum Forming would still probably be the preferred route, but finding a machine large enough has proven quite difficult.
I can send out some sample mistake pieces, if anyone wants to try out the stuff and get a better idea of it's components. Right now I'm trying to shape the shoulder armor with no success.
Hamsterstyle
Well-Known Member
I've given names to all the medals in my head. In order:
Easyrider, 500, Navy Cap
Grinder, Filigree, Athletic
A friend of mine did Immortan Joe and used the Transparent Worbla (Transparart) and hated it. But it seems like the only solution to this problem without having a proper vacuform table.
I've found the armor you did the forming over, but it seems like it's 70+ dollars for it. Did you find a better price on this somewhere?
This costume is easily one of the harder ones I've tackled.
When I get home later I'll put up a zip file with copies of what I've worked with so far. People can feel free to do what they will with them.
Ein, which badges have you done already? The Easyrider one and the filigree one are the two I don't have yet. The Easyrider I might end up hand sculpting and casting, as there is just too much detail to print it. Or, I might just do a custom badge with my cosplay name for fun and see if anyone notices.
Ein
Sr Member
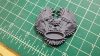
Hamsterstyle - I don't want to derail this thread too much more with my own stuff, but the badges I've done up are posted in the OP of my thread, along with the download links for each file. I have managed to print the easyrider one well enough that I'm happy not to sculpt it:

No idea what the filigree one's going to look like yet but I'm assuming it's modelable. The Navy badge is easy enough to source that I probably won't bother.
No idea what the filigree one's going to look like yet but I'm assuming it's modelable. The Navy badge is easy enough to source that I probably won't bother.
Attachments


Last edited by a moderator:
Morgenes
Active Member
This is a great reference thread, thanks and thanks for sharing files everyone!
What did the cocktail strainers look like when you started? I'm finding quite a few varieties out there, but nothing that looks quite like what you have pulled together. It looks great, especially with the rust applied.
Also, if you do a run of the codpiece before it August I am in
What did the cocktail strainers look like when you started? I'm finding quite a few varieties out there, but nothing that looks quite like what you have pulled together. It looks great, especially with the rust applied.
Also, if you do a run of the codpiece before it August I am in
Last edited:

Similar threads
- Replies
- 17
- Views
- 1,721
- Replies
- 16
- Views
- 1,067