You are using an out of date browser. It may not display this or other websites correctly.
You should upgrade or use an alternative browser.
You should upgrade or use an alternative browser.
Firefox MIG-31 movie aircraft
- Thread starter Firefox3D
- Start date


Firefox3D
Well-Known Member
Thanks, it was a surprise when it happened but not a complete shock if that makes sense. The good news is my Dad is doing ok, wasn't sure how much it was going to affect him.
On a lighter note, I think I have fixed my Form1 printer. Fitted a new laser diode, which was an educated guess from the specs I could gather, Formlabs don't give much away. It's test printing yet another 1/12th canard now with new Photocentric black resin. It looks ok, fingers crossed.
On a lighter note, I think I have fixed my Form1 printer. Fitted a new laser diode, which was an educated guess from the specs I could gather, Formlabs don't give much away. It's test printing yet another 1/12th canard now with new Photocentric black resin. It looks ok, fingers crossed.
Firefox3D
Well-Known Member
Whatever is the easiest for you Firefox.Thanks.
How is this for a start, can size it so it prints out at A4 or A3 with a sensible scale, this is just rough and ready
Can easily make the measurements show in inches if you like it old school style
")
Last edited:
Firefox3D
Well-Known Member
My Form 1 is fixed and working better than ever. I think the laser diode was on the way out when I bought it as now prints are near perfect and I am getting the claimed 0.03mm resolution or darned close.


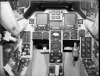
This is with the surprisingly affordable Photocentric firm resin. Learnt from the pilot test that you don't clean/scrub before UV exposure, hence the rough surface and lost detail,
Just let it sit in isopropyl alcohol for 20 mins or so. The firm is not that firm with small things, the cockpit dash is 2cm across 3/4' or so and the supports caused it to deform a bit. The left side printed last with no support intervention and came out much cleaner. Will probably print with the cockpit tub so it self supports.
Also annoyingly worked out the Funtodo resin I had been using caused me to think the printer was working way out of spec as I had to reduce the laser power significantly from the stock "grey" setting to get it to work right. The Photocentric resin works virtually spot on at stock, just slightly overexposed. So the Funtodo resin I received was way out of spec, as it way to much photo-initiator in the mix.


Firefox3D
Well-Known Member
I can tell you exactly how big he is because I measured him checking for the shrinkage factor of the resin, 62.6mm from boot bottom to back of the helmet. lol, or about 5cm tall.

1/48th scale on the left, as I said I scrubbed a bit too much at the black one when the resin was still soft, does well with the very small details - hard to pick up in the pic.
I was just using up the green Makerjuice resin as I only had a bit left. It prints well with bigger things, but is not as sharp and tends to clump around the support points. Also I used the orientation suggested by the software for the small ones, where they printed with some support contact points on the front, The big one I orientated so he was lying on his back with his feet in the air, so most the supports points can not be seen.
Firefox3D
Well-Known Member
So I started looking at Clints likeness when studying details for the ejector seat, and realised the CG scuplt I bought was much worse than I thought. So a silly amount of hours later, it actually looks like him.

What I bought on the left, vs mine, I really am proud of the difference, surprised myself.
After about twenty test renders pinned down a realistic base skin colour, discovered a noise bump map brings it to life, essentially simulating the micro skin variations.
Helmet has a slight reshape, and almost finished what I started doing which was detailing the ejector seat!

Might just put the creases back in his brow, will probably only take about an hour...
What I bought on the left, vs mine, I really am proud of the difference, surprised myself.
After about twenty test renders pinned down a realistic base skin colour, discovered a noise bump map brings it to life, essentially simulating the micro skin variations.
Helmet has a slight reshape, and almost finished what I started doing which was detailing the ejector seat!
Might just put the creases back in his brow, will probably only take about an hour...
Last edited:
Looks a bit rude
Are planning a kit, love that aircraft?
Firefox3D
Well-Known Member
So, I went to add the crease in his brow and quite a few hours later, the final version. Realised it looked ok to the side or partial, but head on but was way too wide and deep. Really done now as I could probably spend another day on it and not be any closer. Did a photo match in Sketchup and it's right on the money.
The fact that even at 1/24th his face is only around 5mm high... well once I started I had to get it right.


I will print a bigger one for the hell of it, 1/6th scale or so just see what it looks like.
Yes, Martin not far off now, I have a few things to finish, body parts are easy to print so those will be direct printed for the kit, still have to get a good engine print, but with my fixed printer that should not be a problem now.
The fact that even at 1/24th his face is only around 5mm high... well once I started I had to get it right.
I will print a bigger one for the hell of it, 1/6th scale or so just see what it looks like.
Yes, Martin not far off now, I have a few things to finish, body parts are easy to print so those will be direct printed for the kit, still have to get a good engine print, but with my fixed printer that should not be a problem now.
Similar threads
- Replies
- 6
- Views
- 1,325
- Replies
- 6
- Views
- 1,192
- Replies
- 5
- Views
- 1,761
- Replies
- 29
- Views
- 3,659