Randy Cooper Tantive IV Resin Kit

CAPTAINCOX

Sr Member
star-wars4-movie-screencaps.com-50.jpg


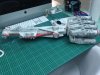
So I finally got my Randy Cooper Tantive IV (Blockade Runner) Resin Kit today...YAY!

IMG_1844.jpg
IMG_1847.jpg

There has been 4-5 builds of this kit on the net and its just such a beautiful kit. The ship only shows up like 10 seconds in ANH but its still one of the Clasic Star Wars ships of all times if you ask me.

There is of course some work too be done in terms of putty, fitting and sanding, normal with a Resin kit, but over all it looks ace.
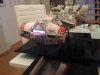
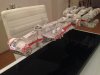
I put all the parts in a luke warm water bath with some soap/Dishwasher agent and will leave it there till the morn
IMG_1853.jpg

If necessary I will go over all the parts with a light wash of acetone before starting fitting/bondo/sanding.

I will post as I go along.

Regards
CPTCOX
 
This is a great kit really. The only fiddly bit is aligning all the engines nice and straight and evenly spaced. Take your time and you'll be fine.

Jedi Dade
 
Last edited:
The ship only shows up like 10 seconds in ANH but its still one of the Clasic Star Wars ships of all times if you ask me.
CPTCOX

Hey,it has a supporting role in Jedi too! And then there's some abomination that kinda, sorta, vaguely resembles its fatter, shorter, lazier cousin in RotS. Such a great, great design, and from the builds I've drooled over, such a great kit to boot!
 
Hey,it has a supporting role in Jedi too! And then there's some abomination that kinda, sorta, vaguely resembles its fatter, shorter, lazier cousin in RotS. Such a great, great design, and from the builds I've drooled over, such a great kit to boot!

True that...my bad ;).
 
It's a great kit, enjoy the build.
The proper alignment of the engines is where most builders struggle. Clamps, 15 minute epoxy and various jigs worked for me, with engineering squares, dowels, sanding on a plate glass sheet and viewing the engines resting on a mirror all help.
 
I will be watching closely, I've had my eye on this kit for a while now, and may just pull the trigger soon. Are there any mods that you plan other then lights?
 
I will be watching closely, I've had my eye on this kit for a while now, and may just pull the trigger soon. Are there any mods that you plan other then lights?
At the moment I am only planning to do the engines and maybe fixing the smaller cannons with some brass piping or something more accurate to the studio model proportion.
Just got home here and pulled out the ol Nailfiles and Sandpaper for some serious cleaning up, will for sure do some "unwarping" using Hot water later tonight. Plan is to have the kit cleaned up for the weekend and then start with fitting and I guess using up a lot of BONDO! love it!
 
Small update on the build. Had less time then I thought due to Work and Private stuff so its not moving along as fast I wanted it to, but no matter, patience is a virtue when building models or so say say.

thumb_IMG_1869_1024.jpg
The gaps are mostly covered with panels but I wanted to try to make the fit a bit better

thumb_IMG_1879_1024.jpg
So I put the parts in boiling water for a sec or two, checked the parts to each other and back in the water etc until I was sort a happy with the fit
thumb_IMG_1880_1024.jpg
Nothing that a bit of Bondo and Sanding will get rid of.

thumb_IMG_1863_1024.jpg
Fit and sanded the backplate of the Main Engine Block, bondo and sanded.

thumb_IMG_1864_1024.jpg
Sanded all the Engine Blocks to fit to the main body,
thumb_IMG_1865_1024.jpg
As they are not 100% mirror symmetrical and sort of individually sanded I had to number all the pieces for gluing later.

thumb_IMG_1873_1024.jpg
Made holes for all the engine cables, not so pretty but will not be visible later anyway

thumb_IMG_1875_1024.jpg

thumb_IMG_1874_1024.jpg

Was looking for a solution for the Engine Nozzles and found an old Tamiya Sturmgeschütz kit at home and thought the Drive Spoke will do the job, will cast it in clear resin later and fit some Warm Led's behind, think it will do the trick.
thumb_IMG_1877_1024.jpgthumb_IMG_1878_1024.jpg

Planning to get on with it on the weekend and will post as I go along.

Cheers!
 
Last edited:
I really like the drive spoke trick. I suggest you reinforce the main fuselage joints with some aluminum or pvc pipe. That is how I lost mine. This model is very heavy on the engine assembly and the resin alone might not be strong enough. Let's just say gravity and resin dont mix well. Anyway best of luck with the build.
 
Hi Guys

Totally forgot to post the final result here...my bad.

Anyhow some pics of the build and the final Model.

IMG_2332.JPG
Engines glued together, the hardest part like so many guys have said and I am not 100% happy with the result as they are not perfectly aligned...

IMG_2335.JPG

IMG_2353.JPG
Licht check for the bridge

IMG_2348.JPG
LED's glued in to the head

IMG_2360.JPG
Radar dish slightly modified with scratch built parts as I broke the original :p

IMG_2368.JPG
Gun current mounted

IMG_2477.JPG
Light check for the engines

IMG_2405.JPG
Red markings painted using some chipping fluid. The white base is a pure Tamiya matt White. After seeing the original models at Star Wars Identities in Cologne
(no Tantive but most of the other Models where there) I decided to use a pure white as a base as the original models looks like they where painted like that with a layer of weathered paint effects on top.

IMG_2401.JPG

IMG_2538.JPG
Started weathering using a mix of Oils for filtering and streaking and rust effects, Pastells for smudging and streaking.

IMG_2529.JPG

IMG_2483.JPG

IMG_2577.JPG
Final model mounted on a stand using a Polycarbonate plate painted from the back with black paint and screwed down with Allen Bolts

IMG_2575.JPG


IMG_2574.JPG

IMG_2570.JPG
I think the final result is pretty cool...even though the engines are not 100% aligned.

All in all a pretty cool project but Resin kits are for sure not as easy as it looks to build.
A lot of filling and fitting, sanding and Bondo work is required, but after all that is done its for sure one the highlights in my Star Wars collection.
 

Attachments

  • IMG_2365.JPG
    IMG_2365.JPG
    1.2 MB · Views: 323
  • IMG_2524.JPG
    IMG_2524.JPG
    2.8 MB · Views: 386
  • IMG_2554.JPG
    IMG_2554.JPG
    1.2 MB · Views: 390
  • IMG_2576.JPG
    IMG_2576.JPG
    1.2 MB · Views: 408
This thread is more than 8 years old.

Your message may be considered spam for the following reasons:

  1. This thread hasn't been active in some time. A new post in this thread might not contribute constructively to this discussion after so long.
If you wish to reply despite these issues, check the box below before replying.
Be aware that malicious compliance may result in more severe penalties.
Back
Top