"BATA" HLMF / HRMF Decals 90% done (95% hasbro parts HRMF build)

retiredadguy

Active Member
RPF PREMIUM MEMBER
The header should read "BETA:facepalm OPPppppss,...


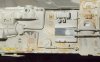
This is were I'm at concerning Millennium Falcon decals.
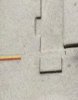
These are NOT to scale. use them at your own risk. To scale them correctly it will take you any were from 6 to 8 hrs:)

Oh and you'll need to figure out WERE they go on the falcon.:facepalm

Or you could wait until I'm done and buy a set with a placement sheet and dupes of the repeat decals all laid out.

JUST say'n.

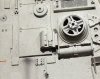
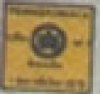
They are one of most of the decals I have been able to find on the falcon. I'm still about 10/12 to go yet.

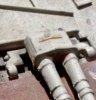
You will note their are more than the Ken Rice (sweet job by the way Ken) decal sheet.

I also have not included a few he has as I can not find them on my Mil Falc refrance shots.

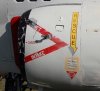
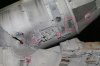
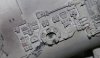
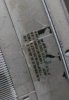
The reference I'm using is of the ANH 5ft version. WHY am I posting them? I'm looking for comments concerning accuracy.

If you spend countless hrs building a REALY accurate model wouldn't you want the same for the decals?

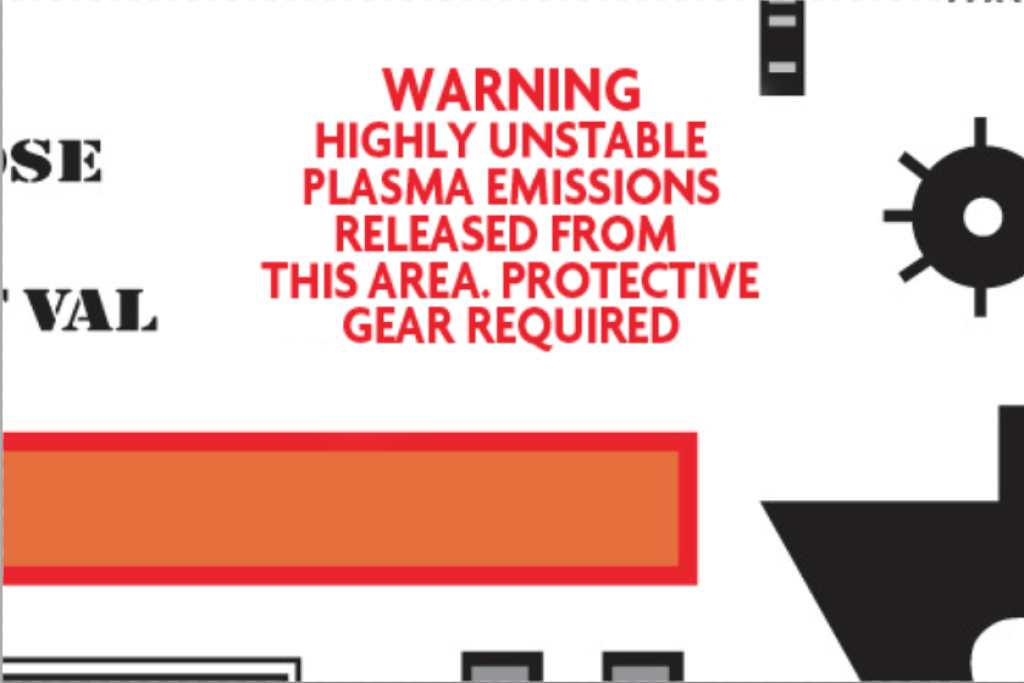
Concerning the verbiage. I can NOT read most of the warning labels. TOOOO small. So I have laid them out with the correct kerning and leading along with font weight to duplicate the look when they are reduced in size. Along with the line count.

Here is an earlier post about the same:
http://www.therpf.com/f11/beta-decals-5ft-anh-version-hasbro-rebel-millennium-falcon-233186/

Soo HHEErrreeee we go,....

HLMF_Decal_1b.jpg

Click it again after the image loads for a larger image.

Thanks for your input in advance, with the goal of making a realy accurate set of MLF decals.

Best regards,

P.S. PLEASE at this point do not PM me about buying them.:) not ready yet.
 
Last edited:
Hey, those are looking great! I did notice the word 'maintenance' misspelled when used on a couple - was that intentional? Also, the word 'authorization' next to the 'RESCUE' arrow and the letter "C" in Champion is Caps - all letters should be same size (Google for the logo to see what I mean.) Spell Maintenance.jpg Regards, Robert
 
I don't know where any of these things go apart from a couple but I have to say bravo :)
I just need to make it look right and these will be more than good enough for my eyes I'm sure. Many thanks

You have 42 posts by the way. Its a landmark.
 
Sorry, I'm just proofing this piecemeal since I don't know when the EDIT will cutoff on my posts... on the "cummins powered' strip, the lettering doesn't fill the space like the original and the words are Cap & Lower characters, plus the middle black stripe should be a triangle.

I'm trying a technique using Google Image search (where you go to Images and click the tiny camera in the Search field to select a file for a 'visually similar image' search. I hope it will help track down some of the graphics...
 

Attachments

  • cumminspowered 2.jpg
    cumminspowered 2.jpg
    14.9 KB · Views: 264
  • cumminspowered.jpg
    cumminspowered.jpg
    2.7 KB · Views: 2,794
Here is another missing item: Autolite Spark Plug logo appears on starboard outer mandible "wall" on a can shaped greeblie.
 

Attachments

  • logo_autolite_lg.jpg
    logo_autolite_lg.jpg
    48.1 KB · Views: 298
  • fwd_strbd_mand_circular cross logo_location.jpg
    fwd_strbd_mand_circular cross logo_location.jpg
    9.7 KB · Views: 363
This marking on the forward starboard mandible 'wall' looks like a graphic for a wheel hub with bolts (?) but is drawn as a 'toothy wheel'. The extensions from the circle should be separate points, not lines. Also, the circle appears to be a dark gray with a black outline & a white center point.
 

Attachments

  • toothy wheel hub.jpg
    toothy wheel hub.jpg
    8.1 KB · Views: 269
  • toothy wheel hub_orig.jpg
    toothy wheel hub_orig.jpg
    8.5 KB · Views: 255
Last edited:
I've determined that the 'RESCUE' arrow decal on the forward starboard mandible wall is from an F-4E or F-4C kit, USAF in SEA camo markings. The yellow block has verbiage that reads (hash marks are line breaks): "PUSH TO OPEN / [rt justified black dot - the finger push button] / JETTISON CANOPY" Note: letters are all caps in stencil style. The black lettering block to the right reads: "PULL / HANDLE / TO JETTISON / CANOPIES"

I suspect much of the blocks of stenciling are from a F-4 Phantom kit given that the SEA camo scheme includes a great many such decals. If anyone has such in their stash, they can whip it out and give it a quick look over... I will later too.

One note for the tiny red circle and text adjacent to the 'Hwy 1' arrow graphic on the top of the cockpit - it is a 'pitot source' marking. So, should read 'STATIC PORT / DO NOT / PAINT'.

R/ Robert
 
Last edited:
The 'tiny house' marking on the outboard side of the cockpit 'tube' is composed of a yellow & black, diagonally striped square with 'clear' center square or circle, topped with an inverted red ejection seat warning triangle with white lettering (same as tiny one on top of cockpit tube.) The striped outline is from something like an F-14 or A-6 stencil that depicts the 'pull to eject canopy' panel yellow warning marking.

Updated: the decal appears to be exactly what shows in the second image, applied to the MF upside down; see post #25 for closeup.
 

Attachments

  • A6_canopy ejection panel.jpg
    A6_canopy ejection panel.jpg
    19.2 KB · Views: 268
  • tiny house marking.jpg
    tiny house marking.jpg
    2.1 KB · Views: 2,761
  • A6_canopy ejection panel 2.jpg
    A6_canopy ejection panel 2.jpg
    17.7 KB · Views: 270
Last edited:
Re: "BATA" HLMF / HRMF Decals 90% done (95% hasbro parts HRMF build)

Here are some items I've found on the 5-footer. This batch are under the cockpit tube and nearby, including a tiny trimmed piece of a logo, a couple of ejection seat warning triangles (small) a static port circle and a block of text that reads like the manufacturer's text from a decal sheet (I can make out the word Texas...) Perhaps someone can flip it and read out more...

- - - Updated - - -

Lastly for tonight, I found thin yellow and red stripes that are across the inner ends of the engine 'thrust flap actuators'. There is also a stray piece of one showing on the port top rear engine deck - which shows the colors better. Oh, I see you have included one already on the 'sheet' - sorry! Regards, Robert
 

Attachments

  • underside markings locator.jpg
    underside markings locator.jpg
    100.8 KB · Views: 456
  • static port n eject warning tri.jpg
    static port n eject warning tri.jpg
    66.2 KB · Views: 426
  • tiny trimmed piece of logo.jpg
    tiny trimmed piece of logo.jpg
    3.7 KB · Views: 2,777
  • under cockpit ET.jpg
    under cockpit ET.jpg
    12.8 KB · Views: 379
  • under cockpit text Texas etc.jpg
    under cockpit text Texas etc.jpg
    18.2 KB · Views: 363
  • port top rear engine deck stripe.jpg
    port top rear engine deck stripe.jpg
    13.3 KB · Views: 298
  • port top rear engine deck stripe located.jpg
    port top rear engine deck stripe located.jpg
    21.9 KB · Views: 324
  • engine flap strut stripe.jpg
    engine flap strut stripe.jpg
    65.2 KB · Views: 346
This is addictive! I found that the '1 arrow' marking is an 'Allied Movers' logo graphic under the ejection seat triangle. The black and white Allied graphic has the words "World's / No.1 Mover" under the third side's 'DANGER' in red. The warning triangle is offset slightly so the D in the overlapping DANGER is touching the side of the shield. So, you should push remove the 'California' add the DANGER (inverted) and the slide the triangle to the left (as oriented on the "sheet" so the right point lines up or nearly with the shield. There is also a small radius connecting the shield to the "stem".
 

Attachments

  • Allied Mover shield.jpg
    Allied Mover shield.jpg
    69.7 KB · Views: 346
Re: "BATA" HLMF / HRMF Decals 90% done (95% hasbro parts HRMF build)

I LOVE IT!!! This is just what I have been looking for,... MORE EYES!! As to spelling ,.. Just old eyes and illustrator doesn't spell check.:facepalm

I'm used to having stuff proof read. Which you guys are doing. thanks big time. Some of the graphics like the triangle in the cummins logo don't really show up when printed small nun the less I would like you to continue pointing out ANY corrections needed. I'll be adjusting them accordingly.
I'm also going to make the black lines on the logo thiner as they fill to much when printed really small. I noticed the champion logo when I was going over the falcon photos last night, just haven't corrected it yet.

I could use existing logos as such but i have found printing inconstancies due to vector graphics vs raster images so for constancy and scale issues it is better to re-creat them as needed.

I assume when ILM did the Falcon originally, they used found decals as opposed to creating custom decals ie I think most of the text are from aircraft models ect.

If / when anyone finds logos (Auto-light as example) the larger the file the better,

The auto light is a good exampl as it's 2.5 x 2.458 at 72 ppi so when scaled down it holds up and doesn't fill in so I can incorporate it without having any printing problems.

LOL I did not know thats what it was thks!

ANY graphic that you notice I'm missing feel free to note it and reference is greatly appreciated!!

My goal is to be as accurate as is practicably possible as the builds on this board deserve no less considering ALL the great examples I've seen to date.

THKS!! I'm looking to do a finale test version some time by the end of this month before they are scaled and laid out along with a placement guide. (the hard part)

Again, thks for the input more is better!:)

- - - Updated - - -

rbeach84,

LOL on the triangle logo!! I only did the california as it looks like an inverted road sign. good find! love it.
 
That's a great image. Well, I'm convinced and yet so many of us thought it was a Highway 1 sign.

As did I! But, getting into the Studio Scale threads, and stumbling on some nice, hi-rez images, I saw I 'ass-u-me'd wrong...

DaddyfromNaboo, what is "ADHS"? Is it similar to AMS (Advanced Modeler's Syndrome, aka "Anal Modeler's Syndrome"?)

Retired Ad Guy, I just hope, using your research & artwork as a starting point, that we can document the decals applied to the 5-footer as completely as possible for posterity, whether they are actually practical for printing or not. It is simpler to adjust for printing from a complete design than to go the other way, in my opinion... plus, who knows what the next round of printer tech will provide for us?

Kind Regards, Robert
 
Hey guys, here is the next challenge for this project: what is the yellow & black graphic that appears in (near as I can find so far) at least in three different locations; one is a partial that appears 'cut'. I've spend nearly 5 hours searching for it, or a better image of it but have had no luck. It is of such a form that it appears to be a placard type marking from an military vehicle, but the design in the middle *could* be a logo of some kind, possibly found as a sponsor graphic on a race car. I just can't get it clear enough to get any real traction. Perhaps someone has a nice picture of it or can drop by the Seattle museum and take a tight pic of it to clarify what it really is.

I thought perhaps it was an International Harvester logo in the circle (because of the asymmetric height in the middle area) though it also looks like a 'turtle' body to me. So far, Google Image search fails because the shape is so indistinct all it apparently can do it search on the color palette, which brings up a bunch of building interior scenes. I also thought the logo might contain a "W", but no luck with that rabbit-hole. So, I'm stumped unless someone recognizes it from a kit they've built.

R/ Robert
 

Attachments

  • maint access yellow_orig2.jpg
    maint access yellow_orig2.jpg
    22.9 KB · Views: 2,658
  • yellow design location.jpg
    yellow design location.jpg
    52.2 KB · Views: 340

Your message may be considered spam for the following reasons:

If you wish to reply despite these issues, check the box below before replying.
Be aware that malicious compliance may result in more severe penalties.
Back
Top