Seth Skywalker
Well-Known Member
Ah, I see, dummy me.Its right in the post.

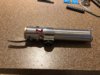
If you put cellophane gift wrap in there, it should help making the blade more evenly lit.
Ah, I see, dummy me.Its right in the post.
Ah, I see, dummy me.
If you put cellophane gift wrap in there, it should help making the blade more even.
Try sanding it, since it already has clear gift wrap inside the blade. Sanding helped with my blade as well. But you should exchange the battery anyways.It is there. The blade is a clear tube.
Try sanding it, since it already has clear gift wrap inside the blade. Sanding helped with my blade as well. But you should exchange the battery anyways.
I suppose he could do it, or if you are fine with a little bit soldering you could do it yourself.I wonder if LDM would do it since this is his saber.


I could probably swap the battery for you if you're not comfortable with it.I suppose he could do it, or if you are fine with a little bit soldering you could do it yourself.
Thank you for your kind wordsHey @Bengrim09 ! I love the inscription on the little plaque! It makes the gift very special and personal.
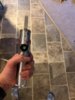
Is that ray skin under the paracord? I see the little Aux button hidden under there too!
Too bad that it doesn't have an LED for a flashlight, this would make for a fantastic survivalist's lightsaber. Chops down wood...CHECK. Starts fires...CHECK. Comes complete with cordage...CHECK.
What's the inner part of the emmiter made from? Is it a spring, or part of a shower head or something?
I think my favorite part of this one is the coin edged (flashlight endcap?) part in the front of the clamp.
Congratulations on a saber well-built!
mmmmmm very nice, very nice indeed
This is a shiny one! Nice work!
Guess you’ll have to wear gloves when enjoying these. :cool
Right on, what sort of trickery have you used in the past?With some trickery, yes. Can you just pop them on? No.
I have several sabers in these pages that use both.
Right on, what sort of trickery have you used in the past?