Apotheosis
New Member
My six year old son, having watched the first Captain America movie and the Avengers decided he wanted to be Captain America too. Since we don't have any native super heroesin New Zealand and I think Cap is pretty cool I had no objections. Jack has a can do give it a go attitude and set out building his own costume.

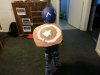
So Jack used paper mache over a balloon and then used my vallejo acrylics to paint the helmet


He used some cardboard to make the shield and crayons to do the reds, and he hand cut a few dozen pieces of white paper and glued them on to make the silver circle. Then he made a pentagonal star and pasted it on. Looking sharp their little guy.
Sadly the helmet was egg shell thin and show and tell was taxing on on it and it was destroyed.
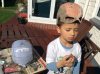
Fear not my little friend, for daddy has seen people make things out of fibre glass before. So a few googles later and we have discovered pepakura and the free cap pro file.
Not really believing this was at all possible, i decided a quick print and sellotape was in order.
Captain America The first Prototype:

So I can see how this might work. I dispatch the wife to buy some decent card stock. But while I'm waiting I thought I'd have a crack at using plain on cardboard, so we glued the pep onto the cardboard we liberated from an old box we had and hey presto!

And damn thats a nice fit. Now in hind sight, we should have stopped here and painted it. But sadly my ambition exceeds my talent so...Time to send the wife on a run to buy some FG resin and some builders mix (Bondo)

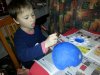
Good habits start young, here's Jack sanding! he hates sanding! He better learn to love it he he hopes to do more of these in his future.

I had untold trouble with the rondo. The FG resin the wife procured used a very slow harder, something like 2 hours. But it was taking several days to cure. I tried brushing mover hardener over it and it seemed to help. (We did measure the qty. per the bottles specs and used a gram scale to do it. No eyeballing it here. Being the firm believer in testing as we build Jack decided to through the 'hat' on. Oh Dear!

Jack learnt some new words and Dad decided to have a bourbon and Jack was bribed with a mars bar. Back to the drawing board.
So Jack used paper mache over a balloon and then used my vallejo acrylics to paint the helmet
He used some cardboard to make the shield and crayons to do the reds, and he hand cut a few dozen pieces of white paper and glued them on to make the silver circle. Then he made a pentagonal star and pasted it on. Looking sharp their little guy.
Sadly the helmet was egg shell thin and show and tell was taxing on on it and it was destroyed.
Fear not my little friend, for daddy has seen people make things out of fibre glass before. So a few googles later and we have discovered pepakura and the free cap pro file.
Not really believing this was at all possible, i decided a quick print and sellotape was in order.
Captain America The first Prototype:
So I can see how this might work. I dispatch the wife to buy some decent card stock. But while I'm waiting I thought I'd have a crack at using plain on cardboard, so we glued the pep onto the cardboard we liberated from an old box we had and hey presto!
And damn thats a nice fit. Now in hind sight, we should have stopped here and painted it. But sadly my ambition exceeds my talent so...Time to send the wife on a run to buy some FG resin and some builders mix (Bondo)
Good habits start young, here's Jack sanding! he hates sanding! He better learn to love it he he hopes to do more of these in his future.
I had untold trouble with the rondo. The FG resin the wife procured used a very slow harder, something like 2 hours. But it was taking several days to cure. I tried brushing mover hardener over it and it seemed to help. (We did measure the qty. per the bottles specs and used a gram scale to do it. No eyeballing it here. Being the firm believer in testing as we build Jack decided to through the 'hat' on. Oh Dear!
Jack learnt some new words and Dad decided to have a bourbon and Jack was bribed with a mars bar. Back to the drawing board.