My HIC Build 2014!

Warpcell

Active Member
IMG_2552.JPG

Hi Guys,

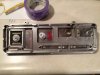
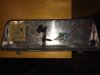
Well after a year or part sourcing and procrastination, my first ever HIC build is finished.

Here are some pics of the project.

The front panel and the Volvo panels are from Stormrider, the box and 3D printed greebs are from Zenix, and model jag did the electronics for the Hero Panel. All 3 guys produce a fine quality product.

The paint codes are on the paint code thread on TDH. I took great care to weather the block and volvo panels. I wanted it to look like it flew across the galaxy to reside in the desert for a few years. Hahahaha!
http://www.thedentedhelmet.com/f61/paint-colors-49944/


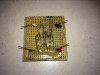
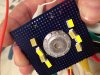
And the lighting display is also on TDH.
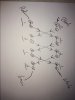
http://www.thedentedhelmet.com/f61/lighting-idea-your-hic-display-49862/

Quick note.....

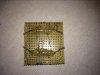
I recommend using a solid piece of plywood on the front back of the HIC. This is a very solid foundation for the frame and makes Han's installation that much easier. The trick is getting the angles correct because essentially you are cutting 2 large trapezoids intended to fit in the frame. As a result, I was able to get it to weigh in at 115 lbs when completed. I built a middle sub-frame as the foundation for the piece. The solid panels give you total control of how you want to hang it and I was able to put a sweet magnetic access panel in the back along with a remote LED kit.

Anyway, hope you like it....

IMG_2292.jpgIMG_2293.jpgIMG_2372.jpgIMG_2375.JPGIMG_2412.jpgIMG_2423.jpgIMG_2427.jpgIMG_2429.jpgIMG_2431.jpgIMG_2483.jpgIMG_2507.jpgIMG_2512.jpgIMG_2527.jpgIMG_2525.jpgIMG_2547.jpg
 
Last edited:
Looking great buddy. Im finishing up on my HIC aswell. I definitely want to hang it on the wall with the rear LED light aswell. Great work!!

I got most of my parts from the same suppliers except the box I made myself & the top and bottom cup recesses were from Moncal.
 
Be sure to post some pics when you're done! I love seeing everybody's take on how they paint it. I'm subbing the recesses for the thruster/grill concept. Stage 2 will have a lit 2nd panel with lit red thrusters on a toggle switch so the red glow doesn't interfere with the wall lighting. I'm tempted to just leave the top and bottom out of it since no one ever see's it unless I pull it off the wall, but the OCD in me just won't let me do it. lol

Thanks for the compliment.
 
Very nice work! I love the paint job and think you did a perfect job with the weathering. I still have a few lighting kits left for sale although I haven't bought a seller account yet to advertise them here since the junkyard changed.

Regarding your question on adding some of the rectangular yellow LEDs to another panel - this could be done but I just don't have the spare time I used to to develop the kit further. You would just need some 5V LEDs and appropriate resistors depending on how bright you want them, then you can splice in to the +5V line on my kit to power them. There aren't enough unused outputs on my kit to specifically control flashing of many additional LEDs. You could add more LEDs to always be on, or rig up your own mod to alternate their flashing. I'm thinking you could do this with a 555 timer circuit but you'd need to figure out the details. No matter which route you pursue, you can use my existing kit's 5V to power it.

-Jon
 
Hey Warpcell I hear you on the top and bottom recesses, they will NEVER be seen but I will always know that they arent there lol so I did them.

I'm also about to try making the second panel as well.

Another member pointed me in the direction of a apparently simple build it yourself flashing LED kit and rectangular yellow LEDs that I bought from from Ebay.

The kit has 2 flashing LED's and instead of installing them you connect 2 top, 2 bottom yellow LED's to the LED1 spot on the electronics board and the remaining 2 top & 2 bottom yellow LED's to the LED2 spot on the electronics board so the all flash alternatively like the real prop.

I'm just going to attach all the yellow LED's to a PCB board that i will probably spray paint black. I'm going to connect these electronics to a second rotary switch on Modeljags light up first panel to switch it on and off. Just means having 2 power supplies. Hope it all goes well because I have NOOOO idea when it comes to this electronics stuff lol.

.IMG_4136.JPG

IMG_4144.JPGIMG_4139.JPGIMG_4146.JPGIMG_4138.JPG

Sorry about the crappy pics but they make the HIC also look square which it isn't, its a trapezium shape from the HIC box blueprints. The HIC was from Kingjawa and was just han cut into 3 pieces so I had to join them all up and create my own carbonite look around him. I might do a little more weathering and nearly finished.

Here is a building pic of when I installed the Moncal recesses.
63.JPG
 
Last edited:
Joshimus!!! Thank you for that tip!!!!!!!! I will start working on that immediately. BTW - your HIC looks great. You did a great job rounding the edges and the paint scheme looks tight.


Sent from my iPhone using Tapatalk
 
Thereynotdolls, I used a French cleat system attached to a 2x3. The cleat is mounted into drywall with toggler toggles rated a 200 pounds. Here's a pic of it...

ImageUploadedByTapatalk1415078764.441456.jpg


Sent from my iPhone using Tapatalk
 
Awesome work Warpcell, I cant wait to get mine up and running. I cant take all the credit it was "juanmatroop" over at TDH that put me on the right path :)
 
Last edited by a moderator:
Thanks Joshimus!

Here are pics of my 2nd panel build out for others to reference.

I used a Velleman MK102 LED kit, wired 8 rectangular LEDs in series (4 per side alternating), and juiced it with a Velleman 3-12Vdc power supply set at 12V. The LEDs are just right on the brightness and still run cool.

I used Joshimus' brass screw method to essentially draw the board up to the clear acrylic window under the greebly by drilling a hole in the clear panel and though the perf board into the hot glue I used to take tension off of the connections. The screw is 3/4" long. It grabs the glue without shorting the board.

I was able to solder a new power connection to the MK 102 board. This allows it to plug into the adapter.

I used a remote switchable power outlet to power both Hero panels. This way I can kill the entire power supply at will. I think it's a good safety feature even though the boards run at 5V and 12V respectively.

Thank you to this community for helping complete the project!

Here's a YouTube vid of my costume corner with the panels looking awesome. I have 1 more u clip to put on panel 2 do to an error in the shapeways order. It's on the way!

http://youtu.be/GZpta80iNkM

Cheers!

Warpcell


Sent from my iPhone using Tapatalk
 

Attachments

  • ImageUploadedByTapatalk1415981689.901174.jpg
    ImageUploadedByTapatalk1415981689.901174.jpg
    312.8 KB · Views: 130
  • ImageUploadedByTapatalk1415983022.071541.jpg
    ImageUploadedByTapatalk1415983022.071541.jpg
    368.5 KB · Views: 123
  • ImageUploadedByTapatalk1415983046.077224.jpg
    ImageUploadedByTapatalk1415983046.077224.jpg
    278.9 KB · Views: 108
  • ImageUploadedByTapatalk1415983055.194111.jpg
    ImageUploadedByTapatalk1415983055.194111.jpg
    173.6 KB · Views: 116
  • ImageUploadedByTapatalk1415983064.317010.jpg
    ImageUploadedByTapatalk1415983064.317010.jpg
    206.1 KB · Views: 120
  • ImageUploadedByTapatalk1415983081.550296.jpg
    ImageUploadedByTapatalk1415983081.550296.jpg
    257.2 KB · Views: 108
Just started my build and im having a problem judging the size of wood to use. Could you share your dimensions of the front panel please? Im not doing a trapezoid as its beyond my woodwork skills. Many thanks.

Should mention that at the moment I've laid out a 2 1/2 foot sheet but it doesn't look right.
 
Last edited:
Here ya go CelticWarrior. Straight from the HIC Builders sight. Good luck with your build! For the record, if you're able to come up with the cash, Zenix HIC Frame is highly recommended.

!CarboniteBluePrintBoxUS.jpg
 
Thanks for the info. i did try to buy a Zenix but Im in the UK.

I had those plans orginally but it just doesnt seem 'right'. Going to remeasure it all again tomorrow.
 
This thread is more than 9 years old.

Your message may be considered spam for the following reasons:

  1. This thread hasn't been active in some time. A new post in this thread might not contribute constructively to this discussion after so long.
If you wish to reply despite these issues, check the box below before replying.
Be aware that malicious compliance may result in more severe penalties.
Back
Top