Thanks! We actually did make a vid of one of my vacuform pulls, but then my wife's phone blew up before we got the video off and it was lost. I probably won't make another soon as the whole thing is disassembled and I have all the parts I need. Not much to see, it all happens really fast. I'll post up some pics of the process and a better explanation this week if you're interested though. My setup is based on this Instructables article, much simpler than a multi hole platen and works well. If I have time I'll be trying to vacuum some bubble eyes, I'll grab video of that if/when I get to it.
Most of the work I got done this weekend is cleanup, not a lot to show, but I did get a start on the back circuit board, and finished the metal greeblies on the chest box.
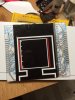
The back circuit is cut from a piece of 1/8" thick clear styrene ($2 from Home Depot). I'm using silver vinyl and a paint pen to make the circuitry, tracking from a template I drew up in Illustrator (basically traced from MonCal's piece). Then I'll back paint the yellow/green circuit board color, should look pretty good. I resisted temptation to try to custom etch and actual board, which would look awesome. I'm not going to use the bug box, though it's accurate I don't really like the way it looks.

The various round greeblies are cobbled together from washers and screws and little metal bits, mostly from Ace hardware which has a great selection of fiddly bits. Some gnurled parts are lamp knobs. The left greeblie above the LED display is a guitar strap button, a great match for the real part! The gear is a resin cast of a lamp switch, a gear from a wrapping tape dispenser, and some plastic sheet. Still need to paint it.


The lower greeblies are scratchbuilt from plastic sheet, scrap box bits, and some finish nailer brads bent 90 degrees, sandwiched in plastic. The backing is textured metal tape I picked up for a lightsaber project some years ago.


So, the chest box is mostly done, time to finish up the helmet and figure out how to actually wear the armor parts!
Most of the work I got done this weekend is cleanup, not a lot to show, but I did get a start on the back circuit board, and finished the metal greeblies on the chest box.
The back circuit is cut from a piece of 1/8" thick clear styrene ($2 from Home Depot). I'm using silver vinyl and a paint pen to make the circuitry, tracking from a template I drew up in Illustrator (basically traced from MonCal's piece). Then I'll back paint the yellow/green circuit board color, should look pretty good. I resisted temptation to try to custom etch and actual board, which would look awesome. I'm not going to use the bug box, though it's accurate I don't really like the way it looks.
The various round greeblies are cobbled together from washers and screws and little metal bits, mostly from Ace hardware which has a great selection of fiddly bits. Some gnurled parts are lamp knobs. The left greeblie above the LED display is a guitar strap button, a great match for the real part! The gear is a resin cast of a lamp switch, a gear from a wrapping tape dispenser, and some plastic sheet. Still need to paint it.
The lower greeblies are scratchbuilt from plastic sheet, scrap box bits, and some finish nailer brads bent 90 degrees, sandwiched in plastic. The backing is textured metal tape I picked up for a lightsaber project some years ago.
So, the chest box is mostly done, time to finish up the helmet and figure out how to actually wear the armor parts!