1:1 Scale Rebel Snow Speeder

godoftoy

New Member


01 by godoftoy, on Flickr

Hi everybody!


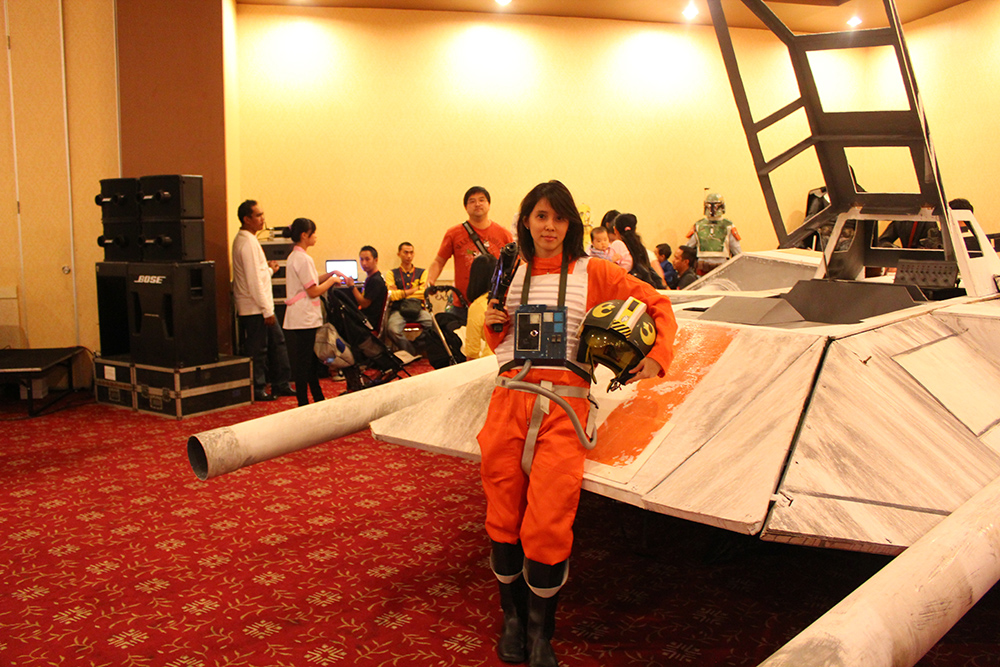
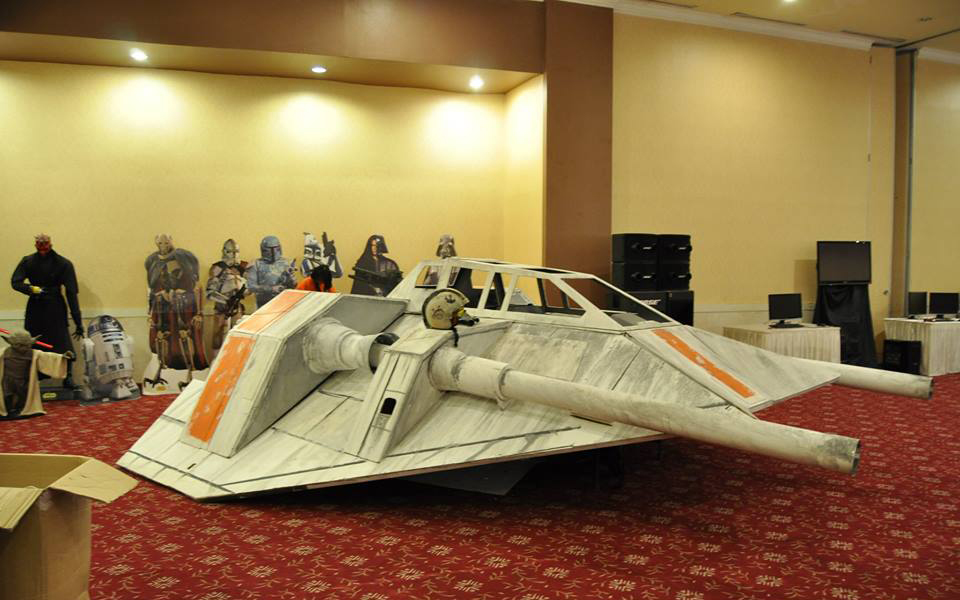
I just want to share a project that wedid in Indonesia last year, a life size Snow speeder ship, before Icompletely forgot about the whole process.


For the background, I am from Bandung,Indonesia, and here we got a pretty massive home grown Star Wars clubcalled 'Order 66'. There are two chapters, the Jakarta Motherchapter, and the Bandung chapter.
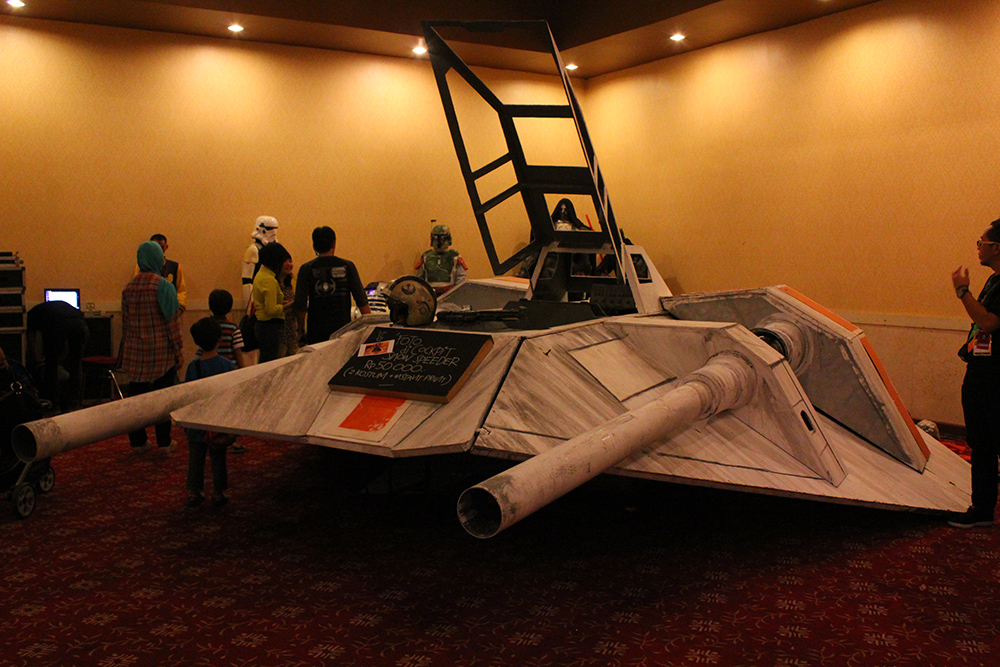
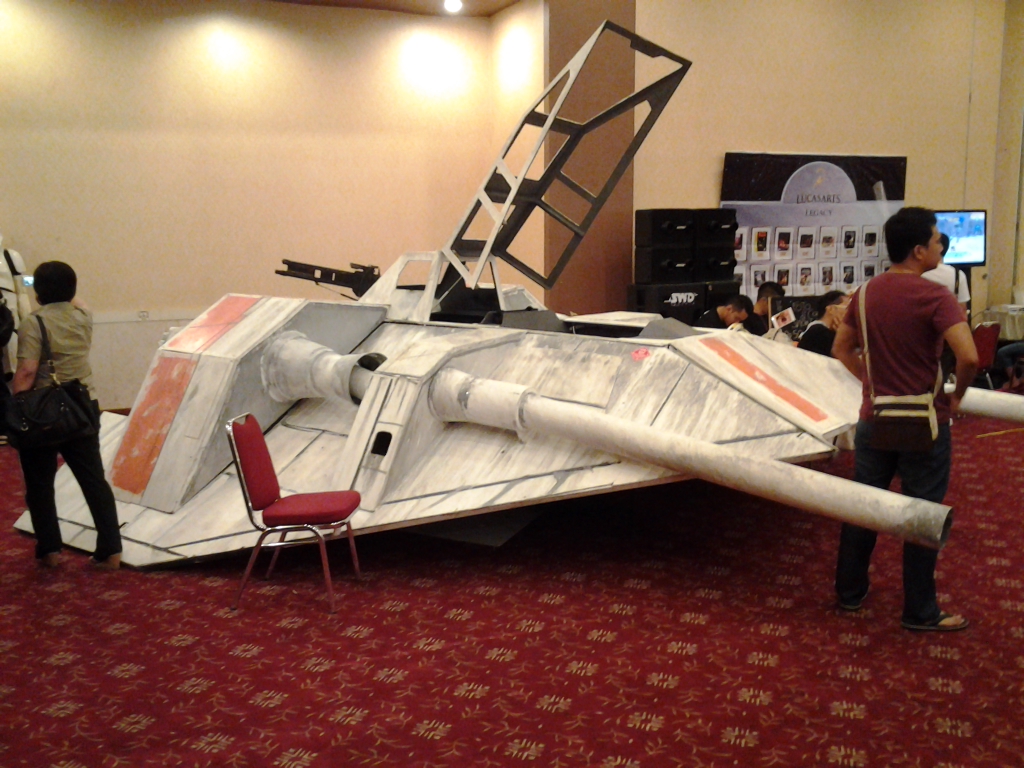
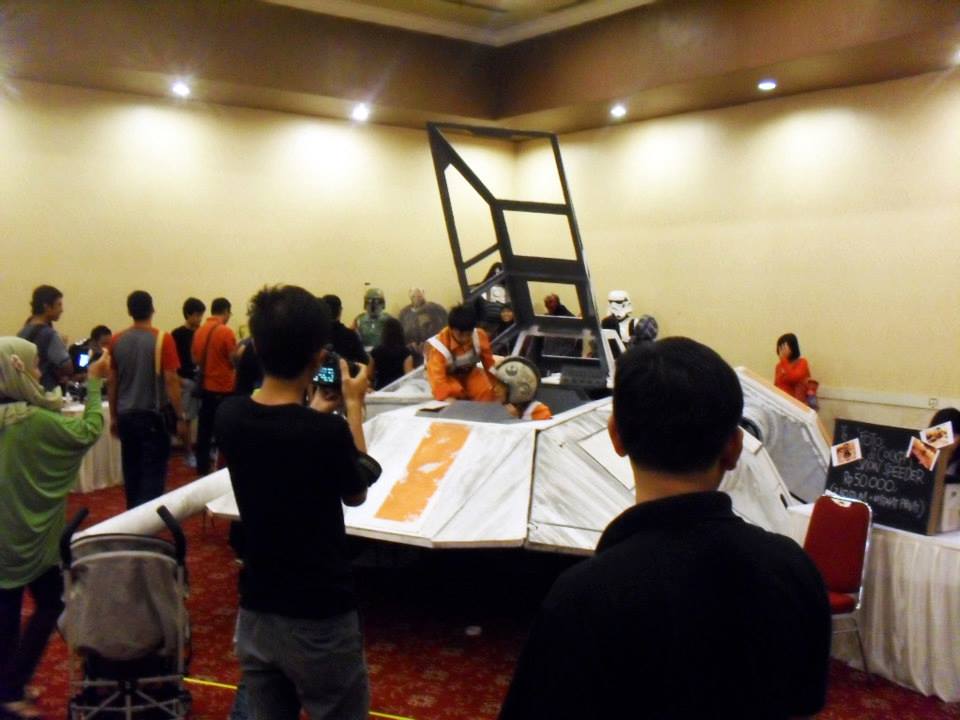
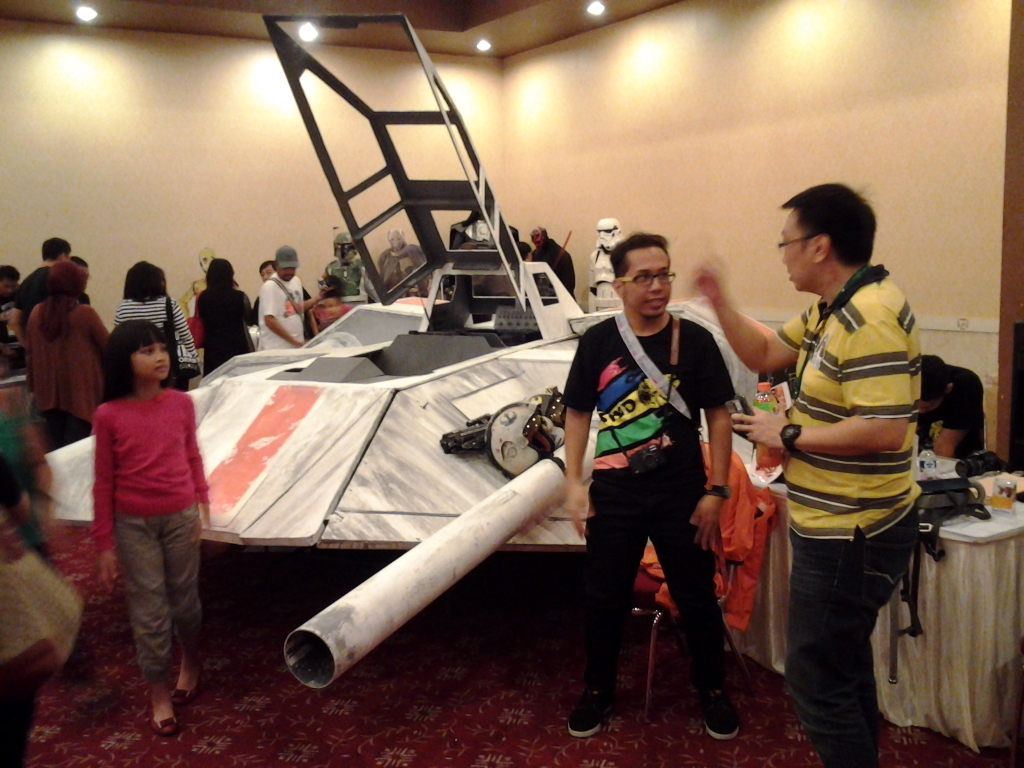
For the last three years, we hosted ourown Star Wars convention (called ,depending on the city it was hostedon: SWDBDG, Star wars Day Bandung or SWDJKT, Star wars Day Jakarta).It has grown quite large over the year, attracting more than 15000visitors on our 2014 event.


Anywaaaay,
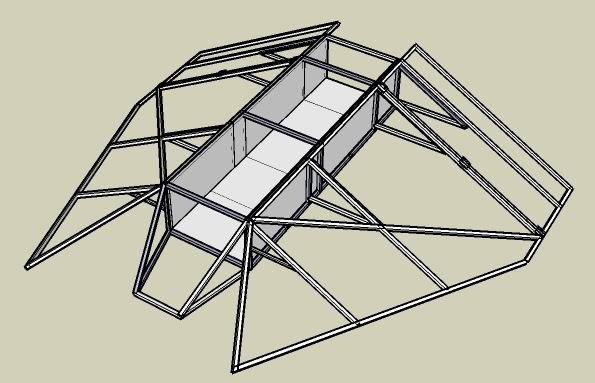
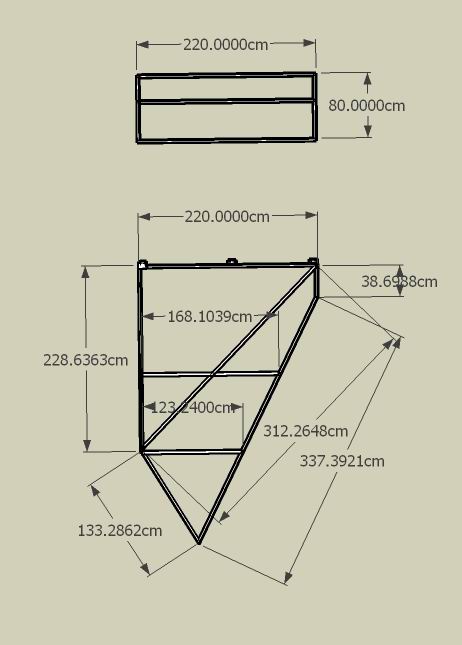
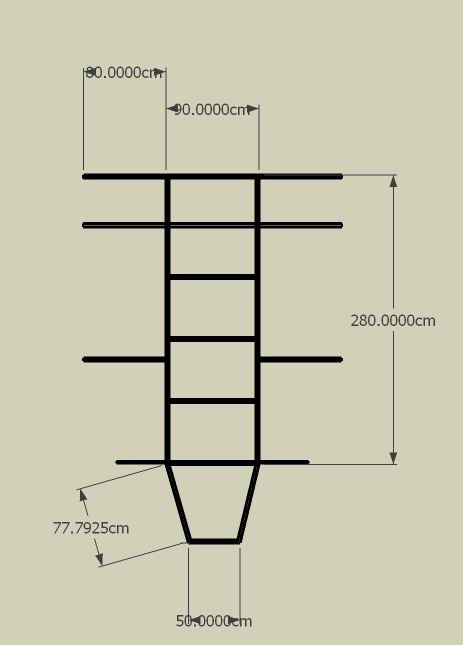
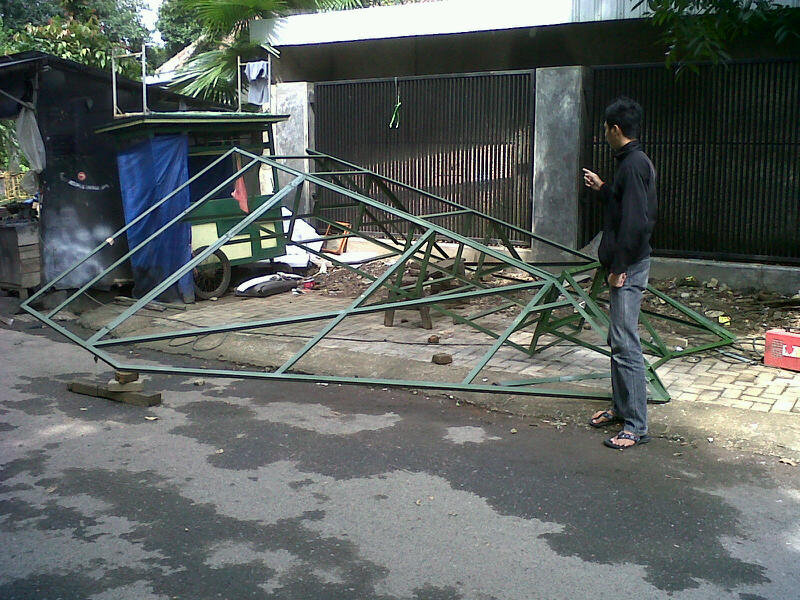
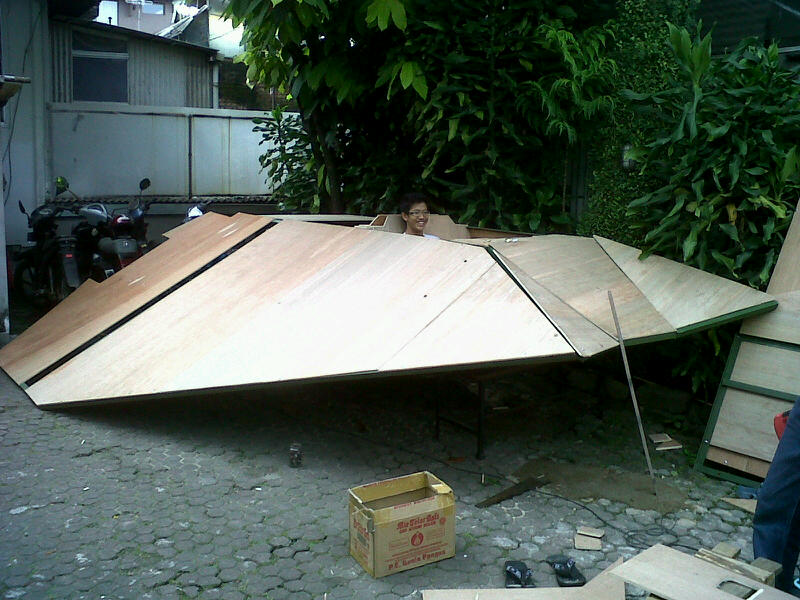
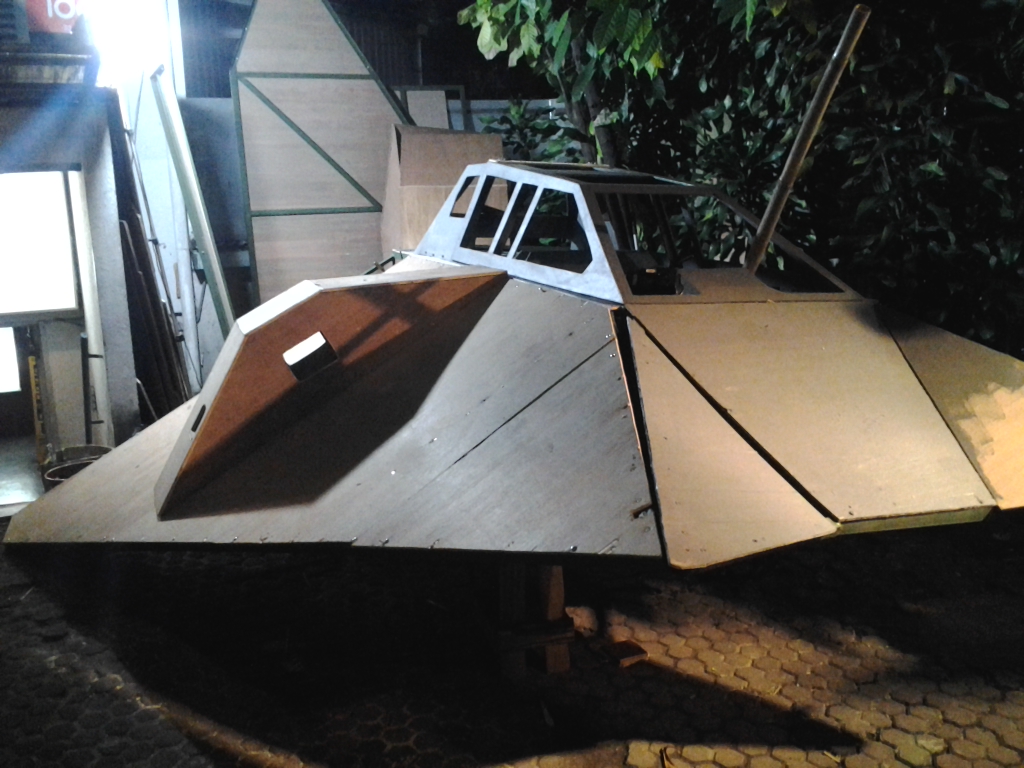
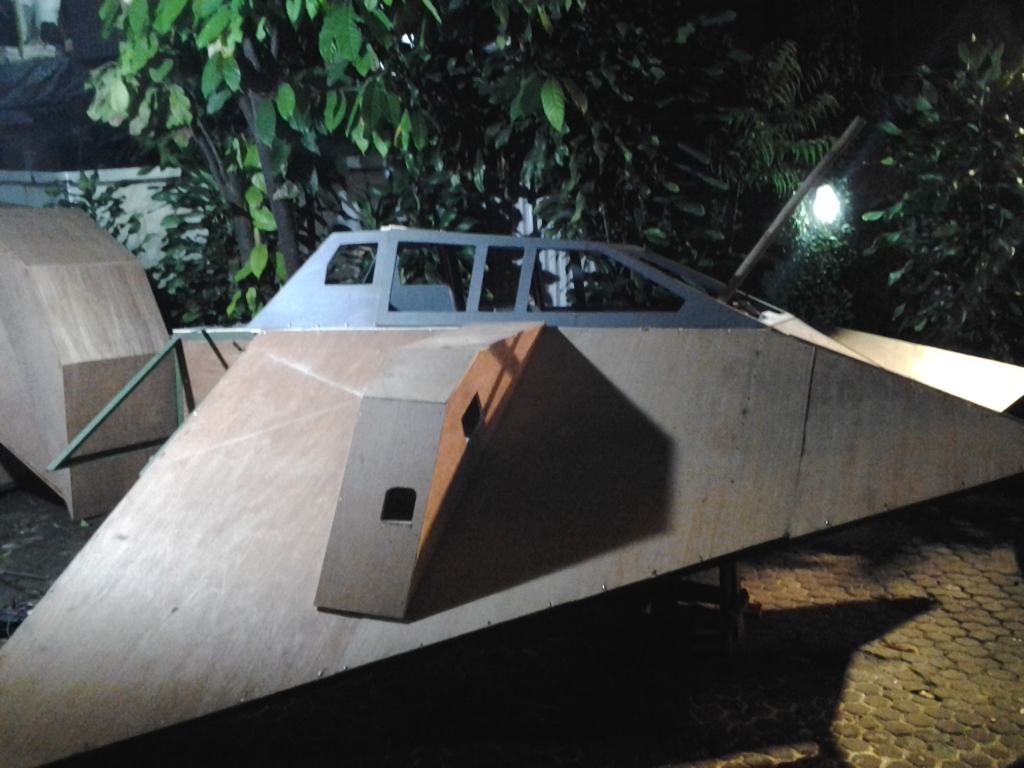
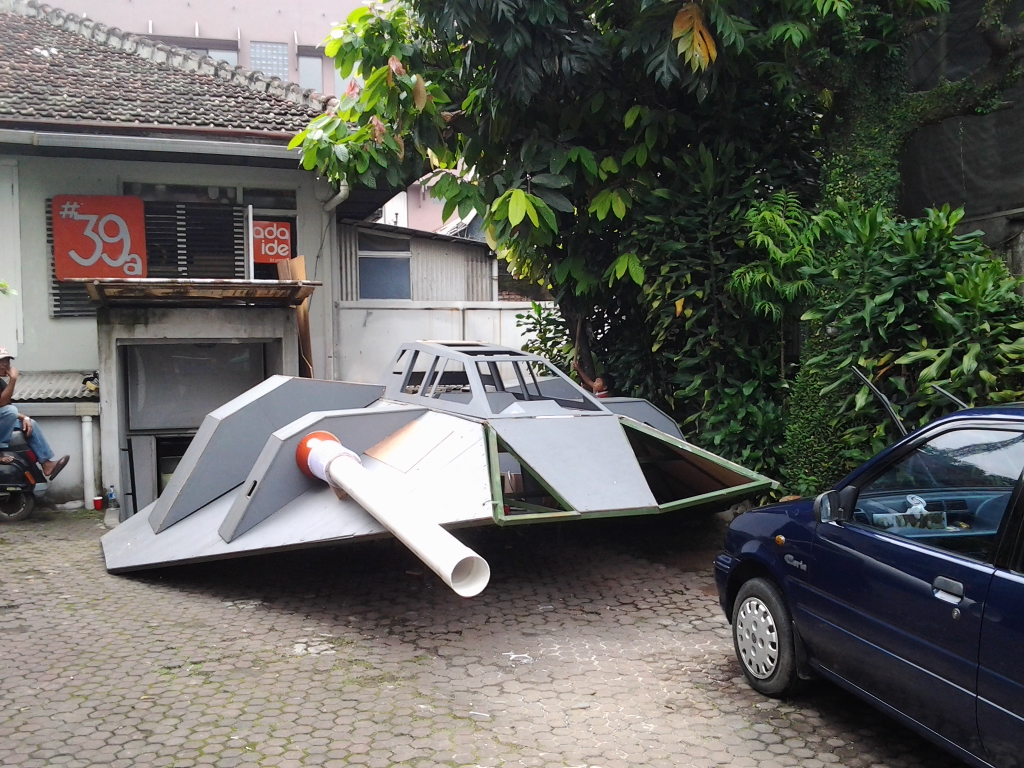
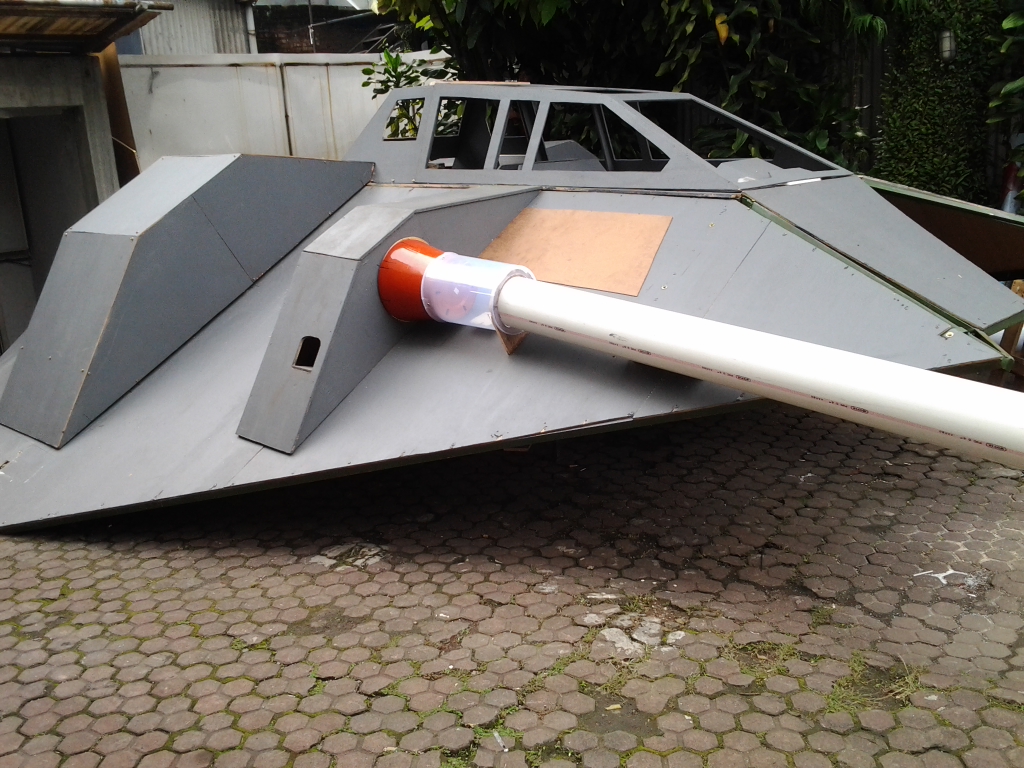
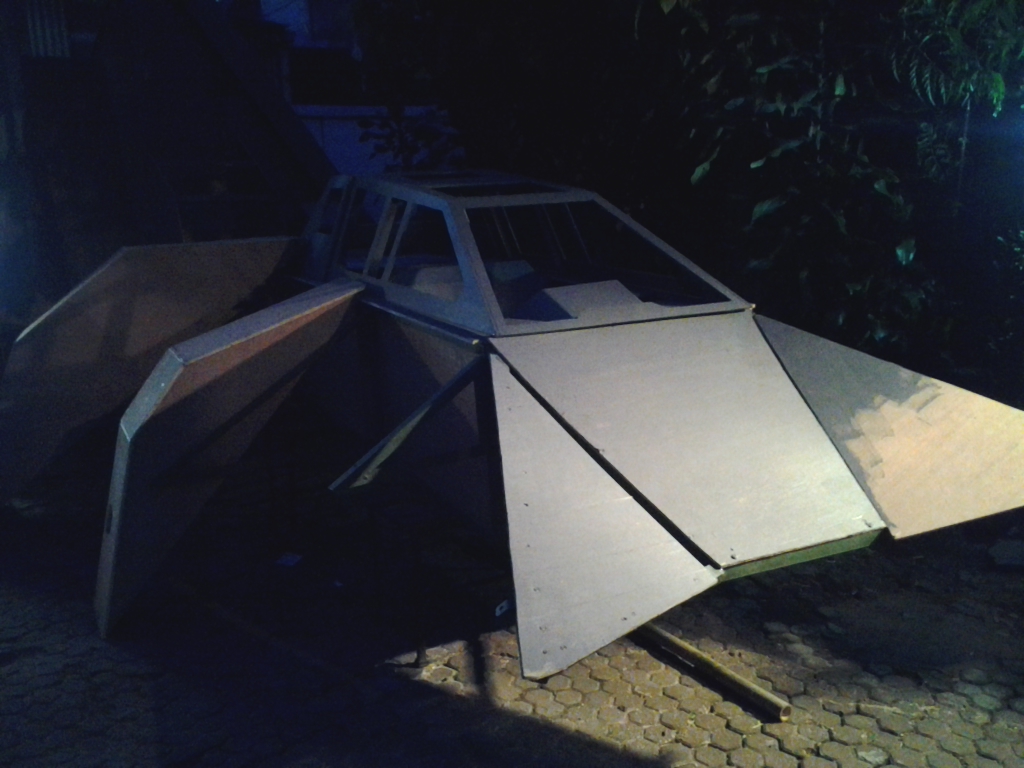
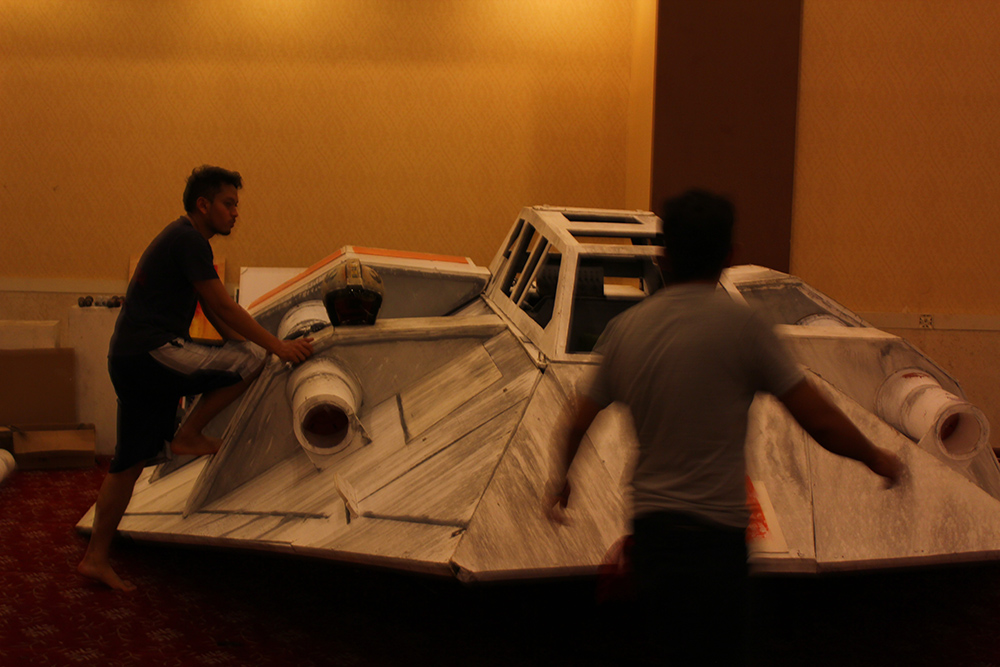
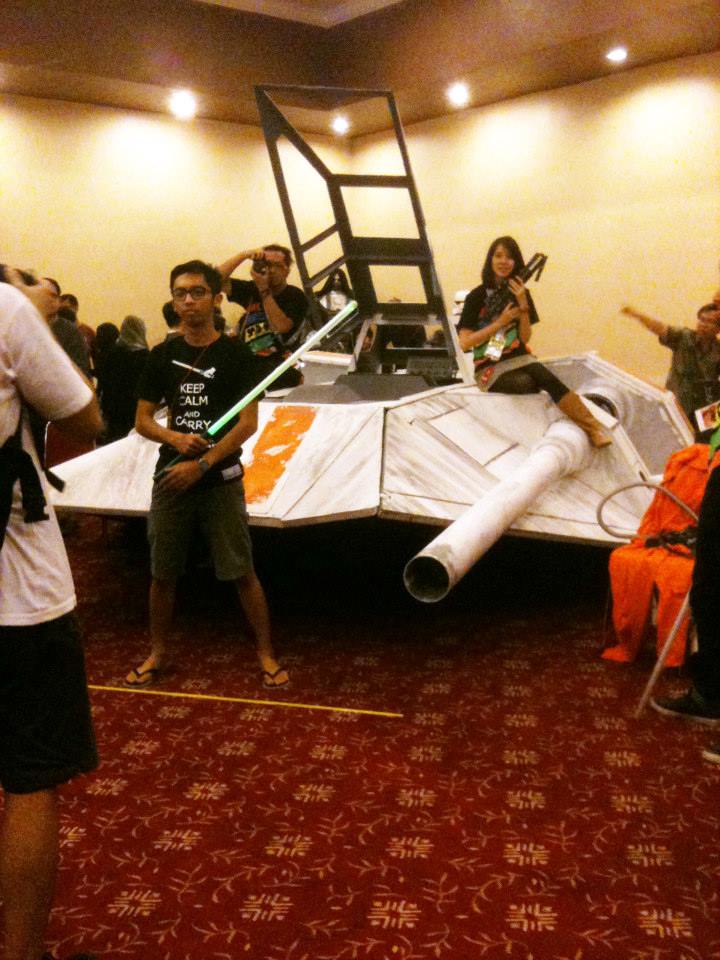
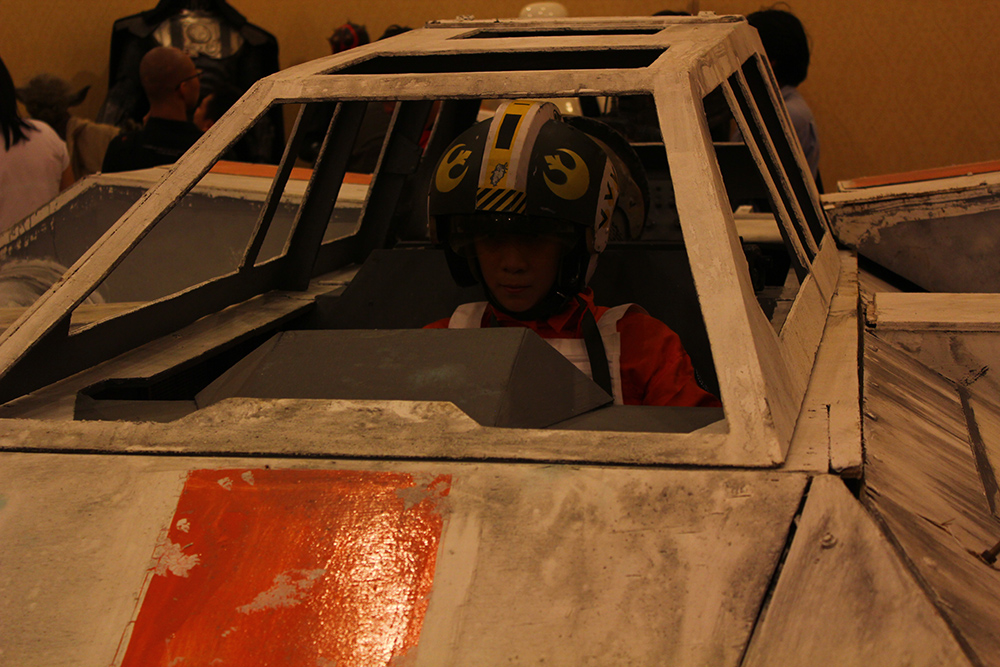
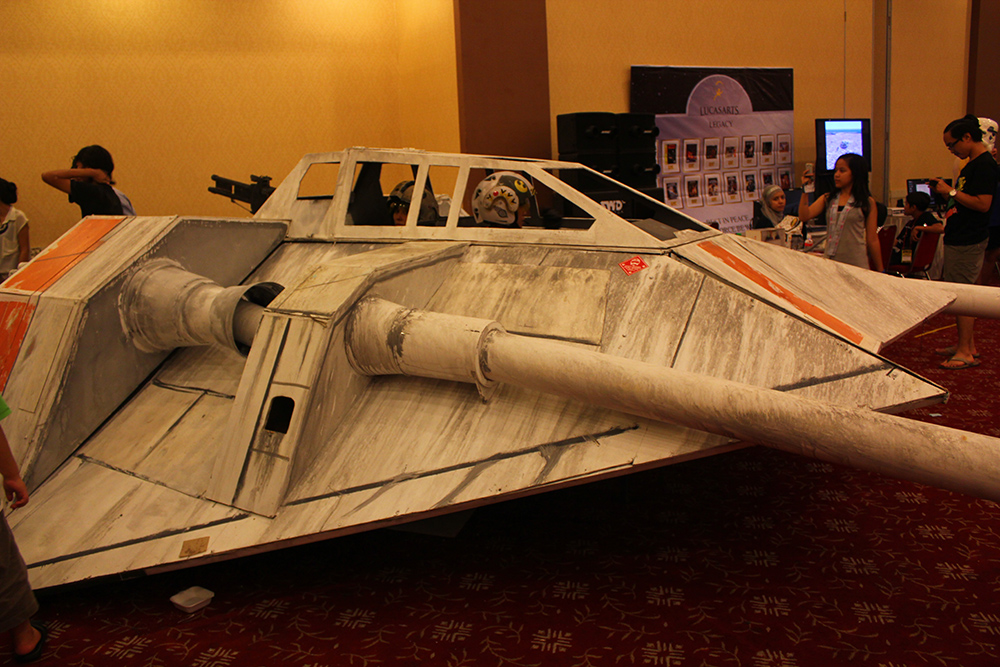
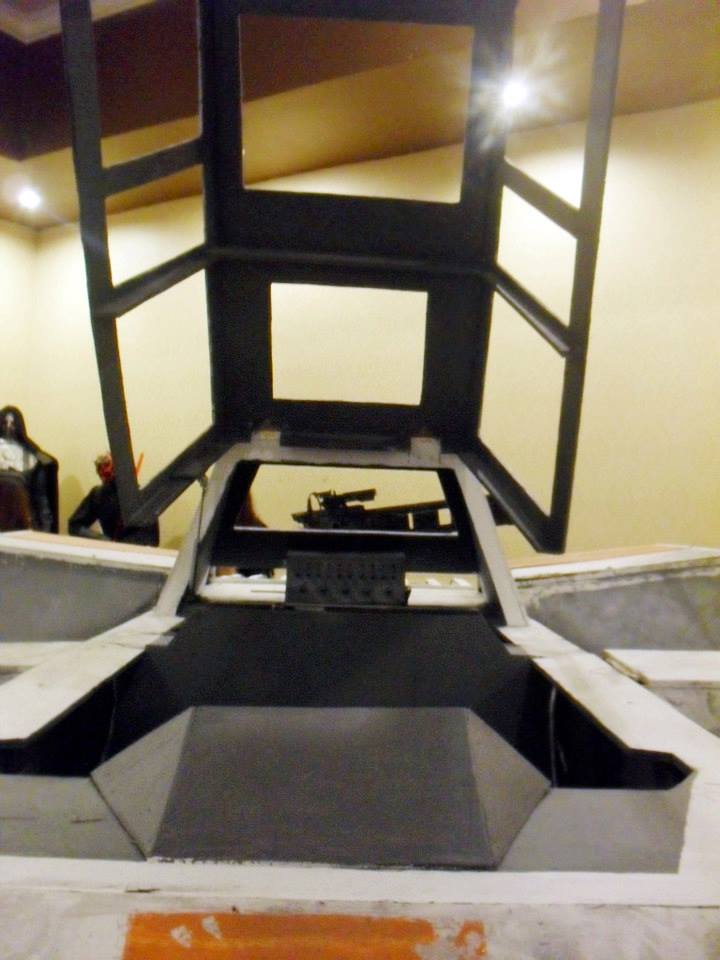
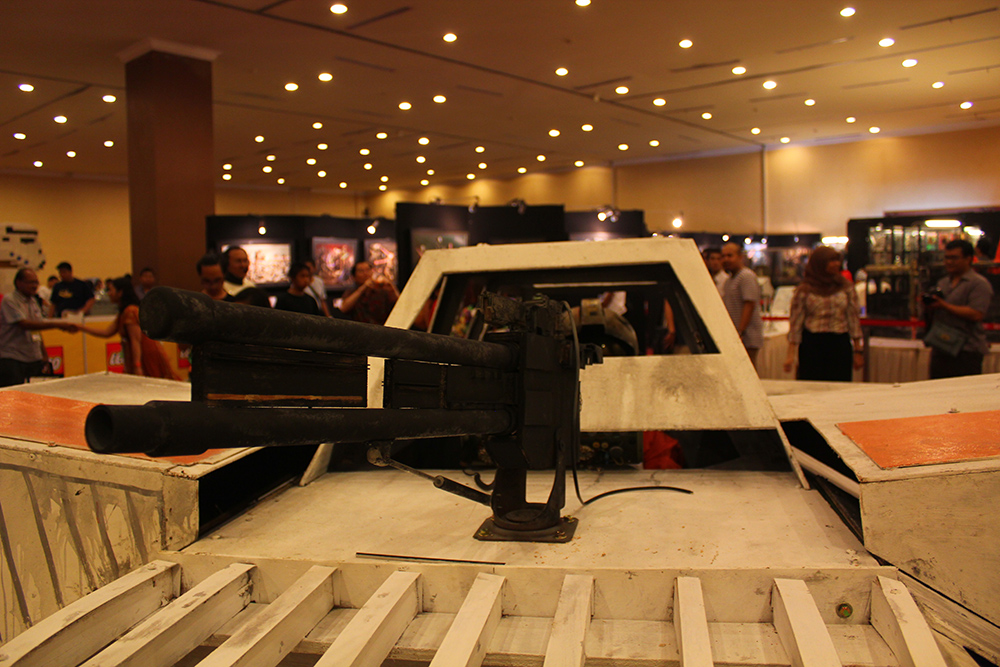
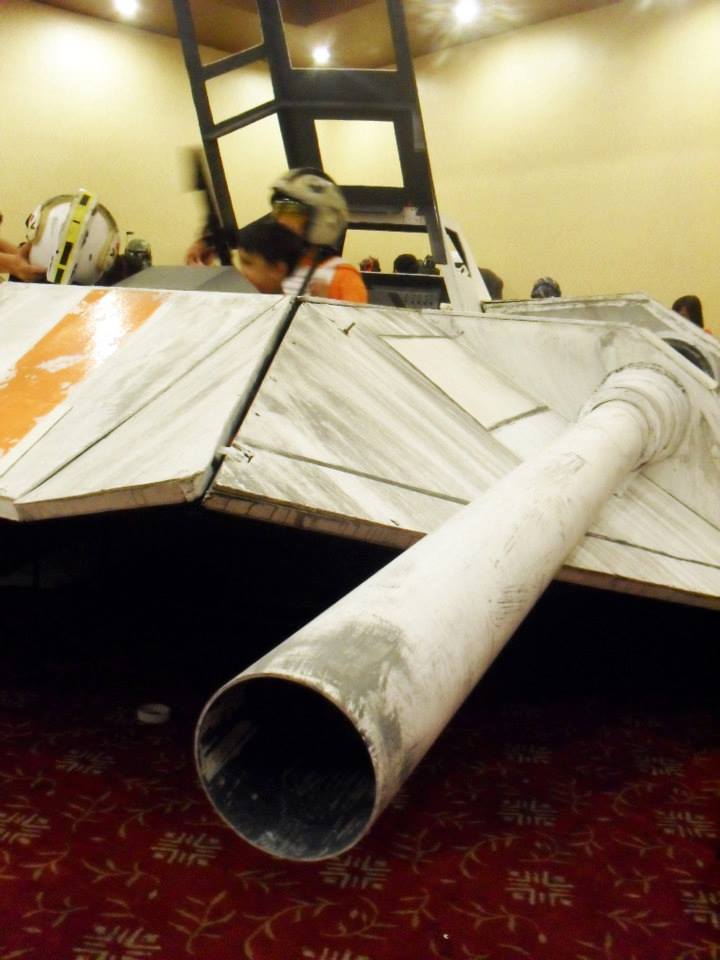
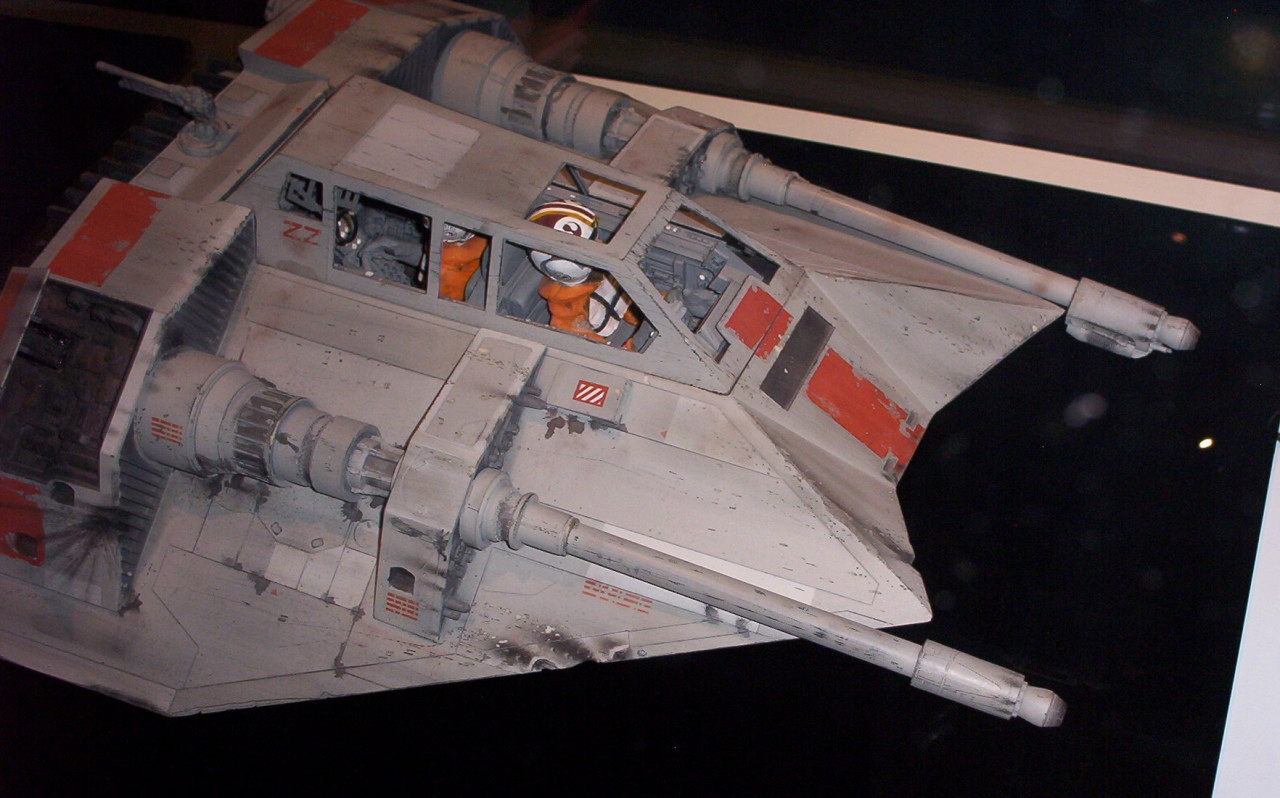
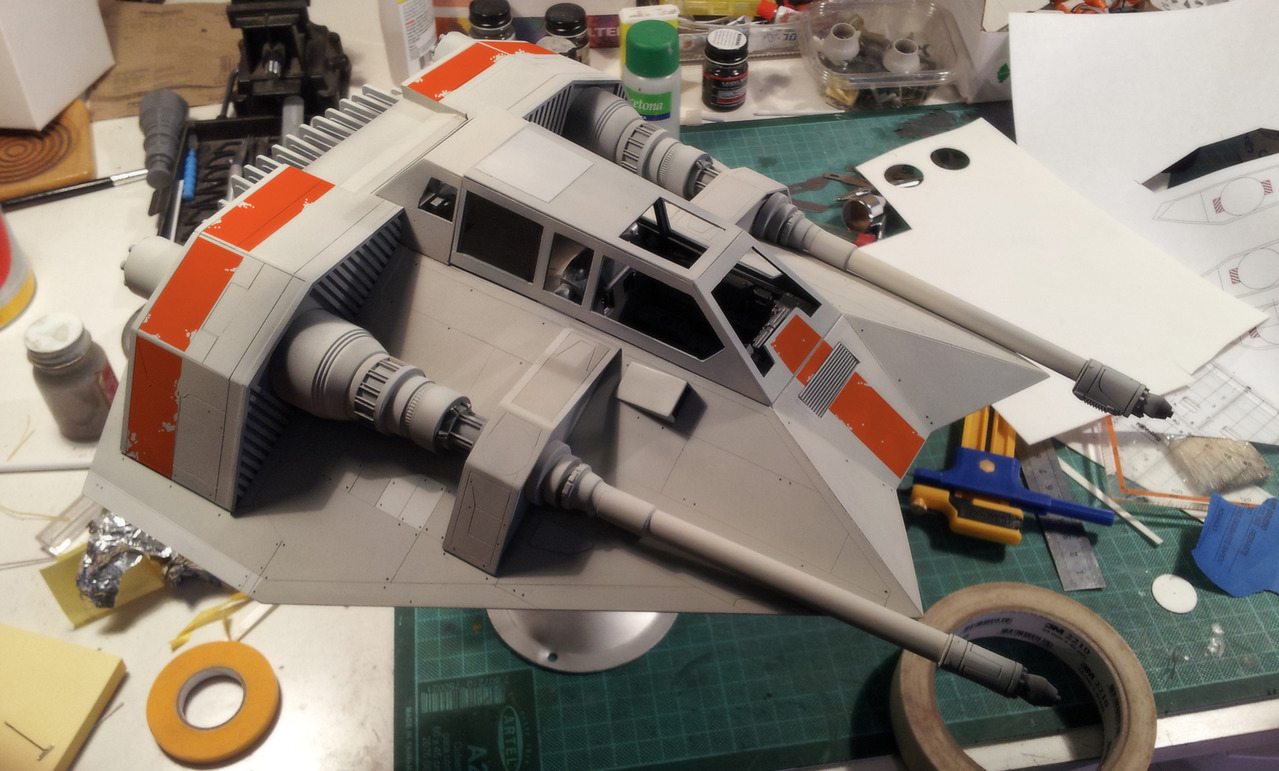
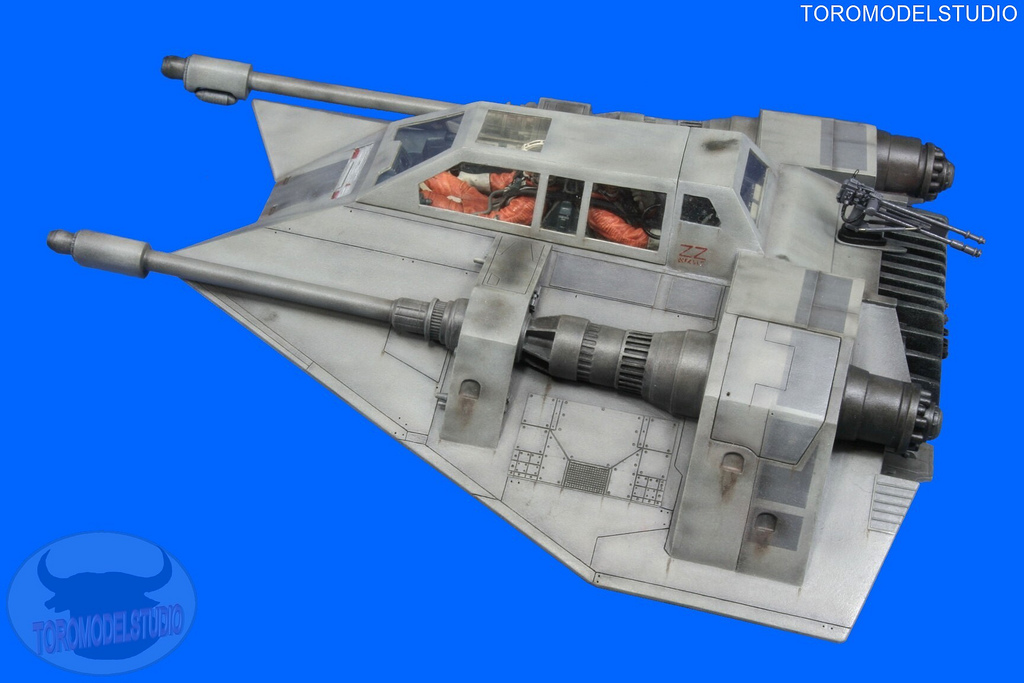
Back in 2013, a couple of us decided“Hey, let's build a real life size spacecraft from the star warsuniverse!”. After some brainstorming, it became apparent that thesmallest craft we can build (but would still make a cool impact)would be a Snow speeder from episode V.


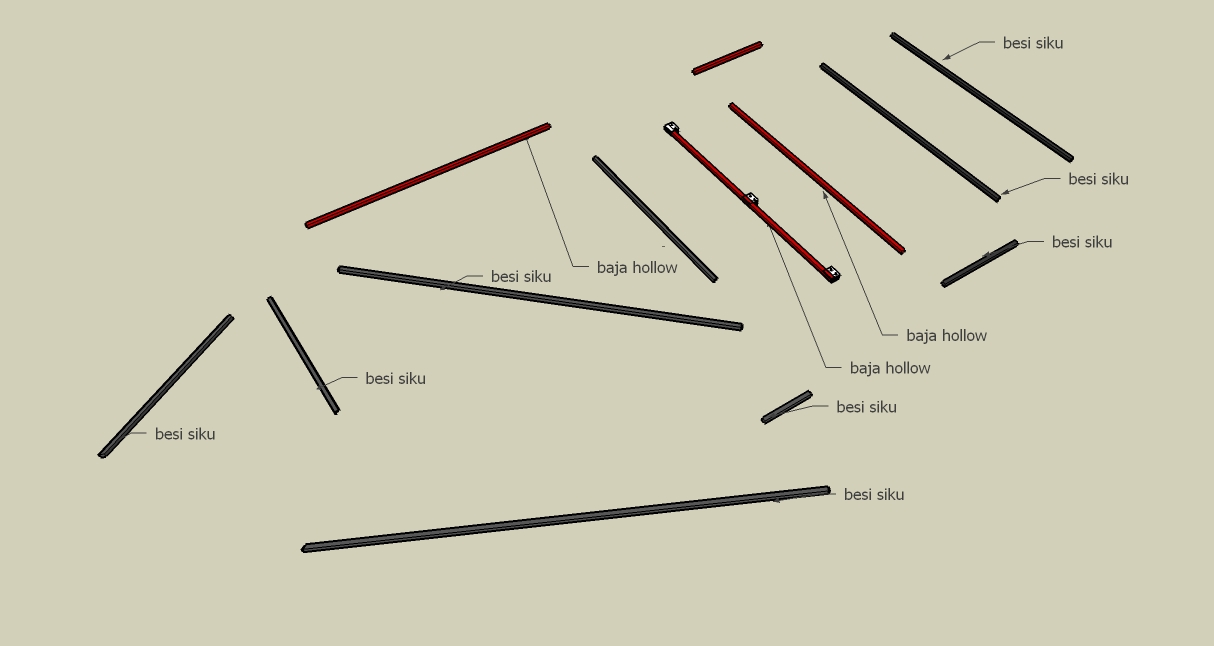
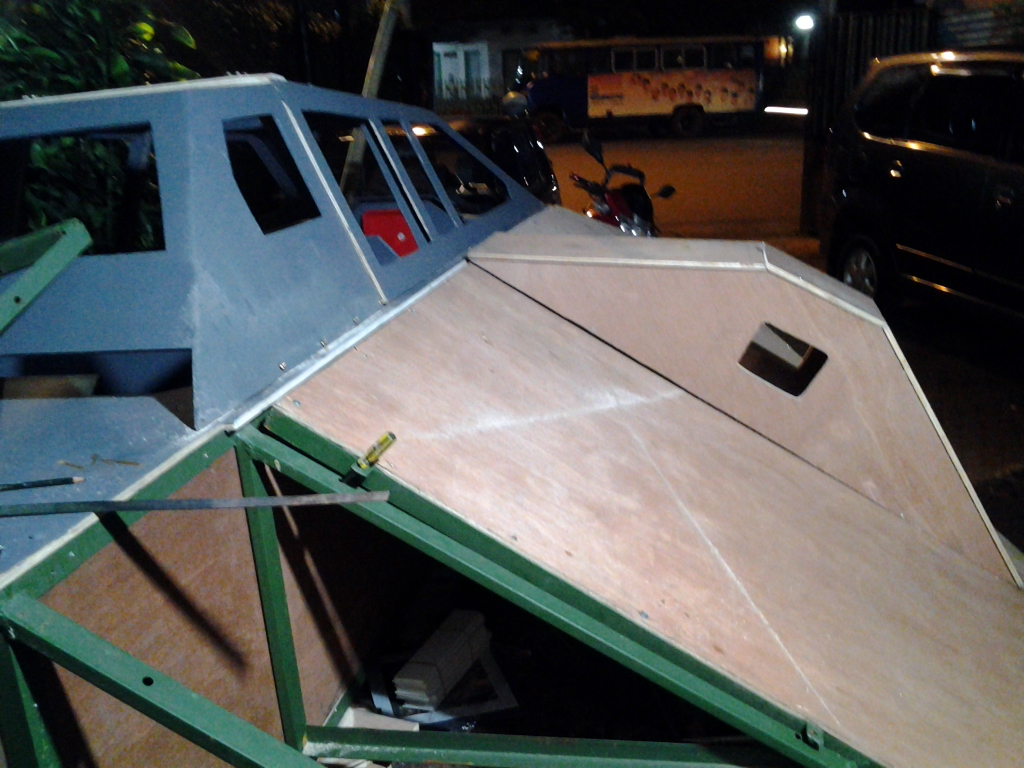
Time was of the essence, since therewas only about one month until the con. How the thing is build isalso a major consideration, since the convention is being held 150kmaway in Jakarta, on the third floor of an expo center, accessibleonly by small freight elevator or a pair of escalator. So it meansthat all the the ship's parts must fit into one medium sized truck!


Oh, and also the cost, since this iscoming out of our own pocket. The goal is to build the whole thingfor under 2000 USD.


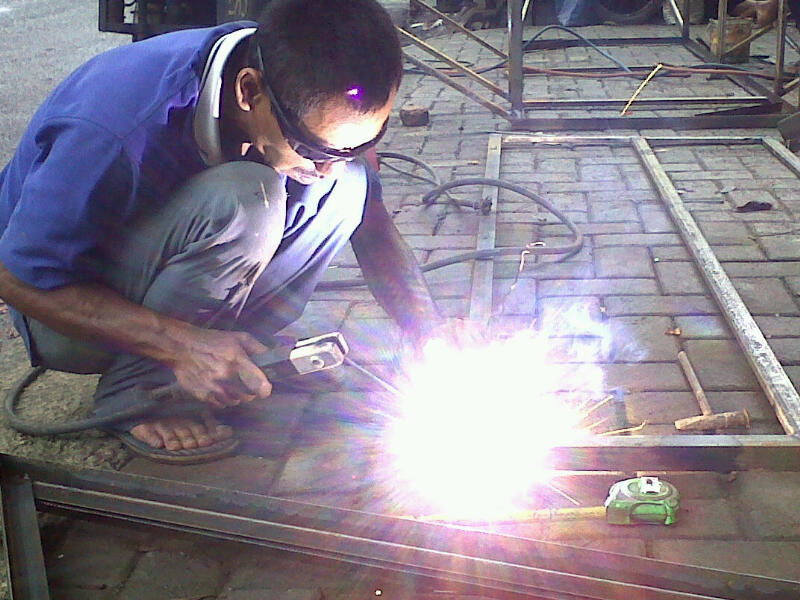
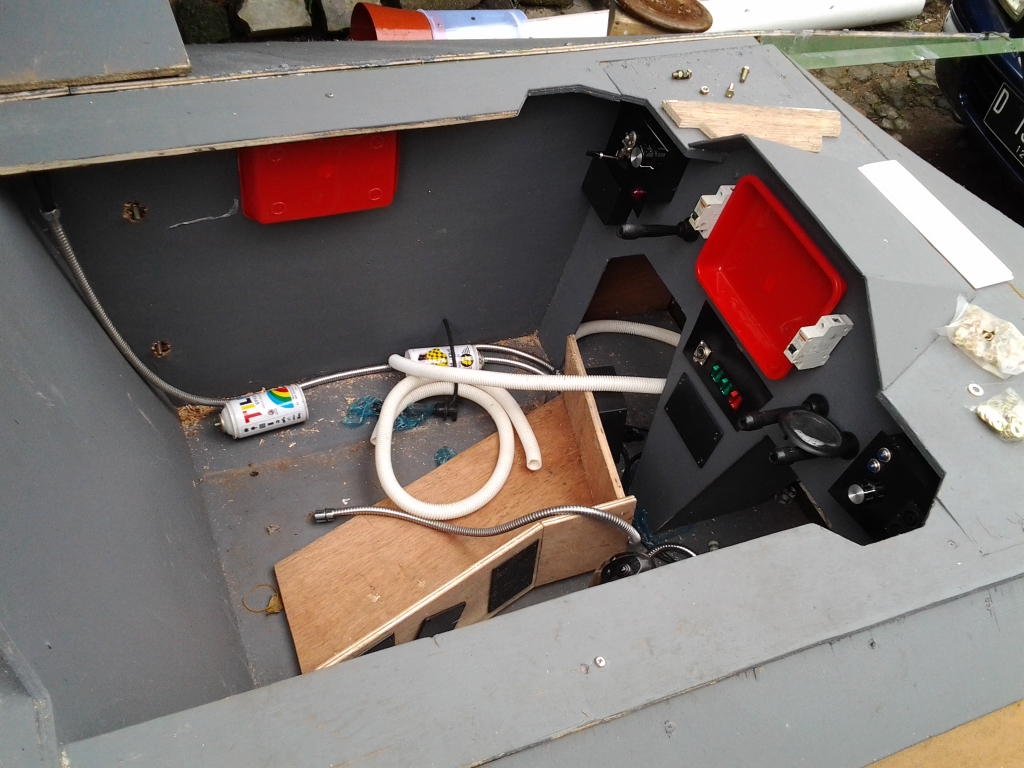
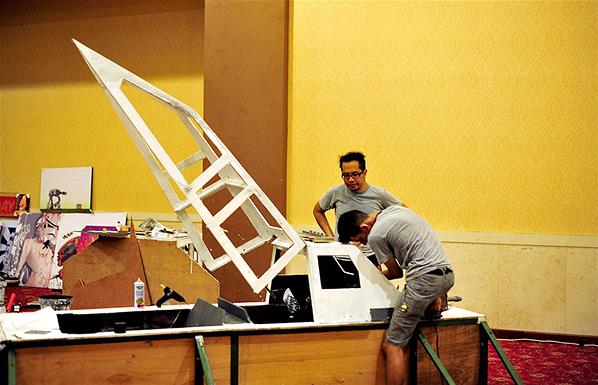
The team that volunteer to work on thisproject consist of 5 guys (Myself-Aldo, Malik, Deri, Ucup, andlukman) , but occasionally other members of the club also gave us ahand.


Unfortunately, we didn't do a lot ofbehind the scenes documentation, but I'll share what we have here

Photos courtesy of:
- SWDJKT
- Toys R Evil
- Fightsaber
- etc
 
Last edited:
PLANNING
First of, is determining the dimensionof the ship. Some of the reference that I found online were thescreen used miniature that were exhibited in the SW exhibition. Ialso found this model by RPFers R Martinez, and this one by ToroStudio to be very useful for detail reference. And finally, a papercraft pattern by fellow Indonesian Julius also helped a lot inproviding overall proportion.

02

03


Screen used model from technical journal:

04


Screen used model from the LFL archieve exhibition:

05


R Martinez's very clean studio scale model:

07


Toro Studio's Snow Speeder

07b by godoftoy, on Flickr


Oh, and let's not forget about thisbeauty.... :D 
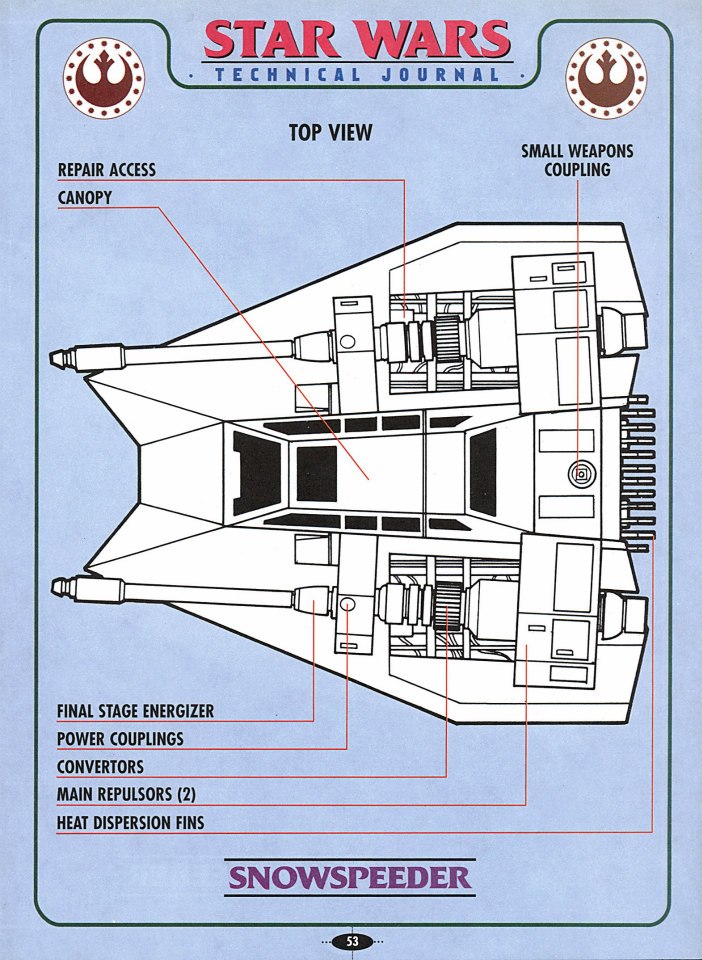
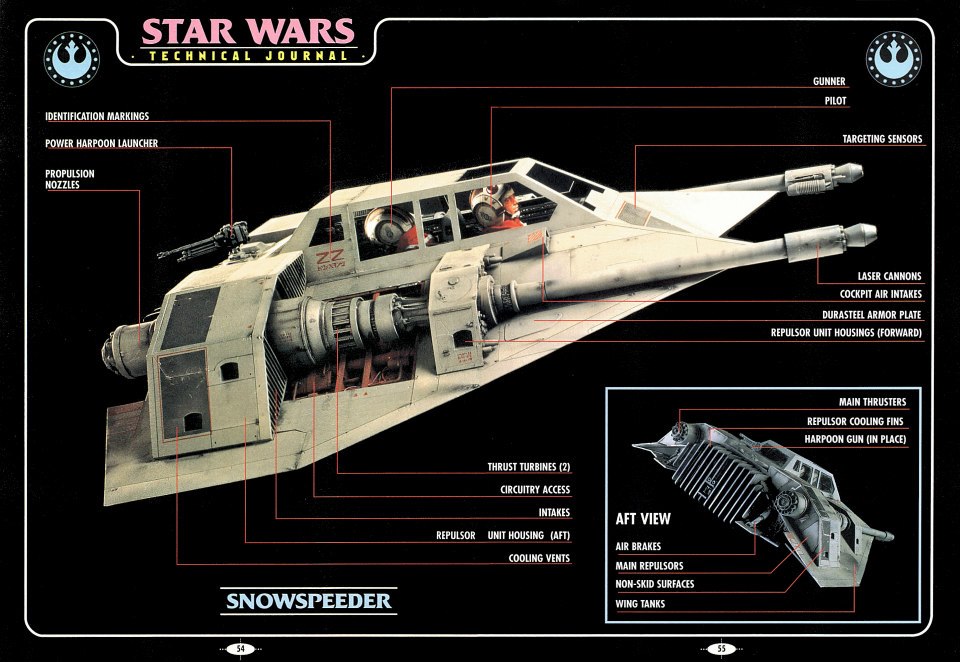
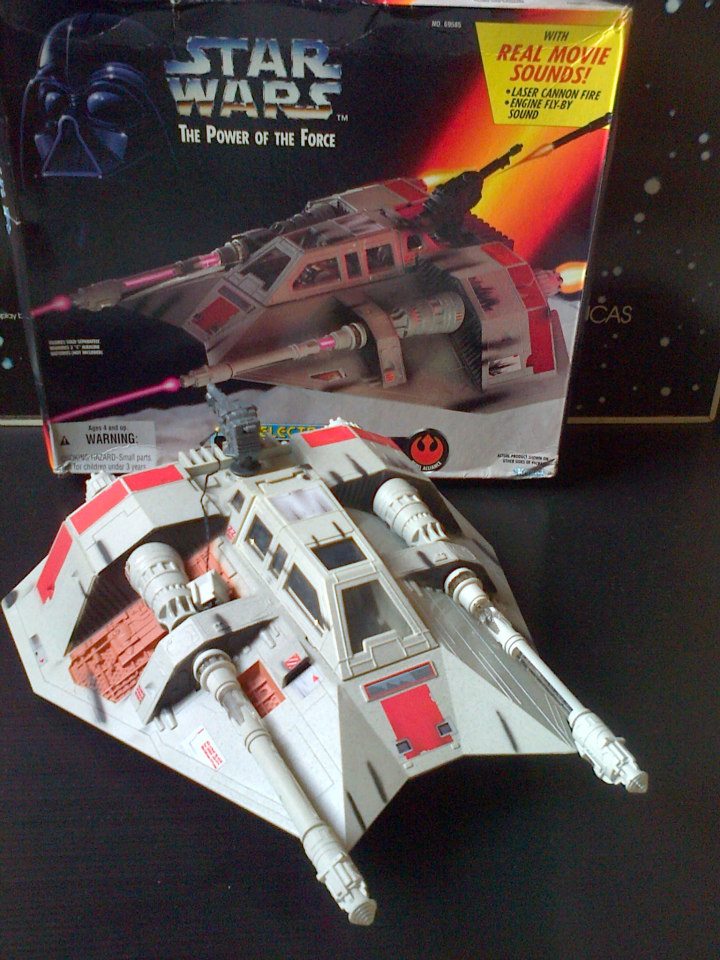
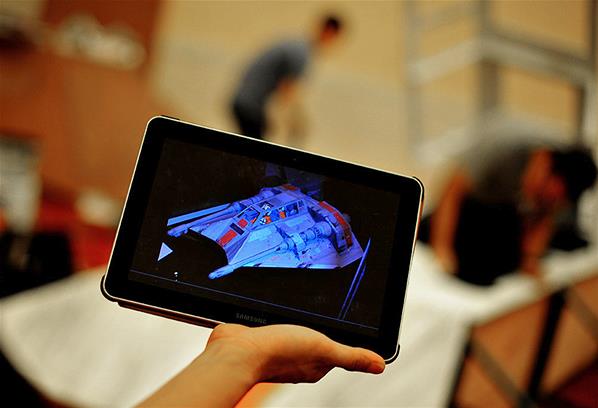
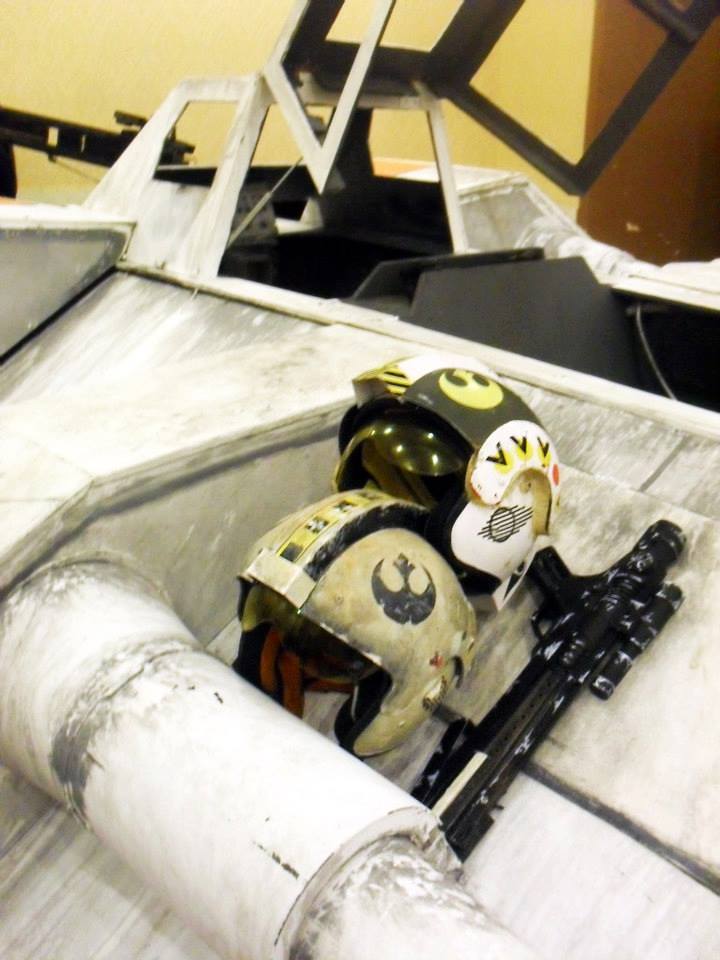
Since most of the image in our mind about the snowspeeder is formed not from the movie scene, but from looking at starwars toys, this humble toy is also a major reference point for us.


07a


Since the ship must be able to becarried by a medium truck, and pass through a normal two doorentrance, we decided to separate the ship into 6 major components:the main body, right and left wing (which themselves are separatedinto two halves), and the rear 'radiator'. On top of that, othersparts (like the main gun, the harpoon gun) were also designed to bedetachable to simplify transporting


Once we had the general blueprint, andapprox measurement, Malik build a 3D sketchup model, which we used toplan the metal frameworks.

08


09


10


11


12

- - - Updated - - -

FRAME
For the structural frame, we used acombination of 3x3cm steel L angle, and 4x2cm hollow steel squarebox.
We went to a stockist, and buy a dozenlength of 6meter steel profiles. We do not have welding capacity inour workshop, but there is this small welder shop nearby, where weusually send out for all our welding job. The guy operate out of asmall roadside shack, and do his welding right on the sidewalk. Thesheer size of the snow speeder though, forced him to do his weldingON the street... It is a wonder he didn't cause an accident or getarrested


Welding in progress

13


Completed steel frame

14
 
SKIN
Originally we planned to use thin 5mmplywood for the skin, but since we wanted people to be able to ridein it, we decided that 1,2mm would be safer. On some critical point(like the forward engine ridges), we used 18mm plywood, so it wouldmake a safe stepping points for the pilots. The plywood have woodpattern, so I originally planned to cover the whole plywood with thinMDF sheets, which will also allow us to create realistic panel lines.


We ended up using almost 20 sheets ofplywood for this build.... a fact that didn't seem to be a problem atfirst,....until we started to move the ship around, and realized thatthe whole thing weight almost a ton!


We used steel roofing screws to attachthe plywood panels on to the steel frames. Since the roofing screwhave build in drill bits on it, it eliminates a drilling step, andconsidering that we used almost a thousand screws on this project, itcame out to be quite a substantial time saver. The screw head alsomakes a good rivet like element to the ship


22


15


Frame with plywood skin 2


Frame with plywood skin 3


WIP 1


WIP 2


WIP cockpit


23
 
DETAILING
Let me tell you one thing, for almostthe whole month of May 2013, when we were building the ship, ITRAINED ALMOST EVERY DAY! And it is supposed to be the dry seasonthen, not the monsoon.... Talk about Murphy's law....
It got to the point that our plywoodwere beginning to warp from the constant rain. To counter this, weended up coating the whole ship with rubberized waterproofing paint. On top of this undercoat, we painted the whole ship with whiteacrylic wall paint.


Another effect of the rain, we werelimited to about 5 hours of work every day, which pushed back ourprogress significantly. Things were looking grim, there's no way wecould meet our deadline sticking to the original plan, so with heavyheart, we decided to forgo some of our original plan, most notably,the MDF skin that we hoped will put a smooth finish over the plywood,and create panel lines details. We were also forced to gave up onmuch of the painting and detailing of the ship, for on the last day(the day we hoped to detail painted the ship) it rained from morning.
Finally, while waiting for the rain tolet up a bit, I noticed that the rain water washed out every paintcoat that we put on it in a streaking pattern....which actually donot look half bad.... so what we finally did is to paint a heavyblack lines on top of each panel, and let the falling water washed itout naturally for us.....
It is not quite the weathering that wewanted, but with less than 20 hours left on the clock, it will haveto make do.


Deri did a fantastic job building theharpoon gun from some PVC pipes and various greebles. We alsodetailed the cockpit with dozens of switches, fake panels, andupholstered seat. A pair of old PC joystick for the pilot, and we gotthis really odd electric panel from a junkyard that looked right athome on the gunner's seat. A pair of 5 point seat belt finishedcockpit experience.


For the main cannon, we used 8” PVCpipe, combined with some big flower pot, Tupperware container, andplastic bucket, to build up the mid section of the cannon.


Another headache is the radiator likegrille on the back of the ship. On 1:1 scale, each one of thosegrille should be around 3cm wide. If we used a solid wood pieces, thewhole thing would weight a ton, (and cost quite a lot too). Thesolution that we finally comes up with is making the grille from 15mmplywood, and then, we screwed thin 3cm wide aluminum stripes on theplywood sides, the result, looked like the grilles were 3cm widesolid aluminum, when in fact, they're made from 1,5cm plywood.
 
continuing.....


Just as the paint started to dry, thetruck that we hired to transport us to Jakarta arrived. Wedisassembled the ship, load it on the truck, and off we went for our150km journey.
We arrived at the exposition buildingaround midnight, and proceed to unload the truck. I've arranged tohave some more muscle standing by at the con, because, (even with 8people carrying the heaviest main cabin) , carrying a ship thatalmost weight a ton, up three flight of stair is no laughing matter!!
By the time we moved all the piecesinside the con main hall, it was already 03.00 in the morning,everybody is soaking wet, mildly dehydrated, and almost dead tiredfrom all the heavy lifting and lack of sleep......


Ah, the things we do for ourpassion....


23a


23b


24


25


After a quick sleep, we started toassemble the ship around noon.
What should have been at most an hourwork, turned into a 6 hours nightmare, as we found out that aftersome warping of the frame during transport ,the main bolt holes onthe steel angle are no longer aligned as it should have been. We wereforced to drill new holes for almost half of the bolt point...
 
@SofaKing01 : Thanks! it was a fun build (at least it was fun remembering about it now)... you seem to have quite a journey ahead of you too!! :D I build a 1/6 scale one back in 2011 http://www.onesixthwarriors.com/for...sion/632774-1-6-millenium-falcon-cockpit.html

Hey G,

As frustrating as these builds go (your rain issue) the end results are always worth it! Our journey is quite a bit longer, but the efforts are the same. You guys are machines! It looks awesome! Do you have plans to finish off the interior?


By the way, this is a teaser video that we made to promote the convention, and build up excitement about the ship. For those of you who don't speak 'bahasa indonesia', the girl michelle is being annoying by constantly talking about nonsense stuff, and distracting us who were working to build the ship
 
Last edited by a moderator:
But, when we finally finished assembly,there it is, a 1:1 Rebel Snow speeder parked inside the huge hall,surrounded by hundreds of other Star wars memorabilia and props. Itwas situated at the end of the hall, but still, the moment you stepin, your eyes will be pulled into the biggest piece you see, thespeeder!


During two days of the con, the SnowSpeeder worked splendidly as the center piece of the 2013StarWarsDayJakarta. We used the speeder as a makeshift stage andphoto booth, renting out rebel pilot uniform, and setting up an photoprinter on the spot.


26


27


28


28a


28b


28c


29
 
Here's a video about the event in general


This one is a video of Fightsaber Indonesia (A lightsaber performance group), that took place right in front of the snow speeder. We ended up taking off the main cannon after one of the performer knocked himself down bumping into one cannon.... :D

 
Last edited by a moderator:
Now for the conclusion...


DID WE ACHIEVED WHAT WE PLANNED TO DO?
Considering the impact of the piece?Definitely. But was it turned out the way I planned it? Maybe I'll rate it at around70%. We achieved the structure and (most importantly) the silhouetteand proportion of the Snowspeeder. But because of the time and budgetconstrain, we missed a lot of the detailing job , which would havepushed the piece from 'Good' into 'Excellent'.


WHAT WOULD I DO DIFFERENTLY?
The thing is just too massive andheavy, impractical to transport, (and later we found out) impracticalto store. The decision to make the cockpit accessible is the mainculprit here. A display only piece would probably resulted in a shipthat is 50% lighter, and 50% easier to transport. It would beanother story if it were a permanently build piece that do nothave to be knocked down for transport


(Also, note to self: do not try tocarry a spaceship up three level of stairs. Not a good idea)


Here's some more detail shot of the ship as it was on SWDJKT 2013:


With Pilot

30


31


Canopy. we originally put a hydraulic damper to held the canopy open, but the pressure is much too strong, the flimsy canopy frame cannot take strain, so we removed it.


31a


The front engine nacelle, that hole is how the pilot can climb into the cockpit.


31b


31c


The Harpoon gun, too bad we don't have a clearer pic of it taken, The pivot mount was made from a large caster wheel.


31d


The main cannon. Another victim of the rain, we didn't get a chance to finish the cannon muzzle. It should have an inner barel, plus some sort of igniter box on the outside


31e


Cockpit interior (pilot). The gunner's seat is so much more cramped!. Those red pattern? it was the convention hall's carpet, we forgot to bring the lower hatch cover to Jakarta! :D

31f
 
AHHHH... More photo goodness... :)

I've been debating whether to build a 1:1 scale snowspeeder for some time now. During my research, one of the things I noticed was the major differences between the scale model and the full scale prop from ESB. The full scale prop, from what I can tell (I might be wrong), is actually MUCH smaller than the scale model. There are several ref photos show how tiny and cramped the cockpit actually is.

Should you decide to build another... this might be the way to go?

Check out this side view:
http://i90.photobucket.com/albums/k243/panzercreations/Snowspeeder/Snowspeeder.jpg

Either way... AWESOME! You guys did an amazing job.
 
Wow this is amazing!

With the budget and time you all did a superb job! Im sure with a larger budget and more time you could have gotten what you wanted and still keep the cockpit accessible to sit inside and keep it transportable.
 
Wow Great Job! The rain streaks do add an authentic "weathering" pattern, I used to think the same thing at Disneyworld in Orlando, watching the full scale speeder in the backlot tour sitting out in the elements.
 
Yes! you're right, the lifesize prop is much smaller than the miniature. Some of the details are also different. I tend to think that the size to go is the miniature one though, because the life size prop just do not have the size and feel of a fighter jet. It looks more like an odd shaped land speeder..


AHHHH... More photo goodness... :)

I've been debating whether to build a 1:1 scale snowspeeder for some time now. During my research, one of the things I noticed was the major differences between the scale model and the full scale prop from ESB. The full scale prop, from what I can tell (I might be wrong), is actually MUCH smaller than the scale model. There are several ref photos show how tiny and cramped the cockpit actually is.

Should you decide to build another... this might be the way to go?

Check out this side view:
http://i90.photobucket.com/albums/k243/panzercreations/Snowspeeder/Snowspeeder.jpg

Either way... AWESOME! You guys did an amazing job.
 
This thread is more than 9 years old.

Your message may be considered spam for the following reasons:

  1. This thread hasn't been active in some time. A new post in this thread might not contribute constructively to this discussion after so long.
If you wish to reply despite these issues, check the box below before replying.
Be aware that malicious compliance may result in more severe penalties.
Back
Top