You are using an out of date browser. It may not display this or other websites correctly.
You should upgrade or use an alternative browser.
You should upgrade or use an alternative browser.
2015 Wonderfest - sneak peek at 16yr old's start for next year
- Thread starter furqueron
- Start date

RogueTrooper
Well-Known Member
Absolutely fantastic work!") .......it's nice to see young people building something with their hands instead of stealing my car keys and joy riding with his friends, crashing my XF Falcon that I spent three years restoring and then crying and vomiting on the police officer who brought them home...
.......it's nice to see young people building something with their hands instead of stealing my car keys and joy riding with his friends, crashing my XF Falcon that I spent three years restoring and then crying and vomiting on the police officer who brought them home...
....sorry...venting about one of my sons.....don't mean to derail....keep building...chop-chop......again, nice to see young people building cool stuff!!
.......it's nice to see young people building something with their hands instead of stealing my car keys and joy riding with his friends, crashing my XF Falcon that I spent three years restoring and then crying and vomiting on the police officer who brought them home.......sorry...venting about one of my sons.....don't mean to derail....keep building...chop-chop
......again, nice to see young people building cool stuff!!Bet the officer wasn't too happy about that either!! At least your son wasn't hurt! Falcon, we had a four door Falcon when I was a kid...think it had a six in it??
We're pretty proud of both our boys...Jon-Luc (he's the one building this model) plays in the Allen Band (largest marching band in the world! approx. 900 members..go Band!), as a Junior he's doing AP courses, is an Eagle Scout and Order of Arrow member. Youngest is not far behind on his Eagle, Jon-Pierre just go inducted into Order of the Arrow last weekend, he plays violin and viola in middle school orchestra. They're both normal kids who put forth effort on things and try.... which is the most we can ask for Yep, pretty darned proud of and for them...we're very lucky to be their parents.
We're pretty proud of both our boys...Jon-Luc (he's the one building this model) plays in the Allen Band (largest marching band in the world! approx. 900 members..go Band!), as a Junior he's doing AP courses, is an Eagle Scout and Order of Arrow member. Youngest is not far behind on his Eagle, Jon-Pierre just go inducted into Order of the Arrow last weekend, he plays violin and viola in middle school orchestra. They're both normal kids who put forth effort on things and try.... which is the most we can ask for
Yep, pretty darned proud of and for them...we're very lucky to be their parents.Props...geeze...what a pain ...our pressure pot isn't large enough so casting at room psi...lots of bubble issues and mold material issues.
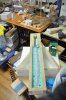
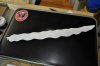
First the mold material...was using MoldMax40 for the fins due to their size..first time using it. Decided to use it for the props..shouldn't be too different for 20T or MoldStar 30 ...right??? Well..it is...first off, the cure time...24 hours (16+ 4 to 8)...so used Accel-T to shorten time down to 2 hours. That part worked very well. The issue introduced by this was apparently the bubbles don't have enough time to escape and they like to cling to the curved under surfaces of the blades...not a good thing. Don't have a vacuum chamber (have one but have never set it up..its a venturi system for woodworking with vacuum bags for veneers) ...never got around to building a roto-caster last summer (darn it!) so kinda stuck. First mold using this stuff was "ok"..at least the half that set for the recommended 24 hours...just not patient enough to wait...plus there was another problem with the first mold...the pour and vent system wasn't designed well...so went to version 2 still using MM40, since this was poured vertically thought the air bubbles might be able to break free...as the first mold was pour flat...devised a farmers-fix for aligning the brass tubing and was off and pouring. The other difference between first and second molds...first mold was a two part...this was a one part. In second mold, bubbles were even worst (large dimples on blade surfaces) AND alignment was way off of the mold parts...getting offset thick blade edges...sooo....some head scratching...then off to mold #3...went back to a material we're more familiar with 20T...figured there might still be issues with bubbles..but KNOW that 20T matches up paper thin edges beautifully...so redesigned the mold again...for pour points and thickened the mold since 20T is a quite a bit more flexible (the reason it wasn't used to begin with honestly...this stuff is $$$). Net results...did the pour...mold looked good...did a cast...and the first "cleaning" cast came out nasty on the edges. Eased off the clamping pressure on second pour (using 305) and the edges came out gorgeous..a bit of flash but workable. As for bubbles...there's still micro-bubbles on the underside of the curved blade surfaces...BUT...after two coats of Duplicolor primer and sanding in between..they disappear after the third top coat...so this will have to do...
By the way...the edges on the blades are SHARP...I've got three cuts across the base of my fingers...20T holds an edge great !
Abandoned 1st mold:

Abandoned 2nd mold:

"livable" 3rd mold:


Various test casts..none of these were acceptable;


First the mold material...was using MoldMax40 for the fins due to their size..first time using it. Decided to use it for the props..shouldn't be too different for 20T or MoldStar 30 ...right??? Well..it is...first off, the cure time...24 hours (16+ 4 to 8)...so used Accel-T to shorten time down to 2 hours. That part worked very well. The issue introduced by this was apparently the bubbles don't have enough time to escape and they like to cling to the curved under surfaces of the blades...not a good thing. Don't have a vacuum chamber (have one but have never set it up..its a venturi system for woodworking with vacuum bags for veneers) ...never got around to building a roto-caster last summer (darn it!) so kinda stuck. First mold using this stuff was "ok"..at least the half that set for the recommended 24 hours...just not patient enough to wait
...plus there was another problem with the first mold...the pour and vent system wasn't designed well...so went to version 2 still using MM40, since this was poured vertically thought the air bubbles might be able to break free...as the first mold was pour flat...devised a farmers-fix for aligning the brass tubing and was off and pouring. The other difference between first and second molds...first mold was a two part...this was a one part. In second mold, bubbles were even worst (large dimples on blade surfaces) AND alignment was way off of the mold parts...getting offset thick blade edges...sooo....some head scratching...then off to mold #3...went back to a material we're more familiar with 20T...figured there might still be issues with bubbles..but KNOW that 20T matches up paper thin edges beautifully...so redesigned the mold again...for pour points and thickened the mold since 20T is a quite a bit more flexible (the reason it wasn't used to begin with honestly...this stuff is $$$). Net results...did the pour...mold looked good...did a cast...and the first "cleaning" cast came out nasty on the edges. Eased off the clamping pressure on second pour (using 305) and the edges came out gorgeous..a bit of flash but workable. As for bubbles...there's still micro-bubbles on the underside of the curved blade surfaces...BUT...after two coats of Duplicolor primer and sanding in between..they disappear after the third top coat...so this will have to do...By the way...the edges on the blades are SHARP...I've got three cuts across the base of my fingers...20T holds an edge great !
Abandoned 1st mold:
Abandoned 2nd mold:
"livable" 3rd mold:
Various test casts..none of these were acceptable;
Attachments
Last edited:


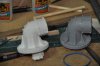
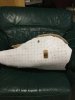
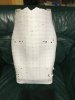
Pivot fixture that the basis of joining the three sections together, first cast using 310:
View attachment 476686
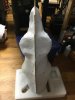
More pics of the master, the tiny holes in the "plates" are for handles (used when the crew removes the plates) to access the interior of the pivots for maintenance. Placing them in the master means not having to remeasure and place on each cast piece..they're already there...the 20T pics details up like this (at least when poured and then pressured) with no problem...yeah...you might can tell we like 20T a lot!


View attachment 476686
More pics of the master, the tiny holes in the "plates" are for handles (used when the crew removes the plates) to access the interior of the pivots for maintenance. Placing them in the master means not having to remeasure and place on each cast piece..they're already there...the 20T pics details up like this (at least when poured and then pressured) with no problem...yeah...you might can tell we like 20T a lot!
Last edited:


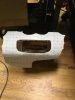
Some detail items being worked for the pilot/navigator cockpit. The standing "desk" is for the navigator charts. The item laying flat is a radio he modeled after the really old-style two part phones...where the micro[phone was built (or sometime handheld) into the wall unit and the earpiece/speaker was handled to the ear separately:


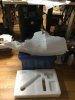
Adding "hinges" for the doors in the pilot/navigator cockpit:

Adding "hinges" for the doors in the pilot/navigator cockpit:
Last edited:

Been a while. Things slowed a bit as most of his of time was consumed this last year as a freshman at university. This is what she looked like last year. She was shown as a display-only model at Eaglequest 2016. She was also at Wonderfest 2016 in a "C" configuration to meet their space constraints. Very unfinished, but much was learned from transporting her and assembling/diasassembling her several times. Yes for those with keen eyes for model airplanes, those right next to her are 1/35 scale 😈
Some the of the photos are darker to show the gun lights better. The lights are animated with arduinos. The engine pods on the back sides are now mountable to the hull and stepper motors are installed and also controlled via arduinos. The model rotary motors (based on Oberursel U I <push> and U III <pull> rotaries) and props are designed but awaiting to find time to 3d print them.


Some the of the photos are darker to show the gun lights better. The lights are animated with arduinos. The engine pods on the back sides are now mountable to the hull and stepper motors are installed and also controlled via arduinos. The model rotary motors (based on Oberursel U I <push> and U III <pull> rotaries) and props are designed but awaiting to find time to 3d print them.
Here's a few more showing her a bit further along. Hull plating and some rivets applied. Edge cleanup on front and rear hull hadn't been done yet. [note: photos look to be stretched when I viewed them... will look into it tomorrow...]
View attachment 728835View attachment 728836View attachment 728837View attachment 728838
View attachment 728835View attachment 728836View attachment 728837View attachment 728838
Attachments
Last edited:
Wow that turned out great!
Very cool idea as well
Thank you for the feedback. Its much appreciated and helps keep me going on it! Jon-Luc


Update on prints for side-pod rotary engines. These are end pieces of the engine block and the cylinder along with the tappet valve. They're being used to check for fit tolerances and also hole sizing for the metal pushrod that will fit into the end of the tappet valve. The tappet valve is kinda mixed in with the supports that have been removed. Using shortened pieces saves a lot of time printing and resin.

One of the side-pods temporarily mounted to test for fit of prop diameter.


One of the side-pods temporarily mounted to test for fit of prop diameter.
Oh, and there's a bit of paint as well. He wants to make some changes, we'll see where he ends up at with it. New HP-CH arriving today (thank you so much Tom Grossman. @ tagteam for expediting!), Jon-Luc's going to touchup some of the paint around the fins before Eaglequest next weekend. Don't know if he'll enter it or do a display-only like he did at this year's (2017) Wonderfest.
.


.
Some closeups of some of the controls. First pass on paint. Needles and hash-marks on gauges will be painted..yes...zoom in, they're there For the keen of eye, yes one of the control rods broke <red spot on egg-shaped controls> off during transit/handling to/from Wonderfest (it is a ways from Dallas to Louisville). That was the only 3d print casualty. Don't know if he'll glue it back on or pop that one off and glue on another. Nameplate (one of five to go on her) is 3d printed as well as the curly cue designs on the sides of the personnel compartments.
Next year, steampunk goggles for Fritz, Han and the rest of the crew along with handsculpted longcoats are in the plans.


- - - Updated - - -
And last for today, some interior shots showing some of the detail starting to come together. Lots more to go.
For the tips of the smokestacks he has some end-cap funnels that were on the model at WF. Don't know where he packed 'em. If I come across them today, I'll post a quick pick of 'em. They really help to set the "steampunk" feel of the model.


For the keen of eye, yes one of the control rods broke <red spot on egg-shaped controls> off during transit/handling to/from Wonderfest (it is a ways from Dallas to Louisville). That was the only 3d print casualty. Don't know if he'll glue it back on or pop that one off and glue on another. Nameplate (one of five to go on her) is 3d printed as well as the curly cue designs on the sides of the personnel compartments. Next year, steampunk goggles for Fritz, Han and the rest of the crew along with handsculpted longcoats are in the plans.
- - - Updated - - -
And last for today, some interior shots showing some of the detail starting to come together. Lots more to go.
For the tips of the smokestacks he has some end-cap funnels that were on the model at WF. Don't know where he packed 'em. If I come across them today, I'll post a quick pick of 'em. They really help to set the "steampunk" feel of the model.
Similar threads
- Replies
- 24
- Views
- 1,172
- Replies
- 31
- Views
- 1,547
- Replies
- 5
- Views
- 466
- Replies
- 2
- Views
- 864