You are using an out of date browser. It may not display this or other websites correctly.
You should upgrade or use an alternative browser.
You should upgrade or use an alternative browser.
2015 Wonderfest - sneak peek at 16yr old's start for next year
- Thread starter furqueron
- Start date


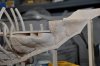
He got some of the forward basswood blocks cut, rough shaped and starting to glue into place.
The curves on this forward part along with the intersection of the dragonfly-eye platforms made it too complex to plank-on-hull.
When he tried the dremel with a carbide wood cutter..bogged down immediately even though this is basswood, clearly it was underpowered for the job. Was a good excuse for me to make a trip to Woodcraft to obtain a tool I've wanted for the woodshop for a long-time...a Foredom power carver. Was the last one they had in stock...destiny")
Also, as in woodworking..in model making appears you can never have too many clamps.


The curves on this forward part along with the intersection of the dragonfly-eye platforms made it too complex to plank-on-hull.
When he tried the dremel with a carbide wood cutter..bogged down immediately even though this is basswood, clearly it was underpowered for the job. Was a good excuse for me to make a trip to Woodcraft to obtain a tool I've wanted for the woodshop for a long-time...a Foredom power carver. Was the last one they had in stock...destiny
Also, as in woodworking..in model making appears you can never have too many clamps.


Some progress on shaping the sub-hull (plastic "hull plates" will be glued to this) and some fitting of the top deck.
The filler pieces under the bottom deck act as spaces and also will be drilled to allow the metal rod supports to come in from the back side...to make the ship look like its airborne.
The forward shaped pieces are basswood..the ones under the lower deck are whitewood/pine.


The filler pieces under the bottom deck act as spaces and also will be drilled to allow the metal rod supports to come in from the back side...to make the ship look like its airborne.
The forward shaped pieces are basswood..the ones under the lower deck are whitewood/pine.
Attachments
Some possible color swatches

Both tailbooms temporarily mounted

Homemade air dry clay for forming the fins.
The foamboard warped...wasn't planned, but now he's trying to
see if he can get the second fin to warp as well...if this clay turns out to be hard
and durable enough...they may not be resin cast...might use as is
There's still a lot of sculpting to do on the fins...this homemade clay seems to
work really nice...but it does take a while to dry for the thicker parts...


Both tailbooms temporarily mounted
Homemade air dry clay for forming the fins.
The foamboard warped...wasn't planned, but now he's trying to
see if he can get the second fin to warp as well...if this clay turns out to be hard
and durable enough...they may not be resin cast...might use as is
There's still a lot of sculpting to do on the fins...this homemade clay seems to
work really nice...but it does take a while to dry for the thicker parts...
Most of the day was spent with researching/refining color choices and paint pattern....he was focusing on WW1 aircraft patterns and colors. Lozenge is too complex to get done in time and the body of this would look "busy"..then he looked through cammo patterns, but those resembled his walker too much in his mind (personally I was voting for the purple and green cammo patterns from German aircraft). Then a few inspired searches of WW1 airships turned up a gem...then it was to paint color charts. He found some very close matches in the Vallejo line and then daddy did what daddy does best...drive and open up the wallet ..unfortunately our two local stores; Hobby Town doesn't stock Vallejo model paints and Madness Comics selection was very picked over, so in the end only find 3 of the 7 colors he was interested in. So now daddy is off to the web to try to find 'em.
So heres some progress shots from the last two days:
Making basswood hull planking:


Gun carriages...these will mount in the two side openings in the mid-section. Apparently they're going to allow the two side guns to extend out from the body of the ship and tilt almost 90 degrees down.


..unfortunately our two local stores; Hobby Town doesn't stock Vallejo model paints and Madness Comics selection was very picked over, so in the end only find 3 of the 7 colors he was interested in. So now daddy is off to the web to try to find 'em.So heres some progress shots from the last two days:
Making basswood hull planking:
Gun carriages...these will mount in the two side openings in the mid-section. Apparently they're going to allow the two side guns to extend out from the body of the ship and tilt almost 90 degrees down.
Attachments
In the forward hull section there's a bulkhead on the lower deck. He's putting a door there, even though it has a wooden block behind it and it will only be visible to someone looking in directly from behind...there'll be an LED behind the door to provide light in the fore-section of the lower deck. Hopefully this'll light the forepart of the engines mounted on that deck.


Attachments
More on the tail...the bend turned out to be a happy "accident"...the ship is going to posed in an "action" state curving and climbing...so when the homemade clay was applied...as it dried...it caused the foamboard to deform resulting in a very nice bend in the tail. He was originally going to sculpt two tails..but now this one will be resin cast...doesn't hurt to have a spare or two...that 14 hour drive to Louisville has a few bumps on the way ;-) Plus, I'm concerned for him about the long-term stability of the homemade clay. He's decided to add two horizontal stabilizer to the the tail area...haven't seen the drawings for those yet...will be interesting to see if same thing happens...he's actually hoping it does the same on the other fin pieces for the mid section.


Progress on the "medium" side guns for the mid-section. He settled on a barrel design for them. Most of the base sled platforms for the two guns are done. One is built in a tilted position the other side will be flat. The tilted one is planned to be shown in the extended slide-position and pointing down. He's still working on the control panels and seatng arrangement for second gun operator. These guns were originally going to use conventional shells...(thus the "revolver" style cylinder...he shoots .38spcl/.357 Vaqueros in teen division CAS)...but when the "tilt" mechanism combined with the agility of a heli-ship were combined he started questioning the ability to reload heavy shells..especially without having to retract and reload the gun-sled....So since the belly turret gun is a tesla-gun...he changed these to "power" guns as well, eliminating the need for reload shells and still keeping the need for the second gun operator ..e.g the engineer....
He's still working on the lower base part of the platform. He needs to build the turntables and mounts to connect the slide platforms.
Yeah these are the conversations we have late into the night and while I drive him to school in the mornings...memories I'll cherish!!! It is so much fun as a dad to watch the gears turn in his head
Last photo shows one of four smaller machines guns that will be mounted on the upper deck of the mid-section.


Here's the smaller machine gun, it'll be case 8-10 times for mounting on the three sections.

He's still working on the lower base part of the platform. He needs to build the turntables and mounts to connect the slide platforms.
Yeah these are the conversations we have late into the night and while I drive him to school in the mornings...memories I'll cherish!!! It is so much fun as a dad to watch the gears turn in his head
Last photo shows one of four smaller machines guns that will be mounted on the upper deck of the mid-section.
Here's the smaller machine gun, it'll be case 8-10 times for mounting on the three sections.
Progress on the "medium" side guns for the mid-section. He settled on a barrel design for them. Most of the base sled platforms for the two guns are done. One is built in a tilted position the other side will be flat. The tilted one is planned to be shown in the extended slide-position and pointing down. He's still working on the control panels and seatng arrangement for second gun operator. These guns were originally going to use conventional shells...(thus the "revolver" style cylinder...he shoots .38spcl/.357 Vaqueros in teen division CAS)...but when the "tilt" mechanism combined with the agility of a heli-ship were combined he started questioning the ability to reload heavy shells..especially without having to retract and reload the gun-sled....So since the belly turret gun is a tesla-gun...he changed these to "power" guns as well, eliminating the need for reload shells and still keeping the need for the second gun operator ..e.g the engineer....
He's still working on the lower base part of the platform. He needs to build the turntables and mounts to connect the slide platforms.
Yeah these are the conversations we have late into the night and while I drive him to school in the mornings...memories I'll cherish!!! It is so much fun as a dad to watch the gears turn in his head
Last photo shows one of four smaller machines guns that will be mounted on the upper deck of the mid-section.
View attachment 450640
View attachment 450642
View attachment 450643
View attachment 450644
View attachment 450646
View attachment 450647
The gun on the right in this photo is shown in "stowed" position...or close to it...
View attachment 450648
View attachment 450649
View attachment 450650
View attachment 450647
Here's the smaller machine gun, it'll be case 8-10 times for mounting on the three sections.
View attachment 450651
Busy weekend...he's working out the machine gun mounts. He's vacillating between have the gunner seated on the gun mount (thus can be strapped in so as not to fall out!) or standing. The guns on the "firefly eyes" up front will need to run on some type of rail as well.
Not quite there yet


Not quite there yet
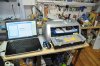
Airbrush colors...oh my..
Probably no single topic on this project has had more discussion than...color combos.
Found a Hippo Zeppelin model that has "realistic" early 1900's war colors/cammo. After some research, didn't find any Tamiya that didn't require mixing colors, so...off to investigate Vallejo. He first got introduced to Vallejo at last year's IPMS...pretty impressive stuff in the figure painting demos (Jon-Luc builds Warhammer as well). He had sat with the Vallejo rep for a couple of hours talking about different techniques from Citadel/Tamiya/Vallejo.
Found colors that are close in the Model Color line..need to check the Model Air line to see if they already have them setup for airbrushing.
Started airbrushing with the HP-CS..did ok...then we remembered we had a unused-as-of-yet Iwata M-2..so...pulled it out for its inauguration! With its 4 needle would it do better than the HP-CS's 3.5? The answer, after coming up with a mix ration that seems to work for him in the CS, tried same ration in M-2...shot pretty good. Added more paint to thicken the mix...worked even better. So, the conclusion, first use of M-2...he gives it a 9 out of 10 for Vallejo. Easy to clean, easy to adjust and very repeatable on paint flow rate...and area of coverage is good along with a large paint cup. BTW, was mixing "in-cup" to determine ratios...was having mixed results (eg not thorough enough mixing) moved over to small squeeze bottle (bought a TON of these from Tom at last year's Wonderfest)...this is THE way to go for mixing Vallejo..Tamiya in cup no prob..consistent...Vallejo...small external bottle...much better.
Colors are kinda washed out (very bright daylight LEDs and camera flash)...will upload better pic after final yellow coat and he removes the blue tape.
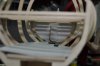
Work on the pine "mounting blocks" in the mid-section. These will be hidden by hull. The opening in the back in the mounting block was made so as to be able to insert a battery pack if needed.

These blocks are the "gear houses" for the forward-section rotors. They'll be cased in plastic sheet. The large holes were made with forstner bits to help reduce their weight.
The rear portion of the upper deck will be cut away so you can look down into the lower engine deck. Figure shown is "to scale".
And who says modeling is without its hazards...
A bit behind on uploading photos for him, was taking photos of his progress when...
So quiz for the day...what's your first reaction when something falls towards your lap?
Why jam your legs together to catch it!!! Great idea unless its an Xacto knife with a brand new blade and the pointed end aimed straight at your inner thigh!
That's what I get for sitting next to him at his workbench! Was quite a little gusher!!


Hmm...not big enough to put finger through...
A bit behind on uploading photos for him, was taking photos of his progress when...
So quiz for the day...what's your first reaction when something falls towards your lap?
Why jam your legs together to catch it!!! Great idea unless its an Xacto knife with a brand new blade and the pointed end aimed straight at your inner thigh!
That's what I get for sitting next to him at his workbench! Was quite a little gusher!!
Hmm...not big enough to put finger through...


Thanks Madmikeee!
Still catching up on photos to upload...here's a few of the pilot's cockpit, drawings and plastic version thereof. I don't know what he's calling the smaller forward control/cockpit area.
Paper:


Heinrich's such a camera hog..but he helps with scale...

Now to turn paper to plastic:


And...here's Heinrich sneaking into the picture...again...

Still catching up on photos to upload...here's a few of the pilot's cockpit, drawings and plastic version thereof. I don't know what he's calling the smaller forward control/cockpit area.
Paper:
Heinrich's such a camera hog..but he helps with scale...
Now to turn paper to plastic:
And...here's Heinrich sneaking into the picture...again...


Deck planking...how do you count the # of steps to get a plank done??
1) in the above photos you slide a 2"wide piece from a large chunk of balsa
2) rip that piece down into 10" scale plank widths
3) cut those strips into 8' scale lengths
4) use a stainless steel wirebrush to distress the top surface
4) sand the sides of each of those planks to remove basswood fuzz
5)lightly chamfer/sand the ends of the planks at 45 on good side
<build a jig to hold the planks so as not to sand you finger nails/skin off>
6) lightly chamfer/sand the 2 long sides of each plank at 45 angle
<build a jig to hold the planks for drilling>
7) drill first hole in planks at depth to allow pin heads (used to simulate bolts) to sit at or slightly below the surface of the plank (don't want the airmen slipping/tripping in flight!)" repeat 6 times for each plank
8) drill a second smaller diameter hole to accept the "tail" of the pin (something for the glue to grab onto), repeat 6 times for each plank
9) now...you're left with fuzz and torn fibers from the drilling operation...so rub two planks face-to-face together to "sand" the fuzz and flatten the fibers
10) place a batch of planks in a fedex box and shake back and forth about 70-80 times to remove dust from drill holes
11) using a nail set (which luckily is same diameter as the outer larger diameter hole) press and twist the drill set to press the fibers down in...this leaves a pretty nice clean circumference around the outer hole, repeat 6 times for each plank
Repeat each step above, 600 times (for each plank).
next steps will be staining the planking, painting the bolt heads brassy-brass (Vallejo), apply wash (TBD) to each bolt head, cut each bolt head from pin body and glue in place...repeat 6 times for each plank.
Whew.
Before hole drilling...


Before and after fiber compression with nail punch:


Stacks of finished planks awaiting transfer to the shipbuilding yards:

Heinrich is inspecting the planks before transfer...looks like he approves?.

Various color tests on "bolt heads"
 :
:
"bolt heads"...most of them primed..awaiting color coat..

1) in the above photos you slide a 2"wide piece from a large chunk of balsa
2) rip that piece down into 10" scale plank widths
3) cut those strips into 8' scale lengths
4) use a stainless steel wirebrush to distress the top surface
4) sand the sides of each of those planks to remove basswood fuzz
5)lightly chamfer/sand the ends of the planks at 45 on good side
<build a jig to hold the planks so as not to sand you finger nails/skin off>
6) lightly chamfer/sand the 2 long sides of each plank at 45 angle
<build a jig to hold the planks for drilling>
7) drill first hole in planks at depth to allow pin heads (used to simulate bolts) to sit at or slightly below the surface of the plank (don't want the airmen slipping/tripping in flight!)" repeat 6 times for each plank
8) drill a second smaller diameter hole to accept the "tail" of the pin (something for the glue to grab onto), repeat 6 times for each plank
9) now...you're left with fuzz and torn fibers from the drilling operation...so rub two planks face-to-face together to "sand" the fuzz and flatten the fibers
10) place a batch of planks in a fedex box and shake back and forth about 70-80 times to remove dust from drill holes
11) using a nail set (which luckily is same diameter as the outer larger diameter hole) press and twist the drill set to press the fibers down in...this leaves a pretty nice clean circumference around the outer hole, repeat 6 times for each plank
Repeat each step above, 600 times (for each plank).
next steps will be staining the planking, painting the bolt heads brassy-brass (Vallejo), apply wash (TBD) to each bolt head, cut each bolt head from pin body and glue in place...repeat 6 times for each plank.
Whew.
Before hole drilling...
Before and after fiber compression with nail punch:
Stacks of finished planks awaiting transfer to the shipbuilding yards:
Heinrich is inspecting the planks before transfer...looks like he approves?.
Various color tests on "bolt heads"
:"bolt heads"...most of them primed..awaiting color coat..
Last edited:


Similar threads
- Replies
- 24
- Views
- 1,173
- Replies
- 31
- Views
- 1,548
- Replies
- 5
- Views
- 466
- Replies
- 2
- Views
- 864