You are using an out of date browser. It may not display this or other websites correctly.
You should upgrade or use an alternative browser.
You should upgrade or use an alternative browser.
1/24th Scale Y-Wing Fighter, a Red Jammer Custom
- Thread starter Avanaut
- Start date
Avanaut
Well-Known Member
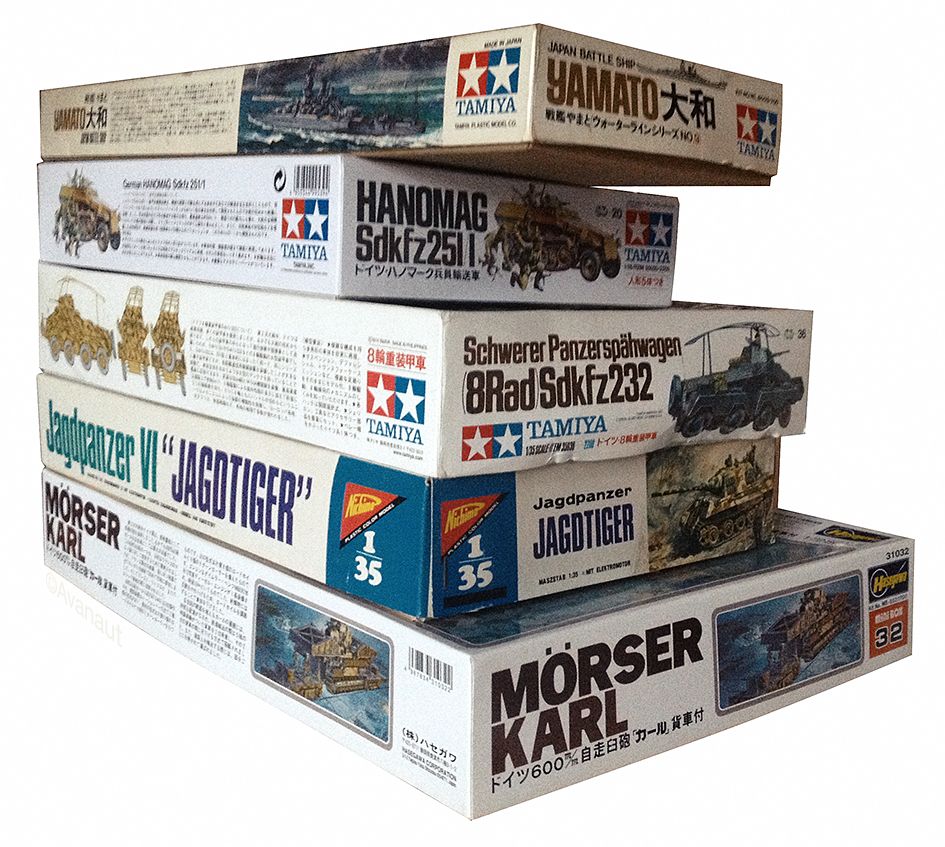
The donor kits for my Y-wing are slowly arriving one by one, a few more are still in the mail. I missed a couple of good ones on eBay, still checking whether they come available again for a good price. The most important one will take several weeks as the cheapest option by far was to buy it from HLJ backordered. Some desperately needed parts were from kits I just didn't have the funds to buy, luckily, I was able to buy most of those parts individually. I know some of these particular kits don't offer much to the build but, well, nobody else made bids on them... It's a start.
I took a little break from the build while waiting for these but I'll be able to resume soon.
You know, at this point I would kill (figuratively) for a good reference photo of the Gold Leader.
I took a little break from the build while waiting for these but I'll be able to resume soon.
You know, at this point I would kill (figuratively) for a good reference photo of the Gold Leader.

You know, at this point I would kill (figuratively) for a good reference photo of the Gold Leader.
I'm more of an X-Wing guy, so my Y-Wing knowledge is very limited, but aren't there any good pics in the Making of Star Wars book by Rinzler, or the Chronicles book?
Avanaut
Well-Known Member
I'm more of an X-Wing guy, so my Y-Wing knowledge is very limited, but aren't there any good pics in the Making of Star Wars book by Rinzler, or the Chronicles book?
Thank you for the tip, Steven!
Unfortunately, the printed material I have been able to obtain suffer from too low a resolution, the tiny rasterized detail is not quite enough for me to positively ID all the parts I want. Some, yes, but not enough. I have the Chronicles book along with Sculpting the galaxy, The Art of Star Wars, From Star Wars to Indiana Jones, Star Wars 365 Days (which is more of the full size props), Star Wars Identities catalogue (sadly, I seem to have lost my Barbican booklet), some ILM books and the Rinzler books in print and iPad. There are some magazines with bits and pieces, but they generally do not focus on the Y-wing. What I don't have is the Star Wars Technical Journal Vol3, so I don't know what exactly it has to offer, but if I'm right, those images have been available online.
From the web I have found some decent reference and some excellent reference. The best reference is from the EFX prototype but I have not been able to confirm whether it's accurate or not. Probably very accurate, but since it has some parts missing and some upside down (compared to Gold Leader and the MOM Tour Y-wing), I'd love to know that for certain.
The people on RPF encourage builders to do their own research and I'm okay with that, I have a limited budget to this (painfully exceeded by now) but I'm still willing to take some chances with the kits. What I am frustrated with sometimes is that without good photographic reference I do not know what I'm looking for.
Any help is appreciated, privately or publicly.
Last edited:
Avanaut
Well-Known Member
The thing that has surprised me the most with this project is the depth of detail on the filming models. Now, I think the Red Jammer is an utter beauty on it's own, but the filming models are so much richer. My favourites are the ones known here in the RPF as the "Tiger Sprocket" and, of course the Gold Leader A.K.A the "Tie Killer". The weathering on the latter is unparallelled by the others IMO.
I am still waiting for kits to arrive for the conversion work to really begin. As those of you who have built these things must know, handling all the details along with the build itself is a challenge on it's own. I know I'm beginning to forget some of the finds already. So, I made a note sheet, which I will update only for the changes I make, not for the parts that are already on the Jammer kit. Also, I will leave out the few replicated Nice-N kit parts, like the ones around the droid socket.
I know my note sheet probably has errors at this point and it certainly does not have all the kit parts marked on it, I will know more when I start gluing them on. It's a start. The original is a big A3 sized sheet, here is a slightly smaller version of it:
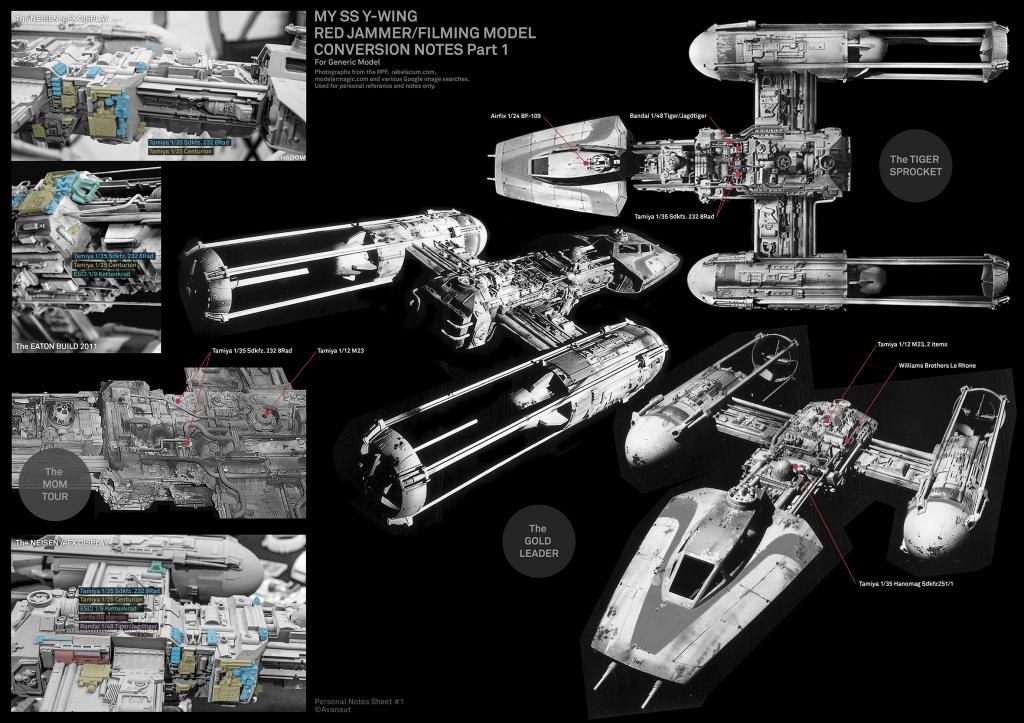
Filming model reference is a pain in the butt to find, this is what's out there as you well know. In addition, to help determining the parts, I am crossreferencing to the Steve Neisen eFX display model, images found on rebelscum.com and a photo of a model Jason Eaton built and featured on modelermagic.com in 2011. I hope the owners of these photographs do not mind me using their images as reference. Crossreferencing these to the originals may just do the trick and I'm good to go for a fairly accurate generic Y-wing.
BTW, does anyone know whether the filming models sport the tiny Yamato parts like they are around the LEM on the Jammer? And, although not critical to my build, I would love to know what goes on on the top of the Gold Leader around the Italeri 155mm gun part behind the droid socket.
kruleworld
Well-Known Member
amazing to watch this going on.
Avanaut
Well-Known Member
Thanks! It feels amazing to go on.amazing to watch this going on.

Avanaut
Well-Known Member
Well, I gotta say the Y-wing is full of surprises. I needed my Y-wing to look like the ones on the silver screen, knowing Nice-N models had called it a day a few months ago and there would be no more Y-wings, I had no choice but to proceed with the Jammer, the last of the Nice-N Y-wings.
Now, I almost wish I hadn't.
About 16 hours ago Nice-N Models announced they're back in business and the plans to offer all of the Y-wings as kits is back on the table. According to their Facebook page, we will have the fabulous Gold Squadron Y-wing fighters, the TIE Killer, Tiger Sprocket, Triangles and MOM Tour, fly again.
Welcome back Nice-N!
Avanaut
Well-Known Member
Do you mean the info on the upcoming Nice-N Y's? It's on their Facebook page, second post from the top in an answer to one of the comments, Nice-N quote: "Gold Leader... AKA TIE Killer... Tiger Sproket... Triangles the MOM all Y's will be avaiable!"I'm not seeing this info posted anywhere...????
DARKSIDE72
Sr Member
The boys are back in town... Your, (OUR) dream kits and collectables are coming to fruition.
Avanaut
Well-Known Member
The good thing is that the Gold Leader was almost finished when Nice-N announced the shutdown. It shouldn't take too long to get things back up and running, I guess.The boys are back in town... Your, (OUR) dream kits and collectables are coming to fruition.
Avanaut
Well-Known Member
I've asked a few times (privately and publicly) whether the Neisen/eFX mock-up on the Rebelscum photos is accurate in it's details. You know, if it's safe to use it as a reference? I mean, it is not easy to see how the bits and pieces are exactly on the filming models for someone who has to rely on web image sources only. The eFX model photos were so clean.
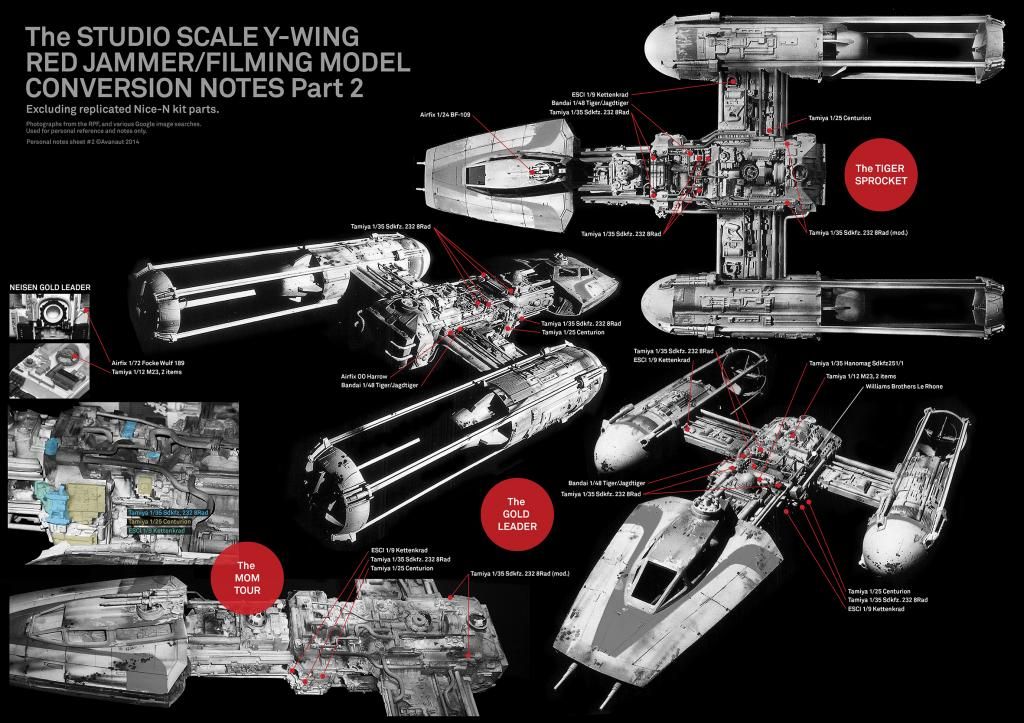
Finally someone answered and told me the mock-up is off. It had some obvious differences to what I could see of the originals but... Oh well, now I don't have to make a fool of myself following the wrong lead.
I updated my notes sheet accordingly (yes, I'm having some fun with this, too). The bits and pieces marked on it is a square one, changes only from the top of my head. I hope my last donor kits arrive sometime next week and I can start putting this together. I'm sure the yet unidentified parts on the hull from the kits I have will find their place as the build proceeds and the big picture comer clearer.
Any help with the flanks on the area where the 8Rad and Centurion parts meet is welcome.

Last edited:
seven
Sr Member
Sweet! That's my 3D Astromech. I drew them per the R2Builders blueprints and made them for my diorama. I have not seen it printed in the 1/24 scale yet. I was hoping the detail would come out better in that scale, but it looks still too soft. I am redoing the files to hopefully come out with more detail. Let me know how it fits together and if there are any things I should improve in in the design file.
I know that material has a residue that needs to be removed before painting. I didn't do that to mine and it really botched it up. Lookin' forward to seeing more progress.
I know that material has a residue that needs to be removed before painting. I didn't do that to mine and it really botched it up. Lookin' forward to seeing more progress.
Avanaut
Well-Known Member
Sweet! That's my 3D Astromech. I drew them per the R2Builders blueprints and made them for my diorama. I have not seen it printed in the 1/24 scale yet. I was hoping the detail would come out better in that scale, but it looks still too soft. I am redoing the files to hopefully come out with more detail. Let me know how it fits together and if there are any things I should improve in in the design file.
I know that material has a residue that needs to be removed before painting. I didn't do that to mine and it really botched it up. Lookin' forward to seeing more progress.
Hi! It is very nice to meet the maker!
The R2 went together like a breeze, it really is a pretty little thing. If there's anything I would try, I think the most delicate surface details, while in reality probably very accurate, scaled down to 1/24th scale might benefit from emphasizing them just a touch. That would be the recessed panel lines on the body and dome. That detail is so small that with the printing material/technique inaccuracies (residue) they are almost lost.
I made a resin copy of the model for practise, with just a touch of sanding it with a patch it turned out really great.
Avanaut
Well-Known Member
I did some castings of the Tamiya Centurion during the weekend and got a little work done on the Y-wing. Going throught the details using the reference I have. I found questions along with some answers.
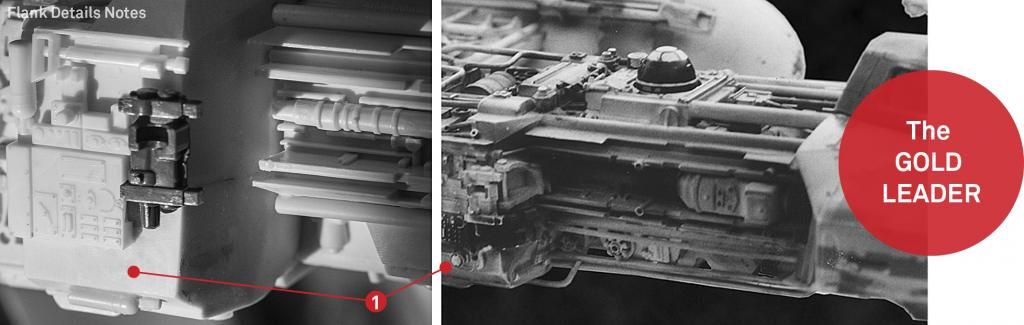
First the Gold Leader starboard side flank. Yup, I should've guessed it. First, it's different than the one on the MOM Tour Y-wing, and secondly there's a part (1), or parts, I had not really noticed before. As I can't find any better photoreference of that area, I will have to pass on this arrangement.
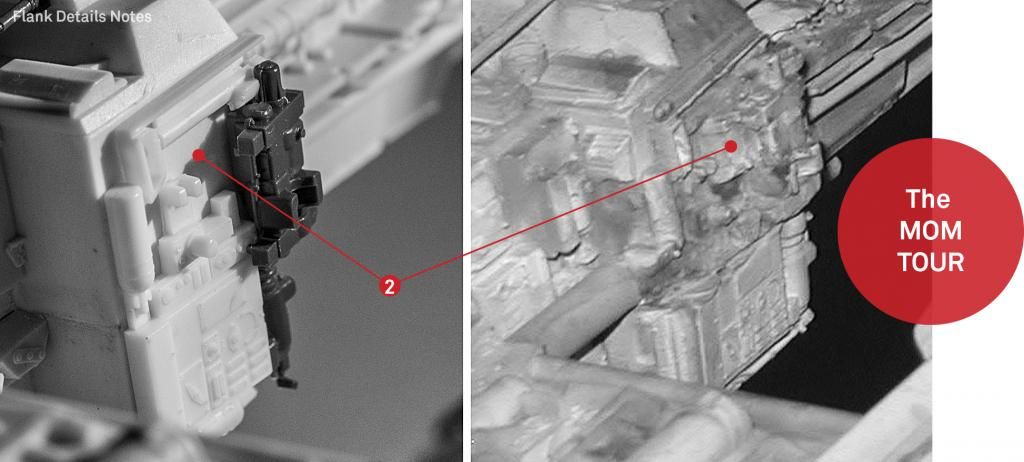
Ont the MOM Tour T-wing the starboard Centurion and 8Rad parts are arranged differently, the unknown parts on the bottom are missing but, alas, there's another new part (2) I can't identify. I will look for something close to it from the kits I have. It is time for some compromises.
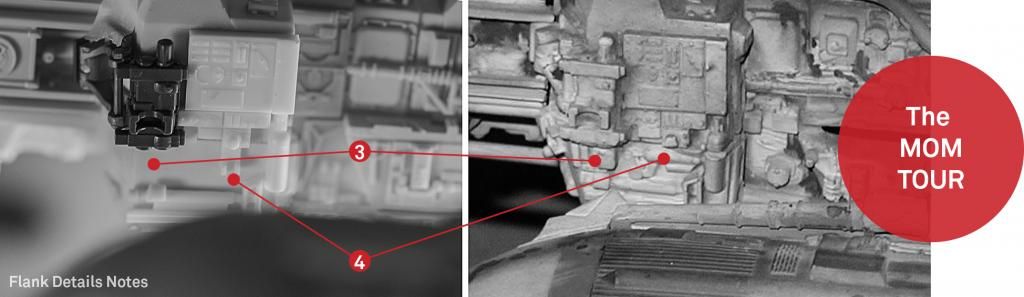
The port side on the MOM has the best reference available, yet there was another surprise. I had overlooked the part below the 8Rad (3), I have to try to find something similar. The part in the middle, in the place of the cut centurion part (4), wasn't a surprise but it is unknown to me. It's back to kit scans.
As you can see from these photos, the flank protrusions are all I am going to go for, the recessed areas behind them and areas under the wings are too difficut for me, they will remain in the Red Jammer configuration.
MonsieurTox
Master Member
Part #4 looks to be a landing gear.
Avanaut
Well-Known Member
Posting here seems to help spotting parts. I was ready to call it a day after some kit scan viewing when I thought I'd better check the model itself for possible duplicates of the four missing parts. I think I found #2, if I'm right that part is used numerous times, for example on the engines. It's very close but hard to tell from the MOM photo. If it fits, I'll use it.
There seems to be some damage to the parts in that area, by the way, the vertical Centurion can on the right is cut in two and it looks like a seam on the wall next to it.
Thanks! I thought it looked like a very small tail wheel at first but I'm still not sure. But yeah, maybe it's one of those Centurion cans placed horizontally and perhaps indeed a tail wheel from a 1/72 aeroplane below it with another, yet unidentified kit part to the right of it.Part #4 looks to be a landing gear.
There seems to be some damage to the parts in that area, by the way, the vertical Centurion can on the right is cut in two and it looks like a seam on the wall next to it.
Last edited:
MonsieurTox
Master Member
OK that's what I thought, it's from an Airfix 1/72 plane, pretty sure it was a german one, I used it on my Y Wing (you should have it in your Red Jammer kit, it's used several times on it) :
Dont remember the kit but someone will help you, at least you know what's the part looks like.

Dont remember the kit but someone will help you, at least you know what's the part looks like.
Avanaut
Well-Known Member
Thanks a million! I was on the right track checking the Jammer for the parts but I missed this one. I feel dumb and, at the same time, very amused.OK that's what I thought, it's from an Airfix 1/72 plane, pretty sure it was a german one, I used it on my Y Wing (you should have it in your Red Jammer kit, it's used several times on it) :
http://i65.photobucket.com/albums/h203/monsieurtox/Divers/y_zpsdb85d8be.jpg
Dont remember the kit but someone will help you, at least you know what's the part looks like.