springsteel
Well-Known Member
MORE updates:
<$200 for entire group


UPDATE: Completed costumes!


Total cost:
We ended up returning the shoes, but adding in a white hair piece ($2?), nylon paracord ($5), white "satin" costume gloves that we painted ($7), one EVA foam floor tile ($5), and a telescoping camera tripod from Craigslist ($10). (The tripod worked perfectly for the Gambit's bo staff; I broke off two legs and jammed it inside of a small length of pvc pipe, using a heat gun). So that should bring the total cost to $99 for the pair! Cut that closer that I thought.
Progress below:
__________________________________________________________________________________________________________________
In the midst of building my own take on a warrior version of Wonder Woman (http://www.therpf.com/f77/multi-use-armor-warrior-hawkgirl-wonder-woman-220624/), my brother finally committed to a costume. He (G) and his girlfriend (J) are dressing up as Gambit and Rogue for the Nashville Comic Con - four weeks out! Fingers crossed everything gets done.
The Deadline: September 25th
The Budget: ~100 bucks
The Plan: Lots of thrifting, painting, and EVA foaming

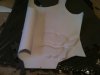
A sketch of the original design we were going for with Gambit. Waxed jeans and a waxed London Fog rain coat, with EVA chest, bracers, the classic Gambit boot:
.JPG")
If I can find some EVA mats locally, my hope is to mix them with craft foam and elastic/velcro for the bracers and boots.
.JPG")
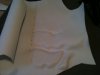
In the end, I think we'll go for a different take on the the legs and boots. We were unable to find a dark tan trench coat, so I'll be painting a grey one to look like leather. If I'm not buying the wax, may as well paint the legs as well! The plan: paint the jeans with black and gunmetal acrylic to resemble leather, and attach craft foam bars for detail. I also liked the New 52 Superman boots, so I incorporated those into the design - which honestly make the boot design more functional.
.JPG")
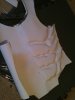
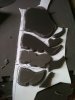
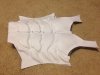
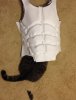
The idea for the chest (which may or may not work?) is to "sculpt" craft foam with a heat gun and my fingers/spoon/shaping tools/etc. I don't have a lot of experience with craft foam + heat, but there's a first for everything.
.JPG")
As for Rogue, I plan to sew a jumpsuit/bodysuit from a separate top and bottom. Both are 97-ish% natural fibers, so they'll go into a pot of dark green Rit dye. The yellow detail will be spray-painted on. J wanted to wear her tall, brown riding boots to look more utilitarian, so I'm thinking about making thigh-high inserts to keep with the Rogue-boot look. For the jacket, I'll paint a little Goodwill number with acrylic.
.JPG")
We've already gathered up most of the supplies, so I'll keep a running tally on costs - it'll keep me accountable.
GAMBIT:
Trench coat: $10
Black jeans: $4
Low-profile shoes: $8 (?)
Current paint total: $7
Gambit Total: $29
ROGUE:
"Bomber" jacket: $4
Top: $4
Pants: $3
Rit dye: $2
Brown wig: ~$10
Rogue Total: $23
Duo Total: $52
Future Purchases:
Craft foam
Foam mats
Yellow spray paint
Black acrylic + gel gloss
So, let it begin.
<$200 for entire group
UPDATE: Completed costumes!
Total cost:
We ended up returning the shoes, but adding in a white hair piece ($2?), nylon paracord ($5), white "satin" costume gloves that we painted ($7), one EVA foam floor tile ($5), and a telescoping camera tripod from Craigslist ($10). (The tripod worked perfectly for the Gambit's bo staff; I broke off two legs and jammed it inside of a small length of pvc pipe, using a heat gun). So that should bring the total cost to $99 for the pair! Cut that closer that I thought.
Progress below:
__________________________________________________________________________________________________________________
In the midst of building my own take on a warrior version of Wonder Woman (http://www.therpf.com/f77/multi-use-armor-warrior-hawkgirl-wonder-woman-220624/), my brother finally committed to a costume. He (G) and his girlfriend (J) are dressing up as Gambit and Rogue for the Nashville Comic Con - four weeks out! Fingers crossed everything gets done.
The Deadline: September 25th
The Budget: ~100 bucks
The Plan: Lots of thrifting, painting, and EVA foaming
A sketch of the original design we were going for with Gambit. Waxed jeans and a waxed London Fog rain coat, with EVA chest, bracers, the classic Gambit boot:
If I can find some EVA mats locally, my hope is to mix them with craft foam and elastic/velcro for the bracers and boots.
In the end, I think we'll go for a different take on the the legs and boots. We were unable to find a dark tan trench coat, so I'll be painting a grey one to look like leather. If I'm not buying the wax, may as well paint the legs as well! The plan: paint the jeans with black and gunmetal acrylic to resemble leather, and attach craft foam bars for detail. I also liked the New 52 Superman boots, so I incorporated those into the design - which honestly make the boot design more functional.
The idea for the chest (which may or may not work?) is to "sculpt" craft foam with a heat gun and my fingers/spoon/shaping tools/etc. I don't have a lot of experience with craft foam + heat, but there's a first for everything.
As for Rogue, I plan to sew a jumpsuit/bodysuit from a separate top and bottom. Both are 97-ish% natural fibers, so they'll go into a pot of dark green Rit dye. The yellow detail will be spray-painted on. J wanted to wear her tall, brown riding boots to look more utilitarian, so I'm thinking about making thigh-high inserts to keep with the Rogue-boot look. For the jacket, I'll paint a little Goodwill number with acrylic.
We've already gathered up most of the supplies, so I'll keep a running tally on costs - it'll keep me accountable.
GAMBIT:
Trench coat: $10
Black jeans: $4
Low-profile shoes: $8 (?)
Current paint total: $7
Gambit Total: $29
ROGUE:
"Bomber" jacket: $4
Top: $4
Pants: $3
Rit dye: $2
Brown wig: ~$10
Rogue Total: $23
Duo Total: $52
Future Purchases:
Craft foam
Foam mats
Yellow spray paint
Black acrylic + gel gloss
So, let it begin.
Last edited:
.JPG")


")