Tom Clancy's The Division (original character build)

Keelan562

Well-Known Member
Hey everyone! So, I posted in the Replica Props area not that long ago regarding tips for starting to create props from the upcoming video game for some original characters. http://www.therpf.com/f9/help-guidance-tom-clancys-division-216169/

In the meantime between then and now, I've been gathering about pieces for the build. Mostly different clothing articles and such, and I selected what sort of pack I wanted to use. Here's a quick colored concept of what I'm hoping the final piece will turn out looking like:

Parker Template.jpg

I've got most of this in the bag, some pieces (specifically, the belt with the drop holster) being recycled from my Leon Kennedy RPD costume.

The arm-band still needs to be made, but that shouldn't take all that long. The jacket was originally going to be a black Dickie's Eisenhower jacket, but a friend pointed out that was going to be very heavy on the black for the upper torso after I sent him a few test photos; and I agreed with him. During the day it looked fine, but in dim light it all muddled together. After playing around with the color of the jacket a little, I settled on burgundy as a great choice. I plan on getting a hold of another Eisenhower, but in gray, and dyeing it, as they don't make them in the color I want.

Some parts are having to be made. These are specifically the comms device and the smart watch. For the comms device, I drew up a rough template to build a model with paper.

SDH Comm.jpg (template; some measurements need to be adjusted, and a bottom flap needs to be added)
IMG_0022.JPG (test build to see if the template would work, made in standard printer paper for the test; quarter next to it for scale)

Fairly happy with how that's turning out. Just got to work on it a bit more and the material it's built out of, then I'll be ready for rigging the lighting.

And speaking of rigging for lighting, I got in the mail an order of 3mm LED bulbs that I've been waiting on so that I could test the idea I had for the watch (which I'll likely apply to the comms device as well). For this, I used an old watch body that fit the size of the watch I'm wanting to use for the final prop. I
IMG_0053.JPGput a printed out graphic on printer paper on the inside of the lens. It looks like it's missing in the photo, but that's because the backside of the paper is still white. Also, the SD card has nothing to do with the build, I just pulled it out of my phone to place the LED bulb on so it could be seen.


IMG_0054.JPG The LEDs are simply placed onto the CR2025 battery and fixed in place on the backside with a small piece of electric tape.

IMG_0055.JPG The LED/CR2025 combo is them placed on the back plate of the watch with a small piece of double-sided scotch tape (you can also see the graphic on the printer paper as seen in the lens of the watch this time)

IMG_0056.JPG 
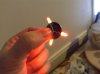
Here's a shot of how the illumination looks with the LEDs housed inside.

IMG_0057.JPG 
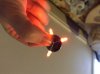
Another shot, with less ambient light to show off the glow.


This is my first attempt at trying to work with LEDs in a costume/prop, so I'm very pleased with how simple I was able to accomplish the goal and how decent it came out. There are obviously some small things I'm going to improve upon for the hero watch, but so far I'd say the test was a success. :D

PS: I'M NOT SURE WHY THERE ARE THE TWO UPSIDE-DOWN THUMBNAILS. Sorry if it annoys anyone else as much as it does me; not sure how those got there...
 

Attachments

  • IMG_0054.JPG
    IMG_0054.JPG
    756.7 KB · Views: 868
  • IMG_0054.JPG
    IMG_0054.JPG
    1.3 MB · Views: 791
UPDATE

Just got the email confirmation some of the other items ordered have been shipped!
I should be getting much of what I'm using for the go-bag in the next couple days (tracking info says Monday, but I like to give it until Wednesday, just in case).

I'll update the post more photos of the materials gathered once they're all here.
 
UPDATE #2

Got the delivery in on Monday after all (the gearsling is just a wee bit larger than I thought it was going to be, at least with my size), but I'm waiting on some parts to arrive for the airsoft M4 I'll be using. Once those arrive, I'll maybe do another test dress with everything and post some photos.
 
UPDATE #3

Alright, so it's been enough time since posting pics, and I have a decent number of items to share that I'm stoked about.

First up is the combination of the respirator and pack.

IMG_0061.JPG (shot showing the "face" of the gearsling, with the respirator next to it, obviously :p )
IMG_0062.JPG (showing off the backing of the gearsling)

The respirator is just a basic 3M respirator. Nothing too fancy about that. The gearsling is a Maxpedition Sitka. They come with right shoulder and left shoulder strap versions; I opted for the left shoulder because, being right handed, I liked having a bit more range of movement with that arm, and not having the strap there allows for better form when shouldering a weapon.

And speaking of weapons...

IMG_0073.JPG (my new baby :3 )

IMG_0069.JPG IMG_0071.JPG
IMG_0074.JPG (ready to kick some *****!!! Shown here with the front and rear sights in the up position; they were collapsed down in the previous photo)

The airsoft replica I chose to go with is an APS full metal CQB M4 (ARS-103 version). This thing is beautiful. The weight feels great, and the stock is four-position adjustable. The one alteration I for sure need to make is with the RIS (I'm thinking of putting a thin layer of craft foam on the inside where the holes are to hide the battery wires).

The model comes as just the body and a [cheap compared to the quality of the unit itself] mid-cap magazine. I intend to get a metal mag to replace the stock one.

I had to get a front rail sling adapter, as the type of front sight used with this verison didn't have a built-on sling loop. The other accessory that I got for it is a standard quick-release vertical grip by G&P.

Accessories that I still plan to get is, obviously, a sling strap, as well as some sort of scope. Right now I'm looking at getting a replica flip-to-side scope. I'm not sure if I'll also get something like a red-dot at the moment, and I'm 50/50 on if I want to get a tactical light (worst comes to worst, I can always use the M3 tactical light I usually attach to my airsoft Glock 17).

Well, that's it for this update! More to come soon! :D
 
UPDATE #4: "THE WATCH"

Got the watch in to do the hero prop. NOTE: I apologize in advance that some of the photos are out of focus; my iPod was being a bit of a punk today, plus the lighting conditions weren't the greatest...

IMG_0078.JPG (base watch is a G-SHORS...'cause it's way more affordable than buying a G-SHOCK when you know you're just gonna gut the thing ;D )

IMG_0079.JPG (I then took some nail polish remover and rubbed it against the markings on the watch body with a q-tip. Worked like a charm!)

IMG_0080.JPGIMG_0081.JPG(the insides of the watch are then taken out, leaving the lens inside. A printed out graphic is placed inside beneath the lens)

IMG_0082.JPGIMG_0083.JPG(LEDs are trimmed down to size and again connected directly to the battery, again in a "Y" formation. Then as a whole they are affixed to the inside of the backplate of the watch)

THIS IS WHERE THE PICS START TO GET BLURRY. I SINCERELY APOLOGIZE AGAIN FOR THAT...

IMG_0084.JPG (the final product once the backplate is put back in place)

IMG_0086.JPGIMG_0087.JPG(lights on/lights off! :D )


That's it for this update. Really pleased with how it's come out! I'd say I'm 90% done with this part, just need to work on the sizing of the graphic used, and maybe find a thinner paper to use so that light from the LEDs can shine through a little easier.

Next task to tackle is going to be the comms device! (I'll admit...I'm a bit intimidated for that one...)
 
Last edited:
Wow! Holy crap, this knocks my group's Division cosplay out of the park. We printed out ours in ABS and used a few LED's for the lighting.

This though, is so much better. Nice work man!
 
Thanks! I appreciate the complement! :D

If you and your group have the means, please by all means utilize the technique I have. And let me know how your comms devices came out (that's my next challenge; I'm more than a little nervous about that piece to say the least...)
 
All good! Not many people are building their own characters, so it's cool to see someone out there doing it from scratch.

Hopefully at some point we do! This info is now vital to how we do the smart watches from now on (it's a lot slicker than our original strategy; buy a watch, stick EL wire in it. now we just print them with my printer) haha.

If you'd like, I can refer you to my friend who designed the 3D model that we use for it for reference? It's a little different than the actual model (due to not a lot of room for electronics) but I'm happy to help you out with it if you'd like! Ours turned out great, bar the lack of adequate LED lighting inside.
 
That would be insanely wonderful! I'd totally go for commissioning a few prints if it's more cost efficient that way. I don't really have anyone in my circle of friends with a 3D printer.

Right now my plan of attack is to try my hand making a prop out of Sculpey, then making a silicone mold to produce hollow plastic copies. For lighting, I intended to basically do the same thing as I've been doing with the watches. If you all took that approach with the lighting, you may be able to revise the look of the shells closer to in-game?

But yeah, PM me that info and we'll see where it leads. In the meanwhile, should my sculpting approach work out, perhaps I could cast a copy and send it to your mate to 3D scan for any future builds.
 
Last edited:
It's likely more cost efficient yeah, plus you can get some more detailing in. Hopefully we can try to do that, if not similar.

Also, PM sent! :D
 
Looks good so far! I love the watch (was stumped for mine) Ill be posting what I have so far in the next couple days!

Thanks! I hope how I approached it helped you out some. Definitely let me know when you post about your's so I can check it out. :thumbsup
 
UPDATE #5: TEST FITTING

Here are a couple pics of the progress so far. I still need to get the Dickie's jacket to dye, but I have a t-shirt that's the color I want the jacket to be so I'm wearing it for reference of how the colors will blend together.

IMG_2737.JPGIMG_2738.JPGIMG_2742.JPG

The paper comms device is just for reference; the finished one will look epic (getting some help from a new friend in Australia on it, thanks in particular to Redback One!).

We have here the full metal APS M4, with the vertical grip on the front rail. We see my Icon Twenty Niner motorcycle gloves. I have the same smartwatch that I showed the making of in the previous update. We have again the utility belt with all the fixings from my Leon Kennedy RPD costume (this time, I have the airsoft Glock 17 holstered).

IMG_2738b.JPG

The Sitka gearsling is still needing some work done (a few MOLLE attachments here and there ought to fix that). The 3M respirator is a bit of a pain to keep in place on the outside of the gearsling like that, but it does fit pretty snug in the buttback (which is part of the belt, and it rests just beneath the gearsling). Also, on the side of the gearsling is a crowbar, for when melee is the tactic of the moment (that, and I have a very odd fondness for the damage that a simple crowbar can accomplish; funny story behind that perhaps for another day ^_^ ). I'm thinking to have a double or triple mag pouch for M4 magazines attached to the MOLLE straps on the side there, with the crowbar still held in place like it is. Also, I want to try to have a knife sheath attached to the two MOLLE straps where the cross strap for the sling comes out, positioned for an underhand draw.

Like I said, there's still plenty of work to be done before it's really ready, but it's come a fairly decent way in a short time with all the elements coming together.

More updates coming soon!
 
Last edited:
UPDATE #6: SOME LITTLE ADDITIONS

Here are a couple of little additions that I've added since the last update:

IMG_0113.JPGIMG_0114.JPGIMG_0116.JPG
First addition is a Maxpedition FR-1 Pouch attached to the gearsling (I used tac-ties, shown in the third photo; the pack came with four, but I only needed two for securing the pouch considering its small size). The pouch can really hold anything, but I recalled it was originally intended for use as a first aid pouch, thus why I put the velcro First Aid patch on it...and yes, i am actually going to put some very basic first aid supplies inside of it.

IMG_0117.JPG
Here we have the Dickies Eisenhower jacket that I plan to alter (I'm looking to dye it so that it's closer to a burgundy color, which is why I chose the silver/gray version of the jacket). Honestly, I wasn't paying attention and got the "lined" version of the jacket, and it feels a bit on the bulky side when wearing it, so if push comes to shove I'll order an "unlined" version, but I'll still use this as a means to see if the type of dye I've been advised to use will do the trick.

IMG_2743.JPGIMG_2746.JPG
This little fella is called a Sphero 2.0, and will be modified to be used as the Seeker Mine (it's an actual remote-controlled sphere!!! You control it through an app). I got the notion of using this little guy from a new acquaintence on Facebook named DB Dave; my intentions are to either paint the Sphero, or to somehow make a rubber or silicone shell to go over it so that I can match the design of the Seeker Mine (leaving just the two rings on the sides and a "button" in the center to glow). The best part is that it fits perfectly in a grenade pouch I added to the utility belt!

BONUS:
IMG_0119.JPGDesigns.jpg
While not technically part of the current costume build, this is something that I added to the design sketches I did of an alternate version of the original character (I have a few variations at the moment, two of which pictured above next to the "final" design the build is based on, mixing and matching from all the different accessories I have at the moment, plus a few that I can get if need be). Housed inside is my airsoft Glock 17, with the clip in the forward pocket (honestly, it's the only pocket worth using. The side one is okay, but I don't have the confidence in it that I do the one I used in the photo; and the third one closest to the trigger, forget about it!)

Thanks for checking the update out! More progress to come soon! :D
 
Last edited:
[mini] Update #7: Comms Device

So, while someone down in Australia is working on the CG model of the main unit to be 3D printed, the two of us put our heads together and thought up of a few ways to replicate the antenna that would be attached. Once figuring out what materials would best be suited for the job, the next step was measuring the parts to see if they would fit in proportion with the unit body.

The following is a simple 1:1 scale printed flat image attached to the [ahem--craptastic] paper reference model built.

paper test.jpg

Once I get all the materials, I'll do a physical test build of the antenna and post it here (as well as perhaps some of the pics of the awesome work being done on the CG model!)

Stay tuned! ;)
 
[mini] Update #8: Some Slight Alterations...

So, in doing my research and wanting to be able to pull this build off, I came across a potential compromise that may have to be made in the design.

I love the contrast of the khaki/burgundy together, but considering the material the Dickie's jacket is made out of and the fact that I'd have to find a good formula to mix the dye (and it would need to be a specific type of dye, at that), I thought it would be an acceptable change to do away with the jacket and stick to a burgundy hoodie. I updated the concept art to reflect this:
Updated Design.jpg

On a side-note, I'm going to have to re-order the type of watch I used in making the smartwatch prop. The bands are very cheap and one of them split off; no shock though, considering the "get what you pay for" logic of them being so cheap to buy. It's not really a big deal, and once the replacement arrives it'll literally take me less than 20 minutes to finish it. Plus, this also gives me the opportunity to try out a better version of the graphic on the watch face.

That's all for now! Sorry I don't have much in the ways of progress or more pics to show. With work having started up again, I'll hopefully have some decent spending cash in the coming weeks/months and be able to get the ball rolling on this costume again.
 
Last edited:
[mini] Update #9: A Little Customization...

So for this brief update, I have a couple items to show. First up is an addition to the go-pack...
IMG_0446.JPG The additions are the two Krill "Extreme 360" AA light sticks. I got the orange ones so they would match the color scheme of the game, but in reality they're not the brightest in the bunch (literally, the only color with less brightness are the red versions). The patches are just there for decoration, since I use the pack at work as a means to break it in. The first aide patch I intend on leaving on, though.

Next up, we have the latest alterations to the AR15.
IMG_0448.JPG
The additions come in two forms, one of which should be easy to spot. :p I have on the top a replica 4x Flip-to-Side scope. As an actual scope, it's friggin' terrible. BUT, as a prop, it works perfectly! The other addition is that I added a sling mount at the base of the buffer tube (NOT to be confused with the one that was already there on the tail end of the stock). This was a suggestion by a fellow member of www.division-agents.net named "Spectator." I still have to get the sling (a couple different options I'm looking at), then that prop will officially be complete!

All for now! I'll look into posting something regarding the comms device in the next update. :D

PS: sorry again for the annoying "attached thumbnail" thing happening again. Not sure how it's happening...
 

Attachments

  • IMG_0446.JPG
    IMG_0446.JPG
    1.1 MB · Views: 448
Update #10: The Comms Device (sorta in-progress)

Hey there again, folks! Just wanted to share a little regarding how the comms device is coming along.

First up, we have a piece of rendered 3D art that's being used to 3D print the prop (done by Keelan O'Driscoll, so look up his business The 105th Armoury if you have the chance...and yes, he is a different "Keelan" than me. We were both very freaked out about the coincidence when we first started communicating with each other ;)).
10590964_686753701399872_430195074_b.jpg

This design was created by the two of us working together going back and forth with various references, starting with the concept art that we've all seen, to our own interpretations, to my spending 2 hours going frame-by-frame of the cinematic trailer for little details neither of us had noticed before. In the end, we had to make a few changes from how it appears in the game/cinematic, but overall I'm thinking it looks good!

Now, for how we're getting the unit to light up, we have good ol' EL wire! The control unit is going to be housed inside the comms device shell, with the EL wire looping into a recessed "ring" from inside.
IMG_0450.JPGIMG_0452.JPG

The wire that I got sorta pisses me off, in that the phosphor glows aqua (which appears white on camera) rather than the wire looking anything near orange. There are a couple of ways that I'm thinking to correct this for the final product once it's all pieced together, but we won't know if any of those potential tricks will work until I give 'em a try.

That's all I've got for you all for now; more to come soon!
 
Last edited:
Update #11: The Antenna

So, I got in touch with [the other] Keelan, and I'll be putting in the order for him to go ahead and 3D print the shell for the comms device in a week or two.

In the meantime, I decided I needed to get crackin' on the antenna!

Here's what I'm using so far...

I know I shared before the printed out image of the antenna attached to the very basic paper mock-up of the comms device, but here's the image I drew out for that, so you can see the detail I'm going for:

Antenna.jpg

IMG_0164.JPG I've got 2 sizes of wood dowels that I'm using (1/4" and 5/16") for the main shaft at the bottom of the antenna, where you can see the bottom portion would be the larger size. Cutting the pieces and putting them together looks something like this:
IMG_0163.JPG (the red band represents where I plan to put a small strip of aluminum tape, to give it a nice metal-piece look)

As for how the build looks with most of the piece in place, we have this:
IMG_0463.JPG We have the flat band for the "antenna" made out of black EVA foam, as well as the small "tail" piece on the end. I took a mini-jack adapter and chopped it up for the connection. The larger piece will attach at a perpendicular angle near where the aluminum tape will go (connecting the antenna to the comms device), while the plug will go above that (the end of the cable being connected to the top part of the "tail"). The tool there is just a small razor saw for cutting the dowel pieces to size.

Some parts I'll probably go over with a layer of plastidip (mostly the blade/flat band and the large end piece with the tail after the cable is glued down) to give it some different texture. Also, I'm thinking that the band that wraps around the middle of the blade will probably be just a piece of electrical tape.

Hope you're all liking this so far! More to come soon!
 
[mini] Update #12: COMMS DEVICE TEST PRINT!!! (Best update so far!)

Just got this pic sent over from the buddy in Australia who's doing the 3D printing for the comms device. It is looking friggin' beautiful! And it's only the first test print! :D

10813898_741237789284796_1484312207_o.jpg

Can't wait for how the final product comes out and being able to see it in the flesh....er, in the plastic. ^_^*
 

Your message may be considered spam for the following reasons:

If you wish to reply despite these issues, check the box below before replying.
Be aware that malicious compliance may result in more severe penalties.
Back
Top