You are using an out of date browser. It may not display this or other websites correctly.
You should upgrade or use an alternative browser.
You should upgrade or use an alternative browser.
Tom Clancy's The Division (original character build)
- Thread starter Keelan562
- Start date

MythMaker
Active Member
3D Model DONE! I'll be making this available online somewhere soon for anyone to download if you want to 3D print for your own cosplay (will reference in this thread). HOWEVER, Massive will probably be making a 3D file available for fans within the next few months anyway, so you might have an even better alternative soon.
This model is one piece, does not open up like Keelan's, but has seams and gaps built into it so it looks like it does. I built some square cutouts into the bottom so that I could push nylon webbing straps in there and pretty much just hook the brick right onto the shoulder strap of my slingpack. Your setup might require that you change that up, so keep that in mind. PICS


This model is one piece, does not open up like Keelan's, but has seams and gaps built into it so it looks like it does. I built some square cutouts into the bottom so that I could push nylon webbing straps in there and pretty much just hook the brick right onto the shoulder strap of my slingpack. Your setup might require that you change that up, so keep that in mind. PICS
MythMaker
Active Member
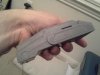
I have a brick! This is a total trip. I keep picking this thing up and just holding it to make sure its real, because it feels so weird and cool to have been making this on the computer and now its REAL. PICS:
 It was printed vertically, and here you can see the rippling. After sanding and painting, it should look great, though.
 Here's the bottom prior to cleaning. The printer had to build in some supports for the overhangs, so this is what it looked like.
 Gorgeous.
 Here's the bottom again after cleaning. I'll push the nylon webbing straps into these c-shaped slots to hold the unit onto my slingpack.
 ")
 It looks like just the right size and proportions. I think all the time spent studying and tweaking has paid off.
 The only unfortunate part - in order to make sure the unit didn't tip over during printing, the printer had to build a support bed on the bottom. It did not come off as cleanly as I would have hoped. Will take some major work to get this looking good.
*EDIT* Had some time to sand it up a little bit, its looking much better already. But HERE's the part I'm MOST proud of!
 Check it out on my pack! It hooks in just the way I wanted!
 I wasn't sure if it would work the way I wanted it to but it totally does!
 Its strong enough that I can hold up the whole pack holding onto the brick!
It was printed vertically, and here you can see the rippling. After sanding and painting, it should look great, though.Here's the bottom prior to cleaning. The printer had to build in some supports for the overhangs, so this is what it looked like.Gorgeous.Here's the bottom again after cleaning. I'll push the nylon webbing straps into these c-shaped slots to hold the unit onto my slingpack. It looks like just the right size and proportions. I think all the time spent studying and tweaking has paid off.The only unfortunate part - in order to make sure the unit didn't tip over during printing, the printer had to build a support bed on the bottom. It did not come off as cleanly as I would have hoped. Will take some major work to get this looking good.*EDIT* Had some time to sand it up a little bit, its looking much better already. But HERE's the part I'm MOST proud of!
Check it out on my pack! It hooks in just the way I wanted! I wasn't sure if it would work the way I wanted it to but it totally does!Its strong enough that I can hold up the whole pack holding onto the brick!Attachments
Last edited:
MythMaker
Active Member
I got everything together for my pill packs. Now, when the game comes out, the "packs" he mentions in the gameplay trailer will probably turn out to be something completely different, but I thought this was a great idea because I could cosplay this and engage with people even if they had no idea what I was supposed to be, by giving them a pill pack, and then they might even look up the game (or me) online later.
I had business cards printed because it was a good way to save time for a little money. Instead of having to print these out and cut them up, I spent about $20 to print 100 business cards, which should be plenty. I thought about making them look hand-printed and much more low-tech, but I figured these pill packs would either be A) manufactured at some secure facility and airdropped to Division operatives or B) manufactured in New York where they definitely can print business cards and have a few labs.
Check it out (sorry, the editor doesn't seem to want to let me turn these pics sideways):
 The front side
 The back side (made sure to explain that the "pills" are tic-tacs!)
I had business cards printed because it was a good way to save time for a little money. Instead of having to print these out and cut them up, I spent about $20 to print 100 business cards, which should be plenty. I thought about making them look hand-printed and much more low-tech, but I figured these pill packs would either be A) manufactured at some secure facility and airdropped to Division operatives or B) manufactured in New York where they definitely can print business cards and have a few labs.
Check it out (sorry, the editor doesn't seem to want to let me turn these pics sideways):
The front sideThe back side (made sure to explain that the "pills" are tic-tacs!)
Last edited:
MythMaker
Active Member
WOO! Comicpalooza was this weekend and I rocked my Division cosplay. I had to cut a few corners for time, but I'm pretty pleased with how it turned out. First, the finished brick:
 The orange circle is not as thick as I would like, but it was too late to change that, and I had some better paint but it would have taken too long to do the process that would have brought out the color better, so I just used this bright acrylic I had on hand. The antenna assembly was 1/4 wooden dowels cut to the appropriate sizes, and partially wrapped in electric tape. I secured the arm joint with a screw, used a thin sheet of craft foam for the antenna, and for the thin protrusion at the bottom.
I painted my watch the same dark grey as the brick, and used the same bright orange acrylic. Not the best results, but gets the point across:


Now, the finished slingpack:
 And then I decided last minute to add a knife where it was easy to reach, but somewhat concealed, AND - this was awesome - a speaker so I could play The Division trailer music as I walked around!


Some low res pics of the final result:


Some much better really awesome pics from outside coming SOON. Also, I handed out my pill packs and everyone loved those, even though most were not familiar with the game.
Some notes: This cosplay is really easy to get around in! I chose my really comfortable hiking shoes and with the hoodie it was a little warm but not too bad. But I could run and move without worrying about anything shaking loose/falling off which was really nice. The only delicate part of the outfit was the comms device which I ironically named "the brick." All in all, it exceeded my expectations and was a lot of fun to research and put together. Can't wait to wear it AFTER the game has come out.
The orange circle is not as thick as I would like, but it was too late to change that, and I had some better paint but it would have taken too long to do the process that would have brought out the color better, so I just used this bright acrylic I had on hand. The antenna assembly was 1/4 wooden dowels cut to the appropriate sizes, and partially wrapped in electric tape. I secured the arm joint with a screw, used a thin sheet of craft foam for the antenna, and for the thin protrusion at the bottom.I painted my watch the same dark grey as the brick, and used the same bright orange acrylic. Not the best results, but gets the point across:
Now, the finished slingpack:
And then I decided last minute to add a knife where it was easy to reach, but somewhat concealed, AND - this was awesome - a speaker so I could play The Division trailer music as I walked around!Some low res pics of the final result:
Some much better really awesome pics from outside coming SOON. Also, I handed out my pill packs and everyone loved those, even though most were not familiar with the game.
Some notes: This cosplay is really easy to get around in! I chose my really comfortable hiking shoes and with the hoodie it was a little warm but not too bad. But I could run and move without worrying about anything shaking loose/falling off which was really nice. The only delicate part of the outfit was the comms device which I ironically named "the brick." All in all, it exceeded my expectations and was a lot of fun to research and put together.
Can't wait to wear it AFTER the game has come out.
Last edited:
MythMaker
Active Member
BAM. There was actually all this construction going on in and around the convention center. How perfect is that?


Cosplay details not previously mentioned:
1) I got some off-white fabric paint and 1 inch and 2 inch letter stencils, and quckly painted "SHD" on the left front of the hoodie and the right shoulder. I wanted it to look worn/hastily done/NOT perfect, and it came out real good. Was worried it wouldn't be visible enough but it looks great in these pics.
2) Took a length of 100 feet of paracord, coiled it up and attached it to the side of the slingpack (wish I had some real rope, will probably replace this later), and a smartphone USB cord because... reasons? With all the power out I dunno why he needs it but... he does!
3) My embroidered patches didn't come in time so I used Keelan's idea and got an armband for $10 and printed the Division phoenix logo and stuck it in there. I wish I had taken 5 - 10 minutes to sew a few stitches onto the hoodie so I didn't have to keep adjusting it all day, though.
4) Rubberbanded a glowstick to my rifle. Hey, what if you drop that puppy underground where its dark?
5) Replaced my holster with a molle holster. Wish I had arranged it differently now, seeing these pics.
6) Although I didn't put in electronics to light up my brick or watch, I saw a little LED flashlight with a red LED in the back that could blink, and I stuck it in one of my mag pouches so it would be blinking as I walked around. Just something to catch the eye. So I had this bigass gun, Division music playing as I walked around, and this blinking red light. But I figured this guy is definitely spending a lot of time underground and maybe wants to make sure someone can find him if he gets lost, or maybe he puts it on the ground somewhere in order to find his way back to it if he's exploring.
7) Put a roll of electrical tape hanging from the bottom right of the slingpack, just like I saw in one of the videos. I loved that little detail right when I saw it in the gameplay video so I incorporated it.
8) Added some chotchkies to the right side of my belt; one had a D-ring underneath and put a caribiner hanging off of it because it made a cool clanky jingle when I jogged or moved quickly.
9) I put my keys and wallet in the drop leg pouch on my left hip and this was great. Also, I put the pill packs in the outside pocket for easy access. That was well planned; yet another little thing built into this cosplay to make walking around easier and more fun.
Can't wait to cosplay this AFTER the game comes out!
Last edited:
Keelan562
Well-Known Member
Good work, Matt! THAT'S how you represent! ;D
And yeah, having to keep adjusting the armband throughout the day is a pain in the ass. I'm thinking if I use it again, I'm having some double-sided tape with strong adhesion between it and the hoodie sleeve to keep it in place.
If we're every going to a convention in the same town, we definitely need to group up.
MythMaker
Active Member
For anyone else who wants to cosplay as a Division operator, here's a link to the Google Sketchup file I made to 3D print your own brick!
https://drive.google.com/file/d/0B-LKRFwzl6A7X21rQkp2bjJkalE/view?usp=sharing
Here's some pics of the final product before finishing and painting:


(The bottom says "Massive Entmt Rock So Hard")
This is PLA plastic, not ABS. See earlier in the thread for how to build the antenna assembly. I made mine with just the 1/4" dowel, a drill and a screw, electrical tape, and thin craft foam and superglue/E6000. Plus, you'll need a 1/8" jack and cord to plug in and attach to the antenna.
Enjoy!
https://drive.google.com/file/d/0B-LKRFwzl6A7X21rQkp2bjJkalE/view?usp=sharing
Here's some pics of the final product before finishing and painting:
(The bottom says "Massive Entmt Rock So Hard")
This is PLA plastic, not ABS. See earlier in the thread for how to build the antenna assembly. I made mine with just the 1/4" dowel, a drill and a screw, electrical tape, and thin craft foam and superglue/E6000. Plus, you'll need a 1/8" jack and cord to plug in and attach to the antenna.
Enjoy!
Last edited:
Keelan562
Well-Known Member
While partially connected to the costume build, the teaser trailer for the fan-webseries is officially online!
http://youtu.be/LzQzd1naEhA
We're hoping to have the post-production work for the pilot webisode done fairly soon, so keep your eyes peeled for updates.
http://youtu.be/LzQzd1naEhA
We're hoping to have the post-production work for the pilot webisode done fairly soon, so keep your eyes peeled for updates.
OneGoodScare
Active Member
Dude, I feel stupid asking this but how do the leds turn on and off on your watch? That watch is so sick! I wanna do something similar for spidey webshooters.. anyway, great costume!
Keelan562
Well-Known Member
Dude, I feel stupid asking this but how do the leds turn on and off on your watch? That watch is so sick! I wanna do something similar for spidey webshooters.. anyway, great costume!
They don't really turn on/off. I actually just attached the LED leads directly onto the battery that was inside the watch. The amount of power going into them is low enough that I can do so safely without worrying about the LEDs burning out, but the battery does get drained fairly quick (especially when at the convention, where I had them on all day). It's just a matter of trimming the leads to the right length without going past a certain point; too short and they won't let the current pass correctly.
But do note, the effect of the LEDs and the EL wire in the comms device don't show up in well-lit areas. Found that out both at the convention and during the filming of the pilot for the webseries. :/
Last edited:
Keelan562
Well-Known Member
Some excellent stuff folks, I've been waiting for the game and I'm really glad to see folks embracing the costuming side!
Thanks! This is my first actual cosplay as well, so I'm very glad I picked being at the forefront of it as my step into the world of being IN costume instead of just appreciating them.
So far I think there are only three of us that have done it: The guy that dressed as the character from the gameplay footage (can't recall his name right now), myself, and now MythMaker. Hopefully, there will be enough at us to attend a convention together someday to have a little firesquad going.
Keelan562
Well-Known Member
Mini-Update: Smartwatch Glow Effect (2.0)
Was looking into ways to get the glow effect to be stronger, and the solution ended up being SUPER simple.
The exact same approach is taken; attach the 3 LEDs directly to the battery watch, affix it to the inside of the backplate, and secure it back onto the watch body. HOWEVER, instead of simply having the graphic printed out on a standard sheet of paper, I printed this one (twice, so that the blacks showed up better) on a sheet of vellum paper. The results are a better and brighter light-up!

While before the effect in a bright lit room or outside wasn't noticeable at all, it can now be seen (though faintly). But the effects in a dark-lit environment are totally noticeable now!
(...now, if I can just get off my ass and figure out a way to make it so that the light can be turned on/off with the watch buttons... Someday )
Was looking into ways to get the glow effect to be stronger, and the solution ended up being SUPER simple.
The exact same approach is taken; attach the 3 LEDs directly to the battery watch, affix it to the inside of the backplate, and secure it back onto the watch body. HOWEVER, instead of simply having the graphic printed out on a standard sheet of paper, I printed this one (twice, so that the blacks showed up better) on a sheet of vellum paper. The results are a better and brighter light-up!
While before the effect in a bright lit room or outside wasn't noticeable at all, it can now be seen (though faintly). But the effects in a dark-lit environment are totally noticeable now!
(...now, if I can just get off my ass and figure out a way to make it so that the light can be turned on/off with the watch buttons... Someday
)Keelan562
Well-Known Member
MiniUpdate: Photoshoot! (part 1)
Just wanted to share some of the photos that were taken today. Had to choose among many to send one to the folks at Massive Entertainment. Here's a good number of the honorable mentions:
This first one, while out of focus, I still like (my friend, who was the photographer, was still working on the settings in his camera when he snapped it).

Starting to get some action-ish shots (and remember how tricky that drop holster is to move with)

My good ol' Glock 17 (for when things get up-close and personal)

"Did I get 'im?... I think I got 'im..."


For those of you who like trivia, this same underpass was actually used in "The Dark Knight Rises"


One of my buddy's favorite shots of the day


(part 1)Just wanted to share some of the photos that were taken today. Had to choose among many to send one to the folks at Massive Entertainment. Here's a good number of the honorable mentions:
This first one, while out of focus, I still like (my friend, who was the photographer, was still working on the settings in his camera when he snapped it).
Starting to get some action-ish shots (and remember how tricky that drop holster is to move with)
My good ol' Glock 17 (for when things get up-close and personal)
"Did I get 'im?... I think I got 'im..."
For those of you who like trivia, this same underpass was actually used in "The Dark Knight Rises"
One of my buddy's favorite shots of the day
Attachments

Last edited:
Keelan562
Well-Known Member
MiniUpdate: Photoshoot! (part 2)
Here come the few rest of the photos I wanted to share...

This zone was suffering a high contamination level

Little scared to be solo'ing this zone as it gets darker...

And finally, we have the image that is being printed out and sent to Massive (there's going to be text filling in the negative space on the left).
Thanks for all the encouragement and kind messages left during the build! Looking forward to continuing to improve, and hope more jump on the thread to put up their progress as well!

Let's put the pieces back together, people!
(part 2)Here come the few rest of the photos I wanted to share...
This zone was suffering a high contamination level
Little scared to be solo'ing this zone as it gets darker...
And finally, we have the image that is being printed out and sent to Massive (there's going to be text filling in the negative space on the left).
Thanks for all the encouragement and kind messages left during the build! Looking forward to continuing to improve, and hope more jump on the thread to put up their progress as well!
Let's put the pieces back together, people!
Last edited:


Similar threads
- Replies
- 14
- Views
- 1,048
- Replies
- 0
- Views
- 311