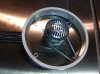
I've got a rush job for three non-functional prop mics. I also have a (vintage) Shure55 lying around. I could throw it in a box of Oomoo and make a couple of quick pulls from that, but I can't figure out how to keep the silicone from oozing into the grill. I don't want to wreck the mic, either.
My best thought so far is to use something like paint or white glue as a sealant -- something I could rinse out of the grill with warm water (I'm taking the original microphone apart to try to repair the electronics, anyhow, so now problem to dunk the shell in a tank and soak it for a while). The grill is metal, and attached to the shell with either brazing or some sort of industrial epoxy; it is hard to tell, but it isn't going to come out easy.
Any thoughts?
(We're opening next Friday, and I've got no time for carving or 3d modeling to print it -- or even time for a mail-order replica to arrive. Our fall-back is throwing together some found-object fake mics with silver spray paint and hot glue. Which is what we're rehearsing with right now anyhow.)

")