You are using an out of date browser. It may not display this or other websites correctly.
You should upgrade or use an alternative browser.
You should upgrade or use an alternative browser.
PLNK Droid Build
- Thread starter Paul6700
- Start date
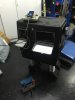
Well it was kind of finished. Okay not really finished. Life has a habit of getting in the way of fun. When we last saw this project I was installing the motors into the feet.
Which I did do.

I then stopped and this is how he sat for the last year and a half. Actually working as I intended as a battery charger for my various droids.


But now it is time to really finish it.
Which I did do.
I then stopped and this is how he sat for the last year and a half. Actually working as I intended as a battery charger for my various droids.
But now it is time to really finish it.
Attachments
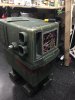
To finish, I need to paint and weather the whole droid and finish wiring the sensor and sound device. To paint the droid I taped off all of the openings and removed anything that the paint might mess up.
The black was always intended as a primer and though I thought I was going to keep it really dark, I have a new paint scheme in mind. First step, spray the whole droid silver.

I was not really happy with how the top of the droid looks, I felt like it still looked too much like the bottom of a plastic container. So once the paint dried I cut and installed a scrap piece of metal for the new top.


That is all I accomplished today.
The black was always intended as a primer and though I thought I was going to keep it really dark, I have a new paint scheme in mind. First step, spray the whole droid silver.
I was not really happy with how the top of the droid looks, I felt like it still looked too much like the bottom of a plastic container. So once the paint dried I cut and installed a scrap piece of metal for the new top.
That is all I accomplished today.
doctorDWwho
Sr Member
Looks awesome!!
The aluminum silver is really the base color. I am going to use a custom green color made with acrylic paints and then dry brushed all over the droid. The color was a mixture medium grey green and grey with a little yellow and black.

To dry brush just load the brush and work it on a paper towel.

Then brush onto the droid. At first I thought I would leave some Silver showing through.

Since my plan is to do a heavily distressed and weathered droid, I did not mind if I missed spots. However I wanted the green to have a matte sprayed on look.


After several coats of the green the droid really began to look one even tone. I used red as accent color which was also dry brushed on.

The next step is to use a screwdriver and chip or scrape away the green or red paint and reveal the silver. The spray paint is much more durable than the acrylic paint. Also I think the application of the paint is weaker too. The dry brushing causes the paint to not adhere as well as it was intended.


I went crazy and scrapped off anywhere I thought this droid would be worn.
To dry brush just load the brush and work it on a paper towel.
Then brush onto the droid. At first I thought I would leave some Silver showing through.
Since my plan is to do a heavily distressed and weathered droid, I did not mind if I missed spots. However I wanted the green to have a matte sprayed on look.
After several coats of the green the droid really began to look one even tone. I used red as accent color which was also dry brushed on.
The next step is to use a screwdriver and chip or scrape away the green or red paint and reveal the silver. The spray paint is much more durable than the acrylic paint. Also I think the application of the paint is weaker too. The dry brushing causes the paint to not adhere as well as it was intended.
I went crazy and scrapped off anywhere I thought this droid would be worn.
RabidBadgerFran
New Member
This is AMAZING!
Now to weather the droid to look dirty and grimy.
Started with a wash of beige sandy color for general dirt.

The color is mixed with lots of water to dilute it and allow it to flow down the sides of the droid.


I just kept layering washes over the whole droid, on occasion i would wipe away some paint with a damp rag or blot it.
I let the washes dry a bit between applications. Then I used blackish green color for the look of oil.


The black really helps to add nice accentuation to parts. My plan was also to weather the legs with the black, and I actually did one of the legs but it is way too bright and shiny still. So will have to fix that shortly.
- - - Updated - - -
Me too, Toddo! I just need a sound board to complete the droid electronics and another battery.
Started with a wash of beige sandy color for general dirt.
The color is mixed with lots of water to dilute it and allow it to flow down the sides of the droid.
I just kept layering washes over the whole droid, on occasion i would wipe away some paint with a damp rag or blot it.
I let the washes dry a bit between applications. Then I used blackish green color for the look of oil.
The black really helps to add nice accentuation to parts. My plan was also to weather the legs with the black, and I actually did one of the legs but it is way too bright and shiny still. So will have to fix that shortly.
- - - Updated - - -
It's really coming together and looks great Paul. I really want to see it moving!
Me too, Toddo! I just need a sound board to complete the droid electronics and another battery.
Today a quick update.


I used flat black acrylic paint straight from the bottle to get the right thickness of the wash. The paint covered okay but allowed some of the metal to show through, which was what I was intending for the black wash.
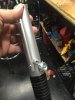
Next, I finished up the hose.


A week or so ago, I sprayed the nozzle end silver. Today I used four shades of Rub-n-Buff to weather the black hose.
I hit the nozzle with a couple colors of the Rub-n-Buff and then used a watery wash of black.


I used flat black acrylic paint straight from the bottle to get the right thickness of the wash. The paint covered okay but allowed some of the metal to show through, which was what I was intending for the black wash.
Next, I finished up the hose.
A week or so ago, I sprayed the nozzle end silver. Today I used four shades of Rub-n-Buff to weather the black hose.
I hit the nozzle with a couple colors of the Rub-n-Buff and then used a watery wash of black.
Attachments
Another quick update!
Took all the tape off the droid.


Then added the hose.

Then I painted this.


This goes on the face of the droid and I removed it because it was falling off anyway. So I sprayed it silver first and then dry brushed red over it. Once dry I scrapped it with a screwdriver and then did a wash of black to help weather it.
Took all the tape off the droid.
Then added the hose.
Then I painted this.
This goes on the face of the droid and I removed it because it was falling off anyway. So I sprayed it silver first and then dry brushed red over it. Once dry I scrapped it with a screwdriver and then did a wash of black to help weather it.
Attachments
")
Tonight I opened up the droid to reattach the switches and finish up a few details.


Inserted one of the switches and realized they should be weathered too, so I used some silver paint to give them a metal look.


I also decided to clean up the ground wires. They were just all wired together via a wire nut. Installed a ground strip and rerouted the ground wires to it.


Reinstalled the switches and the finished grill piece. Also reconnected all of the wires and was able to test that everything is wired correctly.
I need to order a wav trigger board from SparkFun and an extra battery. The wav trigger will be connected to the Arduino to play sounds whenever the sensors are triggered and the battery is for the drive system. Hopefully to get him walking very shortly.
Inserted one of the switches and realized they should be weathered too, so I used some silver paint to give them a metal look.
I also decided to clean up the ground wires. They were just all wired together via a wire nut. Installed a ground strip and rerouted the ground wires to it.
Reinstalled the switches and the finished grill piece. Also reconnected all of the wires and was able to test that everything is wired correctly.
I need to order a wav trigger board from SparkFun and an extra battery. The wav trigger will be connected to the Arduino to play sounds whenever the sensors are triggered and the battery is for the drive system. Hopefully to get him walking very shortly.
Fantastic!
Similar threads
- Replies
- 2
- Views
- 550
- Replies
- 0
- Views
- 330
- Replies
- 3
- Views
- 481