Arrow Season 1 Bow/Suit/Everything Build

JBReplicas

Sr Member
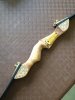
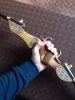
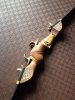
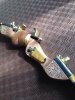
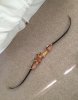
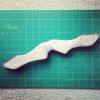
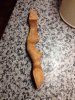
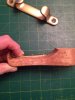
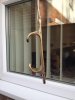
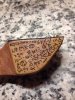
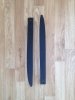
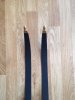
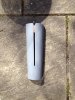
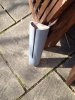
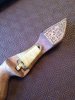
Here I will document my work on my construction of the Season 1 bow from Arrow, I've had this on the bench since Christmas time and was finally at the stage where I had gathered most of the accurate parts to begin putting it all together. First off I located a Ragim Matrix Jnr 48 and had it shipped over, like most people I was surprised how small it was, but as soon as you see it in person you know its right. The first major task was to fit the limbs and string and run around the house shouting 'you have failed this city' at my cats. Seeing how unimpressed they were I decided to do some real work and strip back all the wood stain to reveal the bare finish underneath. This took some time but was worth it. Then I added some light staining which I wanted to do before I did the wood burning, for this I used a new method, English tea - I soaked 3 bags in half a cup of warm water for about an hour and then dabbed it on lightly with a paper towel, I then wanted to add some darker shades so I put 3 teaspoons of coffee in with it, yes it really works, the trick is to not saturate the wood too much, more to come..
 

Attachments

  • 1_zps80e9df31.jpg
    1_zps80e9df31.jpg
    138.3 KB · Views: 259
  • 4_zps9d1f55ed.jpg
    4_zps9d1f55ed.jpg
    124 KB · Views: 264
Last edited:
Re: Arrow Season 1 Bow Build - WIP

When I took delivery of my add on parts (hinges/chock) I took them into work and quickly sliced through the hinges with a hacksaw, it was simple enough as brass is very soft, though I had a little trouble hammering out one of the pins. Next up I chose to follow the photo of what I think is one of the hero bows that shows the hinge part follows the contour of the riser where it sits, you'll see what I mean in the photo, to do this I held the hinge part over a piece of steel bar and gentle tapped it with a soft mallet. For the chock I was certain from the start that it was a stainless steel part merely painted brass/gold. I laid down a few light coats of Rustoleum gold and let it dry, the plan was to add several layers and then add some real weathering/damage. Whilst the paint was drying I started sanding down my limbs to get them ready for a few coats of semi-gloss black.
 

Attachments

  • 5_zps26d2b13e.jpg
    5_zps26d2b13e.jpg
    82.8 KB · Views: 284
  • 7_zpsc8727fef.jpg
    7_zpsc8727fef.jpg
    71.8 KB · Views: 231
Re: Arrow Season 1 Bow Build - WIP

Looking good. I think you're the first I've seen to form the arrow rest hinge to the riser. Keep it up!!
 
Re: Arrow Season 1 Bow Build - WIP

Thank you, yeah for some reason I really liked the way it looked, I do plan on building at least 2 variants of the bow, one being a stunt with no sinew and the hinges bolted on
 
Re: Arrow Season 1 Bow Build - WIP

Here is my chock after a few coats of paint, then a bit of roughing up with some 80 grit wet and dry paper, I then used liquid mask on the steel areas and went back over the chock with a few passes of gold, then I removed the liquid mask and began adding some weathering using acrylic burnt umber with a few drops of water, once that dried I applied some light pastel shading and then gave it 2 gloss clear coats. The next shot shows my first try at wood burning the symobols onto the riser, it went pretty well.
 

Attachments

  • 9_zps4b7d3c1c.jpg
    9_zps4b7d3c1c.jpg
    52.2 KB · Views: 256
  • 11_zps0dd78bae.jpg
    11_zps0dd78bae.jpg
    97.6 KB · Views: 210
Re: Arrow Season 1 Bow Build - WIP

Next step was giving my bow limbs a nice coat of semi gloss black, I did this in about 4 light coats, just until the Ragim logo was covered up, left that to dry over night then went back and masked off the tips to be painted gold, 3 or 4 very light coats and these were the results, I am going to go back and scuff up the limbs a little so they look a bit less immaculate.
 

Attachments

  • 7_zpsc8727fef.jpg
    7_zpsc8727fef.jpg
    71.8 KB · Views: 184
  • 10_zps7cb57dd7.jpg
    10_zps7cb57dd7.jpg
    86.2 KB · Views: 206
Re: Arrow Season 1 Bow Build - WIP

Thanks all, I took some time out from the bow to focus on my quiver, I always suspected it was made of a hard shell with some kind of fabric covering it, I originally thought leather but was pleased when it was revealed to be Black Cordura, a waterproof material, and that the quiver was finished off with a leather trim. A little while ago I started on a quiver shell but it was long before any decent photos were available, so it was basically just a tube...

I went back and chopped it up literally, it was a cardboard frame so I gave it a coat of FG resin, then a few coats of filler/bondo, then set about sanding it smooth. I sanded, and sanded and primered, and sanded and sanded and primered. Then I decided to cut out the slot for the arrows and re prime it, here is what I have so far, my Cordura will be here within the next few days.
 

Attachments

  • 13_zps585c9dba.jpg
    13_zps585c9dba.jpg
    143.7 KB · Views: 173
  • 12_zps239d885e.jpg
    12_zps239d885e.jpg
    132.7 KB · Views: 180
Got the first bit of hardware fitted tonight, I used a tiny amount of epoxy resin to fix the hinge in place where I wanted it, then took my artificial sinew, wiped it down with acetone and slowly started wrapping it around making sure I kept it as tight as I could, once I had it where I wanted I used a tiny blob of superglue which fused the sinew nicely. After that I dry brushed some light weathering on the hinge.
 

Attachments

  • 12_zps572e8315.jpg
    12_zps572e8315.jpg
    110.3 KB · Views: 270
Update time, got my accurate washers and test fitted with my non accurate cap nuts, just using these as placeholders until my nuts come in from Pinders run, also a quick shot of it all together so far, next step is weathering the bar tape, oh and another Ragim bow arrived yesterday to start yet another build ;)
 

Attachments

  • 16_zps6c384350.jpg
    16_zps6c384350.jpg
    140.2 KB · Views: 216
  • 15_zpsb8699957.jpg
    15_zpsb8699957.jpg
    137.7 KB · Views: 299
Forgot to update this! Oops, this bow is actually up for sale now whilst I work on another one for myself and try to find an Oneida
 

Attachments

  • 1.jpg
    1.jpg
    132.2 KB · Views: 240
  • 2.jpg
    2.jpg
    168.4 KB · Views: 223
  • 3.jpg
    3.jpg
    142 KB · Views: 224
  • bowfin.jpg
    bowfin.jpg
    241.9 KB · Views: 261
This thread is more than 9 years old.

Your message may be considered spam for the following reasons:

  1. This thread hasn't been active in some time. A new post in this thread might not contribute constructively to this discussion after so long.
If you wish to reply despite these issues, check the box below before replying.
Be aware that malicious compliance may result in more severe penalties.
Back
Top