Because it was winter, I went with fumeless methods of hardening the pep. I tried EVERYTHING: spackle, patching plaster, Rock Hard, and wood filler. I sanded forever!

there were a couple parts that, even after sanding, refused to be smooth. Those parts I remade from foam. I lined the helmet with craft foam and upholstery foam for padding at this point.

Eventually, I got to a point where I felt okay with the finish. I plastidipped the entire thing, then painted it with Rustoleum hammered pewter.

LIGHTS! The eye pieces were a 5 step process XD. I made circles from apoxie sculpt and then mounted round red lenses from a pair of Lennon glasses. The LED's are half of a 2 set pack I bought on amazon for like $5 dollars. and across the lenses, I placed window film (spidey lenses) that I painted red (with acrylic, like the cheapskate that I am). I then mounted the lenses and the LED set in the helmet, with the battery pack and switch easily accessible on the left hand side.

I did the painting with Testors Enamels. BY HAND. IN MARCH. I had been banned from using paint anywhere near the basement where my parents and I sleep (understandably, even though I HAVE A MASK. DON'T GET ON ME FOR THAT) so I worked up stairs, with my windows open and the fan on. Absolutely freezing my butt off, but the fumes cleared out IMMEDIATELY.

The finished helmet! viewed from the side. This is the closest I currently have to a detail shot. I may build a light box and shoot it that way. I haven't gone for it yet. The back is attached by velcro, but it isn't really used. I just slip the thing on. I didn;t know if I'd be able to, but it worked for the weekend. I may just take it out and seal it back together. (even though
I bruised my forehead from taking it on and off every time I had to take a photo.)

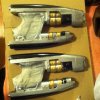
All the photos of the guns put into one shot. I was pressed for time and had 2 costumes to finish for the con, so I went with the Rubies guns. I primed them, then painted with enamels. Top right is unweathered. I then went over it with shoe polish. I did the heat scarring with a scrap of upholstery foam. The next photo is for detail.sorry for the small size.


The shoulder armor is craft foam, heat sealed and backed with fabric using heat N bond, then coated in mod podge. I painted both parts with acrylics, then sealed AGAIN with Mod Podge.

AND FINALLY. the finished costume. I also made the bag and an orb, but I don't have decent photos of them/ I want to remake all the detailing on the bag. The coat was one I bought on e-Bay. It was $40, and light tan, but it was real leather. The tails were done using Heat N Bond (because sewing leather takes way too long by hand and I didn't want to destroy my machine. It also looks way better than sewing would have in my opinion. I took Red DesignMaster Colortool and sprayed the whole thing, then at the bottom and the cuffs I sprayed with Burgundy colortool. This thing felt AWESOME, it didn't crack at all (take that doubters) and due to a semi-splotchy application from the spray, it has a beautiful weathered look. The way the bag clips over it is so comfortable and easy to remove. All in all, This is my favorite cosplay to date.
 Hey all, I just finished my helmet (in cardstock, gonna work on reinforcing it ASAP) and I'm wondering about how to put it on? I'm thinking about cutting it along the curve that runs over the top of the side panel down the back and then putting a second layer of foam or something underneath with velcro. Again, I'm not sure. I need to figure something out before I can go into the reinforcing stage.