LukaFilm
Sr Member
Hi!
Finally!!! I too joined the club of lucky people who have an all metal blaster replica!")
It's been a few years I've been wanting it so I bought the kit around christmas time from mr. Richard Coyle. It arrived in a week, but got held up in customs for another two weeks.. Needles to say those times were hard for my nerves. Since it was insured for 600$, they wanted to bill me with another 200$ at customs. Of course I lied that I got it as a gift, and that I dont know its true value. Its a toy gun, how can it cost 600$, right!?! haha. Well long story short, it ended with me bribing the customs officer with 30$, and he just let me have it... :$
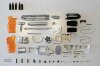
First, the absolutely necessary ritual of spreading the kit on the table:

The kit is great, and castings are precisely done. I was suprised how big and heavy the blaster will be when complete. There is a fair amoung of cleanup to be done on many parts, but pewter is a very soft material and it shouldn't be a problem.

You can manage to achieve chrome like surface with pewter. (if you are persistent enough)

Its been a few days of constant sanding and polishing.. My fingers are starting to hurt..

Here I cut the end of receiver as Rich showed in his tutorial.. Of course you need to find the courage first :lol.

I filed and sanded the receiver. I had to be carefull not to damage the lettering.

Aaaah, favorite part - polishing:

There are a few holes in the metal, here and there.. I couldn't sand them off becouse i would sand the numbers as well, so I just let them be.. I figure it is a well used gun and it gives it more realism.. I'll probably accidentally make some new holes pretty soon too, so better to leave it as it is..

Okay, after a few days I had enough of sanding and polishing so I decided it is time to start building this thing, right???

I must say that I couldn't find the tapping equipment of needed diameters. The screws too are diferent diameters than what we use in europe, at least not that common. So what I do is I drill a slightly smaller hole and force-screw them in. Since pewter is soft, they make their own thread. It works great.

Here all 3 screws are holding the Bulldog grip frame in place (its hard to see the third one but its there):

That's where I'm at now. Its been a couple of days allready and its going very slow. Which I like actually becouse it is a joy to make this great prop!!!
I do have a couple of questions for you guys that built your own..
1. I'm not sure which screw holds the trigger guard and swing arm to the bulldog frame. The one i put on the photo has the correct head, but it looks too short to me, and i didn't get any longer than that.

2. Does the hole need to be to the right like the casting suggests, or should I drill it in the middle?

Okay, sorry I posted like a 100 photos, but I enjoy seeing others build their blasters, so I hope someone will find it interesting..
See you soon, I'm going for a :cheers:cheers:cheers
Finally!!! I too joined the club of lucky people who have an all metal blaster replica!
It's been a few years I've been wanting it so I bought the kit around christmas time from mr. Richard Coyle. It arrived in a week, but got held up in customs for another two weeks.. Needles to say those times were hard for my nerves. Since it was insured for 600$, they wanted to bill me with another 200$ at customs. Of course I lied that I got it as a gift, and that I dont know its true value. Its a toy gun, how can it cost 600$, right!?! haha. Well long story short, it ended with me bribing the customs officer with 30$, and he just let me have it... :$
First, the absolutely necessary ritual of spreading the kit on the table:
The kit is great, and castings are precisely done. I was suprised how big and heavy the blaster will be when complete. There is a fair amoung of cleanup to be done on many parts, but pewter is a very soft material and it shouldn't be a problem.
You can manage to achieve chrome like surface with pewter. (if you are persistent enough)
Its been a few days of constant sanding and polishing.. My fingers are starting to hurt..
Here I cut the end of receiver as Rich showed in his tutorial.. Of course you need to find the courage first :lol.
I filed and sanded the receiver. I had to be carefull not to damage the lettering.
Aaaah, favorite part - polishing:
There are a few holes in the metal, here and there.. I couldn't sand them off becouse i would sand the numbers as well, so I just let them be.. I figure it is a well used gun and it gives it more realism.. I'll probably accidentally make some new holes pretty soon too, so better to leave it as it is..
Okay, after a few days I had enough of sanding and polishing so I decided it is time to start building this thing, right???
I must say that I couldn't find the tapping equipment of needed diameters. The screws too are diferent diameters than what we use in europe, at least not that common. So what I do is I drill a slightly smaller hole and force-screw them in. Since pewter is soft, they make their own thread. It works great.
Here all 3 screws are holding the Bulldog grip frame in place (its hard to see the third one but its there):
That's where I'm at now. Its been a couple of days allready and its going very slow. Which I like actually becouse it is a joy to make this great prop!!!
I do have a couple of questions for you guys that built your own..
1. I'm not sure which screw holds the trigger guard and swing arm to the bulldog frame. The one i put on the photo has the correct head, but it looks too short to me, and i didn't get any longer than that.
2. Does the hole need to be to the right like the casting suggests, or should I drill it in the middle?
Okay, sorry I posted like a 100 photos, but I enjoy seeing others build their blasters, so I hope someone will find it interesting..
See you soon, I'm going for a :cheers:cheers:cheers