You are using an out of date browser. It may not display this or other websites correctly.
You should upgrade or use an alternative browser.
You should upgrade or use an alternative browser.
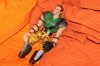
Small Soldiers Brick Bazooka replica for my son
- Thread starter Desponds
- Start date


nathanial91
Member
This thread is full of badassery, great work man!
huggybearjr
New Member
Cant wait to see more 
Johnathan87
New Member
Looks pretty good, love that you guys are remaking a part of my childhood
justice league
Active Member
amazing work
So before I get all the parts for the pressure chamber, I played around a bit with joint solutions... LEGO bionicle joints seem a perfect fit. Don't know yet whether I shall put sawn of joints into the finished resin castings or whether I should make new clay masters with the bionicle joints already in and then cast resin parts that already include the joints... Probably the latter since I don't want to kill all the boys' toys...
I started painting the first resin parts (first primed them). It's my first paint job EVER, so you're allowed to laugh out loud ;-) The air bubbles suck, need DESPERATELY that pressure chamber!!!!! Updates will follow soon...


I started painting the first resin parts (first primed them). It's my first paint job EVER, so you're allowed to laugh out loud ;-) The air bubbles suck, need DESPERATELY that pressure chamber!!!!! Updates will follow soon...
Jok3r0314
Sr Member
awesome solution with the joints, I would just make molds of the joints and then add those duplicates to the finished casting. That way you don't use all the toys and no need to remold all the figures parts over again. I cannot wait for the next updateSo before I get all the parts for the pressure chamber, I played around a bit with joint solutions... LEGO bionicle joints seem a perfect fit. Don't know yet whether I shall put sawn of joints into the finished resin castings or whether I should make new clay masters with the bionicle joints already in and then cast resin parts that already include the joints... Probably the latter since I don't want to kill all the boys' toys...
I started painting the first resin parts (first primed them). It's my first paint job EVER, so you're allowed to laugh out loud ;-) The air bubbles suck, need DESPERATELY that pressure chamber!!!!! Updates will follow soon...
View attachment 587814View attachment 587813View attachment 587811View attachment 587812

Jok3r0314
Sr Member
tr only sure fire way to prevent that issue would be to tint the resin to match the skin tone. Other than that all I can think of is a heavy duty sealer, but even that will ultimately wear away as well, just like the actual toys. I'll try and look into it.Arms colored... How to you provide the color from chipping off? Especially at the hinges?
View attachment 587863
With my pressure chamber finally fully working, there are no more bubbles! But a lot of "pimples, since all bubbles in the silicone molds broke open... arrrgghh... Will have to make a completely new master from chavant clay and then new silicone molds in the pressure chamber. I have used rubber ribbons to hold the joints together, but will change now to LEGO bionics joints in the clay master so that I can cast the joints within the parts already... we will see. Painting only one layer, no camouflage, tattoo, buttons etc. yet. The leg knife will be molded separately as well just like the leather straps to hold the shurikans and the sword on the back... long journey, woohaa...
Attachments
Last edited:
Jok3r0314
Sr Member
With my pressure chamber finally fully working, there are no more bubbles! But a lot of "pimples, since all bubbles in the silicone molds broke open... arrrgghh... Will have to make a completely new master from chavant clay and then new silicone molds in the pressure chamber. I have used rubber ribbons to hold the joints together, but will change now to LEGO bionics joints in the clay master so that I can cast the joints within the parts already... we will see. Painting only one layer, no camouflage, tattoo, buttons etc. yet. The leg knife will be molded separately as well just like the leather straps to hold the shurikans and the sword on the back... long journey, woohaa...
View attachment 602907View attachment 602908
Man I feel you, but the end results will be worth it. I'm trying to view the attached files but it says invalid. I'd like to know what your intentions are with the old molds. Be sure to de-gas the silicone for the new molds. As usual I'm looking forward to seeing your progress
Howlrunner
Sr Member
Looking awesome. Be great to finally see a casting finished up! :thumbsup
Jok3r0314
Sr Member
Now I can see them, awesome! In the meantime I'm back to work on the boxes. I'm pretty sure I've got the dimensions correct, now I just have to work on the front and back character art 

With my pressure chamber finally fully working, there are no more bubbles! But a lot of "pimples, since all bubbles in the silicone molds broke open... arrrgghh... Will have to make a completely new master from chavant clay and then new silicone molds in the pressure chamber. I have used rubber ribbons to hold the joints together, but will change now to LEGO bionics joints in the clay master so that I can cast the joints within the parts already... we will see. Painting only one layer, no camouflage, tattoo, buttons etc. yet. The leg knife will be molded separately as well just like the leather straps to hold the shurikans and the sword on the back... long journey, woohaa...


Jok3r0314
Sr Member
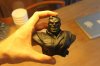
You know.I'm always up for seeing progress photos. Everything is looking so great =)So, before I do a new master and then all those molds again in the pressure chamber, I started to finish my two expression heads. What do you think guys? Nearly ready to mold as well?
View attachment 605363View attachment 605364View attachment 605365View attachment 605366
Waoh!!!!great job!!!!!!
- - - Updated - - -
Where to get that dog tag?
- - - Updated - - -
So, before I do a new master and then all those molds again in the pressure chamber, I started to finish my two expression heads. What do you think guys? Nearly ready to mold as well?
View attachment 605363View attachment 605364View attachment 605365View attachment 605366
Where to get that dog tag?
Johnathan87
New Member
Looks really good