You are using an out of date browser. It may not display this or other websites correctly.
You should upgrade or use an alternative browser.
You should upgrade or use an alternative browser.
Small Soldiers Brick Bazooka replica for my son
- Thread starter Desponds
- Start date

The CD doesn't run on my MacBook... It states that its an old version or something... The files are screensavers and desktopbackgrounds, I think (that's what it says). I'll scan some pics from the book tomorrow... By the way, you wrote "jaw"... ")
The pics on page 9 are also in the Japanese book, the whole figure of each commando and Gorgonite from front and side.
Fun fact: On the last pages of the book they show what was once available from the Soft Garage company. There was even a Butch Meathook figure... doh from my side this time...
The pics on page 9 are also in the Japanese book, the whole figure of each commando and Gorgonite from front and side.
Fun fact: On the last pages of the book they show what was once available from the Soft Garage company. There was even a Butch Meathook figure... doh from my side this time...
Of course, I should have said Nick's jaW needs widened, not his mar. doh!
Looking forward to getting my hands on the Japanese book. Have you had a look at the CD yet? Still want to know what's on there....
The scanner in the office is broken, so I can't scan any pics from the Japanese book right now... sorry for that.
The following may to some extent be useful, however, especially for you, saintmdn:
Regarding the hip joint, I found the enclosed picture from a statue of "Realm of the claw" Winstons team made after Small Soldiers. The hip joint is however parted like the feet joints of the soldiers in the movie and the shoulder joints of the Chip figure from Hasbro. This would be the simplest way, but in my opinion, a complete, closed round joint would look much much cooler. Any inputs from you guys regarding figures that might work as reference material? The same question applies to the connection of the chest/back and the belly. The belly is sunken into the chest/back part and posable to the front and back... but I have no clue as to how far the parts are stuck together and how they are connected. How about the head anyway connection to the neck anyway?
As already stated, the mechanism of the feet joint is the same as with the Terminator wrist as shown in the enclosed photo.
Furthermore, I think that it is safe to state the following: Judging by all the pics I have seen until now and the making of videos, there were two initial action figures which were thereafter amended in order to create the different characters. On one of the pics saintmdn has posted in his thread, Butch and Kip are shown. Both of them have resculpted chest and legs, i.e. underneath the grey clay, white resin lies in the form of a "plain vanilla leg".
In my opinion, the original arms of Kip, Chip, Nick and Link looked like the ones Link and Kip have (those two are actually exactly the same, as especially the green and red version of the fabric wrapped around their right arm show). For Nick and Chip, shirt sleeves were sculpted over these arms. The forearms are all the same (for Kip, Chip, Nick and Link that is and for Butch and Brick respectively). The gloves differ again. As already stated, the legs including boots of Nick and Link are the same as well, only in different colors.
Attachments
![arm1c[1].jpg](https://therpf-f28a.kxcdn.com/forums/data/attachments/77/77134-72c9aa72942521d25d8454e9a1472d84.jpg)
Howlrunner
Sr Member
Yes, I've definitely read that two basic body forms were created and then modified for each of the commandoes. Makes things somewhat simpler than having to sculpt each individual one differently. Glad to see that there's good research going into these.
Desponds you remind me of myself with checking all the details over and over again till it's perfect it's good to see your focused on it and I think between us we will make some amazing figures it's going to be a very time consuming project but defiantly all worth it in the end.I was thinking the same on body types and arms on nick kip chip and link and the same thoughts about the legs on nick and link so like howlrunner said it makes our work a lil somewhat simpler which is a relief lol I'm still working on the joints I have an idea for each section I'll try them out then let you know when I have worked it out with the belly do you mean putting a joint in there so that it can move back and forwards? I think This joint was only made for the animatronic figures.
it's going to be a very time consuming project but defiantly all worth it in the end.I was thinking the same on body types and arms on nick kip chip and link and the same thoughts about the legs on nick and link so like howlrunner said it makes our work a lil somewhat simpler which is a relief lol I'm still working on the joints I have an idea for each section I'll try them out then let you know when I have worked it out with the belly do you mean putting a joint in there so that it can move back and forwards? I think This joint was only made for the animatronic figures.Roughed in the shirt with some ribs and folds... I think his head really is to darn small... But hey, the head is the easiest part anyway, right? Has anyone ever thought about how to mold the parts, since they are hollow. In my opinion the Stan Winston figures had a two part mold for each part, i.e. the chest piece a two part mold and the back piece a two part mold in order to make the inside of the pieces match each other. If you open the Hasbro Chip, you know what I mean. Any inputs regarding the chest until now? I know that the striations on the chest muscles visible above the shirt are still missing, but I'll do that as soon as I'm happy with the chest overall.
I'm going to take a week vacation soon, then I can really work on this guy...
I'm going to take a week vacation soon, then I can really work on this guy...
Attachments

Howlrunner
Sr Member
Looking good. I'd say that yes, the head is too small for the body. I think the neck muscles/tendons could do with being smoothed out a bit or the indentations being filled a little more - I think they stick out too much/too far. Also, can't quite tell from your photo, but I think that perhaps the edges of his vest come too close to his armpits - I'm looking at the Japanese book (scan) and it seems to me like the arm holes of his vest come down lower and wider, showing more of his torso skin around his arms. Though this may just be the angle of your photo that is not showing your sculpt in this area correctly.
I wouldn't bother with trying to cast the pieces hollow. Sounds like a LOT of trouble to me for something you're not going to see anyway.
I wouldn't bother with trying to cast the pieces hollow. Sounds like a LOT of trouble to me for something you're not going to see anyway.
You are absolutely right! I had to redo the whole upper body last night since it was half an inch to wide... Arrgghh... The head is still too small though... The neck needs some work, of course, took me a long time only to lay the muscles right more or less. The shirt is gone again, also the ribs, I will redo them as soon as I can...
Regarding the joints, I found this: http://www.onesixthwarriors.com/for...-hts-noland-barneyross-whiplash-body-var.html. Now I understand how the belly part is/could be fixed within the upper body and how the waist is connected to the belly. The thing is that I don't want the shoulder joints to be hinge ball joints like the Hasbro Chip... And the system shown in the link is too difficult. I thought that maybe one could "hide" one of the 1/6 bodies with all the joints inside a commando, but that's not it either (would be cheating, right Anyway, first, I need to make the clay version. In two weeks, I'll take a two weeks vacation, that should push things forward
Regarding the joints, I found this: http://www.onesixthwarriors.com/for...-hts-noland-barneyross-whiplash-body-var.html. Now I understand how the belly part is/could be fixed within the upper body and how the waist is connected to the belly. The thing is that I don't want the shoulder joints to be hinge ball joints like the Hasbro Chip... And the system shown in the link is too difficult. I thought that maybe one could "hide" one of the 1/6 bodies with all the joints inside a commando, but that's not it either (would be cheating, right
Anyway, first, I need to make the clay version. In two weeks, I'll take a two weeks vacation, that should push things forward Looking good. I'd say that yes, the head is too small for the body. I think the neck muscles/tendons could do with being smoothed out a bit or the indentations being filled a little more - I think they stick out too much/too far. Also, can't quite tell from your photo, but I think that perhaps the edges of his vest come too close to his armpits - I'm looking at the Japanese book (scan) and it seems to me like the arm holes of his vest come down lower and wider, showing more of his torso skin around his arms. Though this may just be the angle of your photo that is not showing your sculpt in this area correctly.
I wouldn't bother with trying to cast the pieces hollow. Sounds like a LOT of trouble to me for something you're not going to see anyway.
Howlrunner
Sr Member
Any further updates?
Yes sir! I have holidays since today which gives me the time to move forward. I redid the Brick head since it was about 4mm less wide than it should be and about 5-6mm less high than it should have been. I will post pics soon... I'm further working on the pic that will go on the box.
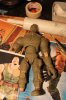
Finally, here are some pics from the making of Small Soldiers figures that I find interesting, especially regarding the joints, i.e. neck (see Archer) and shoulders (see Butch). The pic of the heads shows part of the Commando's weapons too and a very good sight of the heads in a more bird perspective. Very interesting regarding the depth of the eyebrow area. Further showed me that my Butch head is too wide in the jaw area relatively to the rest of the head. The pic of the half clay Butch clearly shows that they had body for the big guys (Butch and Brick) and just sculpted their clothes on them later. And yeah, that pic with the suitcase is stunning (sorry for the quality). Made me think about making different expression heads and hands. Imagine you could just change them at will when you take the figures out of the box... God, why am I not a billionaire, then I could work on this project all day...


The busts from the comic shop have arrived, and they are amazing. Showed me that even though I had redone my Chip head it was rubbish ;-) I will PM you regarding this.
Since my Brick head was too small, the same applies to my Butch head. Kip's head, however, seems to be about right.
Updates will follow shortly
Finally, here are some pics from the making of Small Soldiers figures that I find interesting, especially regarding the joints, i.e. neck (see Archer) and shoulders (see Butch). The pic of the heads shows part of the Commando's weapons too and a very good sight of the heads in a more bird perspective. Very interesting regarding the depth of the eyebrow area. Further showed me that my Butch head is too wide in the jaw area relatively to the rest of the head. The pic of the half clay Butch clearly shows that they had body for the big guys (Butch and Brick) and just sculpted their clothes on them later. And yeah, that pic with the suitcase is stunning (sorry for the quality). Made me think about making different expression heads and hands. Imagine you could just change them at will when you take the figures out of the box... God, why am I not a billionaire, then I could work on this project all day...
The busts from the comic shop have arrived, and they are amazing. Showed me that even though I had redone my Chip head it was rubbish ;-) I will PM you regarding this.
Since my Brick head was too small, the same applies to my Butch head. Kip's head, however, seems to be about right.
Updates will follow shortly
Howlrunner
Sr Member
Very cool pictures. Are they from the documentary on the DVD or the Spanish making of on YouTube or something else? (really must go back and watch that DVD doc) I'd love to just have a set of those heads there - wonder what happened to all those little things like that?....
Interesting on the headless Archer pic - none of his heads appear to have the dreadlocks. Would they have been sculpted on later or cast from something more flexible and added? I originally figured that they were sculpted on, but seeing that picture makes me rethink. Plus there is an Archer head keyring (with laser eyes) that looks pretty accurate but has no dreads. Having two of the laser eye heads that I've tweaked, they're SO close to the original heads compared with every other licenced piece of merchandise that I have my suspicions that they were based on original castings (before having seam lines, screw holes, company logos, battery compartments, etc. added) or at least the 3D computer renderings.
I've been working on filling seams, holes, sanding, etc. my laser eye Chip head and am now painting it. Didn't bother moulding that one. Like the Brick head it is very accurate (though yours will blow it out of the water).
As well as that I've been repainting my Stellar Gifts 12" Archer vinyl statue. It's been going slow and steady but it's ALMOST finished now (though I then also need to make him an arrow for his crossbow).
Looking forward to seeing more!
Howlrunner
Sr Member


Photobucket is NOT wanting to play ball, so hope this works....
I've been keeping busy repainting my Stellar Gifts 12" Archer. It's not perfect, but it's not too bad at all once repainted.
Also filled, sanded and painted my Chip Hazard laser-eye keyring head. Again, it's not perfect, but it's the best Chip head that's been released commercially. Would love to see it next to a from-original-sculpt head.....


Last edited:
Hi everyone
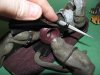
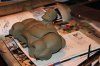
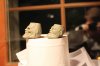
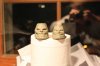
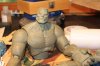
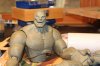
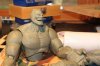
Small update in the enclosed photos. I would love to show everything refined and finished, but it is just incredibly hard... All the folds in the pants, the boots and so on... And all the measurements you never get right. Did all the leg and arm joints in wood now, need to redo the hip joints however since they are too small.
The head was, as mentioned before, too small, so there is a new one now... The black eyes are due to me being to stupid to take the sculpey out of the oven in time.
Cut open the chest yesterday, it needed to come more forward... will redo the lower part of the chest soon and the traps as well. The hand seems to be the right size now, but the forearms are not buff enough, yet.
I'm very sorry that I haven't got more to show yet, but I hope you have some creative inputs... If anyone has some more reference pictures, especially from the back, that would be great.
All the best
Florian
Attachments
-
 Brick left side left.jpg347.2 KB · Views: 291
 -
 Brick left leg.jpg346.9 KB · Views: 225
 -
 Brick left arm.jpg329 KB · Views: 241
 -
 Brick heads comparison right.jpg307.4 KB · Views: 245
 -
 Brick heads comparison left.jpg323.6 KB · Views: 242
 -
 Brick heads comparison.jpg315.2 KB · Views: 298
 -
 Brick new front.jpg446.8 KB · Views: 418
Howlrunner
Sr Member
Good to see this still on the go. Body and limb forms look to be getting there. Got any plans for the dogtags yet?
Changed the hip ball joints yesterday and start today with different expression heads. With the dog tags, I thought about making a cast from the ones on the Chip Bust Captain EO bought for me, bringing a casting to a friend with the right machines and making aluminium prints or whatever they do...
Will update with pictures once I will consider it worth it
Will update with pictures once I will consider it worth it
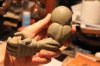
Played around with expression heads today and made the following roughed in heads. What do you guys think? Don't know yet how to cast the one with the open mouth... Maybe I need to make a separate mold for the jaw? Or a hinge system for the jaw to open and close?
Watched parts of a tutorial from Stanwinstonschool today regarding the making of animatronic puppets... best stuff I've ever seen. Did they really make animatronic faces for the Small Soliders or were they only moving the eyes? How would you have put all that stuff in these little heads?
Watched parts of a tutorial from Stanwinstonschool today regarding the making of animatronic puppets... best stuff I've ever seen. Did they really make animatronic faces for the Small Soliders or were they only moving the eyes? How would you have put all that stuff in these little heads?
Attachments

I love to see this project go forward! What japanese book are you guys talking about? I must have missed something ...
I´d build bigger heads for close ups or scale the whole animatronic up.
... How would you have put all that stuff in these little heads?
I´d build bigger heads for close ups or scale the whole animatronic up.