Modifying the Struss Dredd Vest

Art Andrews

Community Owner
Community Staff
Got my vest in from Kurt today and wanted to walk through the steps I take in finishing it out.

First thing I am looking at is coloring the Pauldrons. Started with the left.

Here is the raw shoulder piece:
dredd-shoulder-pauldron-01.jpg

First thing I did was tape off the piece I wanted to color with painter's tape:
dredd-shoulder-pauldron-02.jpg

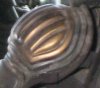
Next I took a tube of Goldfinger's Sovereign Gold metallic paste (supposedly what was used in the movie) and using a Q-tip, very very lightly covered the armor, leaving the creases empty.
dredd-shoulder-pauldron-03.jpg

From there, I took a paper towel and evened out the gold, almost, but not completely filling in all the cracks. If you wanted to look like a new, shiny Judge, this is a pretty good look.

dredd-shoulder-pauldron-04.jpg

Because I DON'T want to look new and shiny, I then took a scotch brite and knocked down the brightness. I also used a wet Q-Tip to clean the creases back out a bit.

dredd-shoulder-pauldron-06.jpg

Still, not quite happy with the look, I continued to use the scotch brite and a wet Q-Tip to add additional weathering and to further define the creases. Finally, off with the tape. Obviously this still needs a bit more roughing up, but I think it is a pretty good start.
dredd-shoulder-pauldron-07.jpg

And here is the Stuss left shoulder compared to the original. Again... the weathering leaves something to be desired, but it is getting there.
dredd-shoulder-pauldron-08.jpg

One of the really nice things about Goldfinger's Soverign Gold is that unlike Rub-N-Buff (that we are used to working with on Jango Fett), the Gold can be relatively easily removed from the leather-covered armor.
 
Art, those two colors look very different. HOWEVER... as I'm sure you know, different photos in different lighting situations can look very different (and taken with different cameras, etc.). Not to mention that fact that Kurt's shoulder pad is not made from the same exact material as the hero pads.
As an example, here is a closeup photo of a hero pad from the movie, probably under closer lighting conditions to the pad you painted. They're starting to look more similar, aren't they?
DSCF1775.jpg

Here are a few more examples.
Three photos taken on set during production. One taken with a flash, two in full sunlight (no film lighting or image treatment involved). They all display a distinct coppery tint. So I think we can safely say that the purely-gold-looking photo Art posted is the anomaly. I believe sovereign gold by Goldfinger is still most likely the correct color (Goldfinger only makes two other colors, and they really didn't look that close to any of the production reference in our tests).

View attachment 274701View attachment 274702View attachment 274703

EDIT: This is starting to come up more now as more and more people are receiving vests they want to paint, so I thought it would be best if I put as much information here as possible. I've already seen Art's photo above used elsewhere as an example, and I think it's creating some confusion.

It is a fact that Goldfinger brand paint was used for the vest shoulders in the movie. It was used in the UK, and in South Africa (the suits were made in both places). This has been confirmed by two different crew members, including one of the films original costume creators (Rob).
Goldfinger only makes three colors of gold. Jeff and I tested all three and compared the results to behind-the-scenes photos (taken with flash and natural light) as well as in-person comparison with a set of screen-used armor that Jeff owns. The sovereign gold color appeared to our eyes to be the closest match of the three. The other two colors were not that close and it was not a difficult decision.
Is it possible we were both mistaken? Yes. Is it possible that there was some fourth color of Goldfinger paint available several years ago when the film was made, or that the color offerings from the company have otherwise changed? Yes. But we don't think that is likely.
If anyone else would like to do a test with all three Goldfinger colors, especially someone with access to screen-used armor for an in-person comparison) please feel free.

Also, no one is currently producing vest armor that uses the actual plastic that was used for the movie armor. This will affect the look as well. Not to mention that everything in the movie had a lot of fullers earth on top of it.
Remember also, that films today are heavily processed and the colors can look VERY different onscreen from what was onset.

I should mention that, according to Rob, very little weathering was done to the vest armor (if any). He simply applied goldfinger (with his finger) very lightly, letting the black of the plastic show through in places. But again, given that the materials the current vests are being made with are not exactly the same, you may have to work harder to match the look.

In the end, you can obviously use whatever color looks good to you (it's YOUR costume), but for those of us trying to replicate the original costumes as close as possible, I still think Goldfinger sovereign gold is our best bet based on the evidence we have available.

P.S. There is a larger debate hinted at here, which is to say, should we be trying to match what the real prop looked like, or what it looked like on screen? In a film like Dredd, that's a legitimate question. For example, for a long time, people were thinking that the suede on the side of Dredd's boots was green (it's actually grey) because so much of the lighting in the film (and even in some publicity shots) has a green cast to it. Given that a lot of lighting and post-processing tricks are used to change colors on a film, I think it's a very legitimate choice to decide to make a costume or prop look like it appeared onscreen, regardless of what the "real" version may look like. However, that's not the path I'll be taking. With the judge costumes, I think it looks great when a whole group of judges get together and the colors basically match across uniforms. I believe following what was used on the original suits as much as possible presents an easier path to group uniformity and eliminates some guess work.
 
Last edited:
deleted
 

Attachments

  • Untitled.jpg
    Untitled.jpg
    85.4 KB · Views: 302
  • Untitled 2.jpg
    Untitled 2.jpg
    26.5 KB · Views: 258
  • Untitled 3.jpg
    Untitled 3.jpg
    32.4 KB · Views: 266
Last edited:
Jared, I agree that the difference in color is primarily due to the lighting. I think Goldfinger Sovereign Gold is indeed the correct color.
 
Did your pauldrons come with the trim like that? Mine had over 1" of extra mesh at the top of each shoulder, which flipped up like little wings when I wore it. I had to take the trim off, cut down the mesh, and sew new trim on.
 
Thanks to Rex for this suggestion. When you get the Struss vest, even the V2, the ab plates are pretty flat, like so:

dredd-vest-armor-bend-01.jpg dredd-vest-armor-bend-02.jpg

Wearing the armor like this makes you look fat and ridiculous. At best, if you cinch in the sides, it bends, but not always the way you would like.

Instead, at Rex suggestion (and you can see it this way on the original suits), I hand bent the side of the armor to wrap around your ribs. The first couple of times I did it, I did it very carefully... too carefully. It just returned to the flat shape. Finally I bent it in half and pinched a hard crease all the way down. At first it seemed like I overdid it, but again, the plastic flattened back out quite a bit, but because of the hard crease, left just a bit of an angle, like so:

dredd-vest-armor-bend-03.jpg dredd-vest-armor-bend-04.jpg

While this is yet another small change, it makes a HUGE difference in the look of the armor and makes it looks LIKE armor as opposed to silly wings on your stomach.

Be VERY careful how much you pinch the crease at the top and bottom. If you see the plastic start to turn white from the stress of the crease, STOP before it splits or cracks!
 
On to my favorite, but also most stress-inducing part.... beating up the armor.

I used a mix of 4 things (still just getting started) to get to this point.

First, I made a few cuts/scratches with an xacto. I will make more of these, but this was just an early test.

2nd... my favorite, I use a claw hammer and turn it on its side to scratch and scuff the armor. I also, on rare occasion will use the claws to scratch or the hammer to ding and dent. Be careful with the claw. It can go right through the plastic.

3rd, I take the armor out and scrape it on rough concrete cinder blocks. I never scrub when doing this but always go in one direction. Not all the scratches need to be in a single direction but each brush across the brick more or less should be. Scrubbing might be quick and easy but it doesn't look natural.

When I am happy with this I hit random areas, especially heavily scratched areas with 320 grit sand paper. This tends to turn the plastic a bit white and make damage stand out a bit more.

Now... keep in mind, while all of this seems like a lot, the end result is VERY subtle unless you are right up on the armor. From a few feet away, you can't even see it and you will never see it in con photos. Still it adds a bit of wear and realism that the original suits have and that just makes you look a little more like this is something you have been wearing for more than a day.

Keep in mind, while it is tedious, the more varied your techniques and tools are for weathering, the better it is going to look. I plan to use a soldering gun to melt a couple of places (as similar damage can be seen on a few of the original pieces) and use various sharp tools to get different types of scratches.

dredd-vest-armor-weathering-02.jpg dredd-vest-armor-weathering-01.jpg dredd-vest-armor-weathering-03.jpg

Again, still pretty early in the process. I really want to put a bullet hole in this armor.. but since I will probably sell it, I don't know if anyone else would like that as much as I do.
 
I agree wholeheartedly with Art's bending of the plates above. Kurt even recommends that people do it when they get their vest (if it doesn't come properly bent already when you get it).

A couple of other tweaks you can do to the ReelImages vest to make it more accurate:
Darken the zipper. The real zippers were a heavily antiqued/blackened brass. Dredds zipper looks black from a distance, and up close you can see a lot of brass highlights showing through. Anderson's zipper is straight brass.

The trim around the vest that is vinyl on the RI vest can be upgraded to black suede for more accuracy.

And, of course, once you get it adjusted, stitch down all the strapping, and stitch down the floppy mesh side "wings" on the back of the vest.
 
Thanks to Rex for this suggestion. When you get the Struss vest, even the V2, the ab plates are pretty flat, like so:

View attachment 276214 View attachment 276215

Wearing the armor like this makes you look fat and ridiculous. At best, if you cinch in the sides, it bends, but not always the way you would like.

Instead, at Rex suggestion (and you can see it this way on the original suits), I hand bent the side of the armor to wrap around your ribs. The first couple of times I did it, I did it very carefully... too carefully. It just returned to the flat shape. Finally I bent it in half and pinched a hard crease all the way down. At first it seemed like I overdid it, but again, the plastic flattened back out quite a bit, but because of the hard crease, left just a bit of an angle, like so:

View attachment 276216 View attachment 276217

While this is yet another small change, it makes a HUGE difference in the look of the armor and makes it looks LIKE armor as opposed to silly wings on your stomach.

Be VERY careful how much you pinch the crease at the top and bottom. If you see the plastic start to turn white from the stress of the crease, STOP before it splits or cracks!


I heated mine up a little with a hair dryer and it helped out getting the bend in it. It softens the plastic up just enough, you just have to hold it and let it cool, but so far it has held the shape.
 
Art, I know that this image isn't exactly the same as the design that Kurt used but any chance you could let me know the measurements of your vest, in relation to the red lines on this image.

I need a rough idea when I build my own vest.

Matthew

Vest Sizes.jpg
 
Just be aware that the shape of the vest in that template, and the shape of the Kurt / ReelImages vest is not completely screen accurate.
But it's close enough for most people.
 
Further along on the weathering. Think I am pretty close to being done with the front.

Cut in a number of nicks "in the style of Dredd." Didn't try to match the scratches, but did try to get similar placement and overall look.

Went back to the cinder block and added a lot more general roughness, especially to the edges.

Finally, used a soldering iron to melt in a few final details, as appears to have been done on the originals then tones them down a bit with a final light sandpapering.

Need to finalize the backplate and I think we can safely call the armor weathering complete.* It isn't perfect, but for a first attempt, I am pretty happy. The only thing that bugs me is that I feel like NONE of this will show up in a con photo and the armor will look all but pristine. :(


*Of course everything is going to need a heavy coat of fuller's earth, but that wont' be applied until the very end.

dredd-vest-armor-weathering-05.jpg dredd-vest-armor-weathering-04.jpg
 
Art, Looks great! I am doing the same stuff, but I started dirt first. I am in the process of fullers earthing the crap out of it in tans and grays, then outside dirt. once I am sufficiently dirtied, I will be giving a through field cleaning scuff and scrap, and then re-dirtying it different scuff and scrape, re-cleaning it, and re dirtying again to give it that long owned, cleaned a lot look. There has also been quite a bit of wearing my leathers around the house, and crawling around outside to put some wear and flex to them. When I get rolling full steam I will post up.
 
This thread is more than 9 years old.

Your message may be considered spam for the following reasons:

  1. This thread hasn't been active in some time. A new post in this thread might not contribute constructively to this discussion after so long.
If you wish to reply despite these issues, check the box below before replying.
Be aware that malicious compliance may result in more severe penalties.
Back
Top