My first 1/350 scale Enterprise NX-01

Miketastic

Jr Member
Hello fellow modelers, Trekkers, or Trekies (whichever you choose to call yourselves) and everyone else who chooses to check this thread out,

My name is Michael, and I am a modeler. I have bult many, many Refit 1701 ships as it is my favorite version of the Enterprise, but for kicks, I have decided to try a 1/350 NX-01. I know the refit details, lighting, etc. by heart, but had to do a LOT of research to make sure I build as acurate version of this ship as i can... well... maybe with a FEW non-cannon details, just to tie it into the 60's ship and the Refit ship. so dont beat me up TOO bad if you see something you didnt see in the show.
My real challenge is to make this ship look "old" or dated compared to the refit and the 60's ship. No easy task as this ship has LOTS more detail, and usually more details, means more modern looking. but I think I can achieve this look by not dulling or adding "burn" streaks as some people has done, but by lighting. this ship will be lit by ONLY warm white LEDs,(except for the obvious colored details) the only cool white LED will be in the lower sensor dome, just because i feel that this is a MECHANICAL part, and therefore would NOT be the same "color" as the interior lighting, just my feelings. even the stobes and running lights will be warm white. I might do a few things with painting to simulate "primitive" panel alignment, but thats for later on...

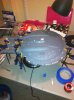
I have posted a few pics of just starting out. the color of the ship is just the base primer coat. I will post more as i progress, thanks for checking it out!

1701 008.jpg1701 010.jpg1701 009.jpg
1701 003.jpg1701 006.jpg1701 011.jpg1701 007.jpg1701 005.jpg
 
Good luck with this. I've had the same kit for years but haven't had the room for it so it sits in the box up on the shelf for now.
Hopefully you won't experience the same problems so many have complained about concerning the warped pylons and out of skew nacelle alignment.
 
Thank you!! yeas they are quite big once they are assembled, I am building a wall shelf area of my hobby room to display my 1/350 ships. i hope to make it resemble the display you see on star trek first contact. i have noticed that even the Round 2 kit has some rather large faults with part alignment as well as the potential for the nacelles to droop. But im used to this from building the 1350 refit kits. those also can have HUGE nacelle droop due to the engineering hull not fitting together properly. just have to find the right tricks. That or weld up an inner skeleton. have done that before and am considering that for this kit too. Ill post pics and procedures for whatever i find that works, or doesnt work. but if anyone has any ideas, advice, or horror stories, I'd be more than happy to hear them. thanks again :D
 
Such an under-rated series and ship. I couldn't stomach the series when it first aired (never got past the open), but years later powered through an episode on Netflix and *boom* started binge watching. Excellent work so far!
 
Such an under-rated series and ship. I couldn't stomach the series when it first aired (never got past the open), but years later powered through an episode on Netflix and *boom* started binge watching. Excellent work so far!

I agree, I was never a fan of ths show while it was airing. I watched pretty much the entire series over the last few weeks on netflix with the intention of getting an idea of what the ship looked like, but found myself really enjoying the the show. a great idea and dynamic amongst the charicters. My wife still remains not much of a fan, and would cringe when she heard the intro song... haha even i have to admit that i would always fast-forward through the credits myself.

thank you guys very much, I hope it comes out as good as my refit did. I had to work this weekend and didnt get any progress made except to solder the rest of the interior lighting. nothing worth taking pics for. I got ther Tennacontrols engine kit in the mail friday, it really looks good. thinking about incorerating a deflector controlk kit to change the front deflector from blue to orange. to kinda tie it into the other kits. idk yet. i have one laying around, i might rig it up and test it to see how it looks.
 
No new updates yet nor anytime soon I'm afraid. I am in total "pack up mode" right now. We are closing on our new house this week and moving in within the next week or so. That said, I have been CAREFULLY packing and cataloging all of my bits and pieces so nothing gets lost. I hope to have something soon to show you guys, but probably not for atleast acouple more weeks. Thanks so much for the kind comments and advice, I am amazed at the level of courtesy from all you peeps on the RPF.
 
Congratulations on the house! It'll be that much sweeter to get started on it again. :thumbsup

Thanks oujala! its good to be done with moving, and am happy to say it looks like i didnt lose anything haha

Back again on this thread. I got all moved in and set up and hope to start some masking for the aztecing this week. I will post somwe pics and all.
Ive been posting on my other thread about my refit that i did, but last night I got home from work and started laying out all my parts for painting and started getting my masks together. wish me luck!!
 
I'm really interested in that aztecing. Looking forward to seeing it!

I started laying out all my parts and started masking the upper saucer. I'm thinking of going with a tri-color pattern. metalic silver overall, with a layer of dark aluminum, and then a blend of gunmetal and dark aluminum as the base of the aztec. I dont want it to stand out too much. But if any of you have seen the episode with the Romulan mine field, and the close ups with the mine latched to the hull, and the crewman :-/ , it appeared to me that the ship had three different types of metalic shades. I dont know if i can achieve the level of detail seen close up on the hull in that episode, but I think I can come close. Keep in mind, this is my FIRST attepmt at actually painting aztecing on a ship. I used decals in the past. but i want some of the results ive seen online, and decals just dont allow that. If anyone has any tips, I'd be very very grateful!!
 
I started mixing some colors, but havent found anything i like yet... im beginning to see what a process it is finding that "on screen" look. But since this ship was never an actually filming model, but CGI, i might take a few "creative liscences" in regards to exact colors...

Last night just consisted of setting up the new "ship yard" and finshing wiring up my interior window lamps. I do have a few pics though...
1701 199.jpg 1701 205.jpg 1701 206.jpg
the saucer isnt glued down yet, just wanted to clamp it down to see what light leaks im going to have to fix. looks like a LOT!! the fit and finish of this kit isnt that great im finding. Im going to need a lot of filler, and a few more clamps... haaha:eek


1701 202.jpg1701 203.jpg1701 200.jpg1701 207.jpg
 

Attachments

  • 1701 198.jpg
    1701 198.jpg
    1.8 MB · Views: 237
There's something immensely satisfying about seeing a model with lights coming through the windows, finished or not. Awesome.

I couldn't agree more, :D

buuttt, I had my first "disaster" of the build this weekend... I am using the tennacontrols NX engine/navi control board. And I got this crazy idea to instead of having the six red rotating LEDs in the buzzards, to replace them with blue, green, and orange, combos with three red 3mm in the center on a different circuit for the red ambiance, but the effect would be multicolored like the 60s kit. But I didn't take into account of different color LEDs use differnt resistors, and somehow fried my voltage regulator and microprocessor chips.... But I got in contact with Mr. Ralph at tennacontrols, who was really great and very helpful, and purchased new control chips. They will be on the way here next week, so I have some time to get the rest of the effects and spot lights figured out and wired up. I'm still going to do the multicolor buzzard effect, but this time just use white LEDs with some paint ;) haha. Rookie mistake, just got in too big a hurry without doing enough research first. I got some of my spots wired up and started planning a few extra ones just for added effect. Stay tuned, I'll have more pics when I get something going. Thanks again for looking. :D
 
UPDATE ON "DISASTER"

I figured out how to add the differnet color leds to the buzzard control board, without frying the board haha!! Its pretty simple actually. Makes me see what a dumb mistake I actually made... when you think you know something, you probably dont. haha oh well, just a $15.00 mistake. this time... When I get the replacement votage regulator and microprocessor chips soldered in, Ill post a video of the effect. Ill have three 3mm red leds in the center with a slight pulsating effect, and 6 LEDS on and outside "ring" of blue, yellow, and greeen. those will chase and rotate to simulate the "hydrogen explosions" but be closer to the TOS Enterprise light effect. just no motorized rotation. So far, with just static on lighting, it looks pretty good. I know it wont be cannon to the show, but remember, I'm trying to tie this ship into the 60's TOS ship as much as I can. When I display this ship next to the TOS and to the Refit, I want people to be able to tell this is an older version of the other two ships, wether they are Star Trek fans or not.
 
I had some time last night so I figured I'd tackle the Warp coils... I started out masking and triming tape on both outer Coil partsrNx-01 001.jpgNx-01 003.jpg

Then I sprayed the back silver three times to give a nice show thru appearance.

Nx-01 006.jpg

Then I light blocked with the same number of coats of flat black

Nx-01 004.jpg

after that I sprayed one more coat of silver over the black just to give me some light reflection for the other side, here are unlit results...

Nx-01 009.jpgNx-01 010.jpg

And lit, now i have NO light blocking, and the final effect wont be as bright, so that the individual coils can be better distinguished, but I was hoping to have the coils "glow" and reflect against the inner part, not just the coils illuminated, and it looks like i achieved that!

Nx-01 011.jpg

This last pic is just a profile of the ship, I've seen a lot of builds where this ship has bad nacelle droop due to the poor fit and finish of the kit. but the way I joined the saucer and drive section first, might be a fix for this problem without having to purchase or make a structural intregity device. there is a little droop in the pic, but these parts are not glued yet, just clamped. I think I can TEASE the plastic a little more to give lose that negative pitch and keep the line of she ship intact and correct. More on that later...

Nx-01 013.jpg

Thanks for looking, I hope everyone has a great weekend!!

Michael Cothern
 
Not too much to update today, no pics this time, but I'll let you guys know where I am now...

I got a deflecctor fade circuit for the main deflector, for low and opperating power modes to tie into engine modes,

also got a random Pulsating thruster control so that my RCS thrusters will randomly flicker on to simulate course corrections and station keeping

I wired up my stand and switches and fixed the lower Hull to the stand. tonight I'm going to start wiring up my diferent circuits and maybe, JUST maybe get the Hull closed up by the end of the weekend... *crosses fingers* haha

thanks for looking, everyone have a great weekend!!

Michael
 
This thread is more than 8 years old.

Your message may be considered spam for the following reasons:

  1. This thread hasn't been active in some time. A new post in this thread might not contribute constructively to this discussion after so long.
If you wish to reply despite these issues, check the box below before replying.
Be aware that malicious compliance may result in more severe penalties.
Back
Top