stonecold913
New Member
Re: "Arrow" Season One Build *Pic heavy*
How long are the bow arms. Tip to end.
Sent from my iPhone using Tapatalk
How long are the bow arms. Tip to end.
Sent from my iPhone using Tapatalk
")
I believe for the hero bows, like the one shown at SDCC, the chock is slightly above the limb, but for the stunt (firing) bows I think it does rest on the limb, I say stunt as there is also no sinew around the brass hinge parts, its a stripped down prop, I suspect purely for firing.
Not sure how many people have watched the bonus features on the SE01 discs, but there are actually now arrows fired in the show or even drawn, they're all CGI
Ya they don't fire arrows they are all cgi. The do however dry fire the bow. Maybe that's why they have several made cause I'm sure those bows are no good now. Also does anyone know where I can get the jacket(s) that Stephen Amell is wearing in this pic? I found it on Instagram.


Nice, a lot better! Your costume looks a little darker green. Did you paint it? Also, when you get the chance, please take closeup shots of your costume, especially where the fabric lining is. I bet it feels alot more movable and breathable.
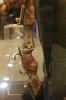
Spent my superbowl sunday finishing off my quivers by filling them with arrows!
Suit comes back from the tailor tomorrow, and the hood is nearly done.
Not much to go, now!
View attachment 281708View attachment 281710View attachment 281709
Awesome! Thanks for the info. I was leaning towards some sort of Acrylic paint, but had not found the leather/vinyl specific kind.
Since we are sort of on the topic of the Arm quiver. I just finished my version of the arm quiver. Its pretty straightforward stuff, but in case anyone needs more help with that piece I'll post some info on how I did mine.
Here's my first quick attempt at the arm quiver. I used the one that came with my Leather costume, and turned it into more of a Season 2 look. Anyways, i ran out of time to work on it before the Sci Fi Expo. It served its purpose.
View attachment 291231
I started with a fore arm guard similar to this one.
View attachment 291233
I then cut pieces of cardboard, black vinyl (included with the original arm quiver) and some polyester scrap fabric I picked up at Johann's. Mostly used hot glue to combine the different layers. My arm quiver is approx 7 " long.
View attachment 291234
Then added the nylon straps and piece of Velcro.
View attachment 291236
The rubber arrow locking pieces I picked up somewhat randomly. I bought a cheap practice bow and it came with one 5 arrow lock. Then I purchased a cheap quiver and used the arrow lock from that. This is the one I used, Amazon.com: Bohning Sentry 3 Arrow Quiver, Black: Sports & Outdoors . Bohning also sells just the rubber arrow lock piece. Its not screen accurate but its close and cheap.
View attachment 291235
1/4 inch wooden rods work well, and fit the arrow locks. Painted the wooden arrows black/metallic silver. Then painted my Arrow vanes a lighter more yellowish green. Attached 2.25 inch Vanes/fletching to the wooden rods. The arrow vanes I used were these Amazon.com: Bohning 2.25-Inch Shield Cut X-Vanes (36-Pack), Neon Green: Sports & Outdoors
View attachment 291237
Then I used hot glue to attach the rubber locks to the nylon straps on the quiver. And added a few fabricated "arrow-heads".
View attachment 291240
I'm pleased with the results, its not screen accurate but its definitely closer than I was before, and a vast improvement from the original. Note: I purchase whatever i can through amazon simply because of the free shipping i get with amazon prime. :thumbsup
I don't know if this information was really needed, but everyone on this forum is so great and helpful. I wanted to contribute what little I could. Hopefully more to come as I continue to work on upgrading my Arrow costume.
How did you make the hip quiver? What material did you use?
Did both rubber parts come with it?
Like the back quiver, I used a piece of cardboard to give me a general shape and clad it in a decent looking faux leather vinyl. So far it's held up well, and it looks pretty good.
It's on the list of eventual upgrades, though lower than some others.
Each quiver usually only has one rubber arrow lock, so you generally have to order two separately. At least, that's what I did. Luke may have other info.
Tvayumat, how exactly did you make the replica bow limbs? You have the 3 photos up but did you carve them out of wood first?
I don't know how to attach my straight chock to the wood bow. Any suggestions? Do
you guys glue it on before adding the sinew and handlebar tape?
I also need help positioning the Straight chock correctly. When I place the straight chock where I think it should be positioned, the top of the Chock
blocks the brass strap hinge arrow rest so you you can't place the arrow on the arrow rest. Any suggestions on proper Chock placement?
thank you for any help you can provide!