Nerf based M41A Pulse Rifle

Dynofiend

Well-Known Member
There are a few of these builds on the forum now, mainly thanks to the work of Quest in putting the plans for the shroud online (thank you!). Due to the restrictions of the Nerf blasters, the finished rifles usually have incredible handiwork done on the shrouds, but less accurate blaster parts, particularly around the grenade launcher.

I've seen one person starting to use a toy SPAS shotgun to add to the front part of the gun, and this looked really promising. Unfortunately for me these toys aren't available in New Zealand, and importing them would be expensive and problematic. As such, I was forced to look for an alternative solution.

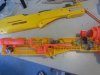
Below is the progress of the build so far.

I started with the usual Longshot, Recon, Raider parts combos, and then set to work building the shroud from 4mm MDF. MDF is ideal for my needs as it's very cheap and extremely easy to work with. It will also allow decent smoothing and rounding of edges, and once sealed, hopefully produce a good paint finish.

2013-11-18 16.42.27.jpg2013-11-18 16.43.17.jpg2013-11-18 16.48.15.jpg2013-11-18 16.48.47.jpg2013-11-18 16.50.21.jpg2013-12-03 18.50.51.jpg2013-12-03 18.54.55.jpg2013-12-08 17.03.48.jpg2013-12-08 17.04.14.jpg2013-12-15 18.00.50.jpg2013-12-15 18.01.15.jpg2013-12-15 18.01.25.jpg2013-12-16 11.49.39.jpg2013-12-21 15.10.40.jpg2013-12-21 21.15.49.jpg2013-12-23 15.51.49.jpg2013-12-24 12.08.32.jpg2013-12-24 13.25.19.jpg2013-12-24 15.43.20.jpg2013-12-28 13.30.07.jpg2013-12-28 13.30.16.jpg
 
A few more pictorial updates. As there are so many photos I won't comment on each one, but if anyone has any questions at all, please just shout up!

2013-12-28 13.30.37.jpg2013-12-28 22.00.24.jpg2013-12-28 22.00.34.jpg2013-12-28 22.00.46.jpg2013-12-28 22.01.40.jpg2013-12-28 22.02.06.jpg2013-12-28 22.11.25.jpg2013-12-29 17.49.43.jpg2013-12-29 17.49.53.jpg2013-12-29 17.50.18.jpg2013-12-29 17.50.32.jpg2013-12-29 17.50.49.jpg2013-12-29 17.51.07.jpg2013-12-29 17.52.03.jpg2013-12-29 17.52.06.jpg2013-12-29 17.53.13.jpg
 

Attachments

  • 2013-12-29 16.02.16.jpg
    2013-12-29 16.02.16.jpg
    1.9 MB · Views: 239
Last edited:
Today's progress. Lots of sanding really. Also had to reposition the light as it got in the way of the action of the blaster

2013-12-30 17.33.07.jpg2013-12-30 17.33.17.jpg2013-12-30 17.33.25.jpg2013-12-30 17.33.34.jpg2013-12-30 17.33.47.jpg
 
Painting begins! Trying very hard not to rush ahead as it's so nearly completed :) There is one piece I've not finished yet as I don't have the right material to make it from, that is the 'mid band' which runs under the rear of the shroud with the block that hangs under it. This would have to be quite solid and removable and isnt suitable to make from plastic or wood. Only metal will do. I can add it later once I've found the right material.

2014-01-04 16.10.46.jpg2014-01-04 17.23.49.jpg2014-01-04 23.10.08-1.jpg
 
Unfortunately the toy SPAS 12 I used aren't available here either, a fellow member bought one on my behalf and shipped it to me (which wasn't a cheap option it turned out). I really like your solution though, it came out really well :thumbsup
 
Nice work!

Not sure what you used to get such uniformly rounded edges on the MDF, but super-mega-kudo's to you if you did it all by hand.

Just by hand, the pictures probably hide a few sins though ;)

Unfortunately the toy SPAS 12 I used aren't available here either, a fellow member bought one on my behalf and shipped it to me (which wasn't a cheap option it turned out). I really like your solution though, it came out really well :thumbsup

Thanks! I'd really like a proper SPAS cage one day. Perhaps I'll luck out and find one locally. I can always change out my home made one for a proper one later. I'm making everything so it's all screwed rather than glued in case I want to make changes later down the track.
 
Nice work Dyno ! .... you are flying through this build !
I just finished mine ....Yay for me ! lol
Cant wait to see yours finished.
Cheers,
Grant.
 
Starting the rebuild. It's going a little slower than I expected as I lost some tolerances with the layers of paint, and am having to work out the best way to attach a few things, but so far so good.

2014-01-08 19.28.35.jpg
 
My favourite bit so far, the counter.

Did some tests and eventually chose a piece of paper with a seven segment dual LED picture of '88' printed on it. Masked off three of the segments from behind with black electrical tape. Now when the light is off, it looks like an inactive 7 segment LED display, but when the light is on, it displays '95' just like it should :D

20140109_222928_resized.jpg
20140109_222945_resized.jpg
20140109_223032_resized.jpg
20140109_223035_resized.jpg
 
Excellent work! I was wondering if you used any clay as a filler for your edges, and if so what kind?
I used a general wood filler for any panel gaps, but no filler on the edges per se. I did give each wooden shroud a couple of coats of PVA glue all over to seal it before painting though.

Looking good Dyno !
Love your ingenuity with the counter display.
Looking forward to seeing more ;)

Thanks :)
 
This thread is more than 10 years old.

Your message may be considered spam for the following reasons:

  1. This thread hasn't been active in some time. A new post in this thread might not contribute constructively to this discussion after so long.
If you wish to reply despite these issues, check the box below before replying.
Be aware that malicious compliance may result in more severe penalties.
Back
Top