Formori
Member
Hey guys, after being a long time lurker around here and building a couple of smaller props and things, I read tekparasite's build log of building a Thomas Bengalter helmet and decided (after drooling over Volpin's build a year or so earlier) that I wanted to build my own DP helmet. :cool
It was going to have a full LED matrix display, hand-made so I could see out through, with rainbow earpucks, a clean chin and helmet line (that really stands out to me when I see those helmets) and it had to have a decent chrome job on top (but not real chrome since I'm not made of money).
You'll see what I actually ended up with at the end of this post, but suffice to say that I accomplished most of my goals and I'm happy with the helmet, and I still have more improvements to make yet!
Stage 1 - Designing and References

I took most of my design notes on the helmet itself from both tek and Volpin, seeing as they have much better and clearer pictures of their helmets than almost anything of the original, but I still have a bunch of pictures of the originals from searching (and thedaftclub, those guys are awesome!) to keep it as original as possible. This helmet is being made to the Discovery era, since that was the helmet I most liked so far with a nice display and clear helmet lines.


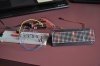
The first parts I ordered were a SURE 8032 Dot matrix display board from Sure Electronics and I already had an arduino lying around with a bunch of parts and wires, so my first task was to build the working display with animations and a selector switch. The code is original arduino code from which I modified with a selector switch, a Mode2 switch (for walking around in dim lighting) and some custom animations. With that all done I moved on to how the display was going to fit into Artfunk's cast and what acrylic I needed to buy for the visor, sub-visor, earpucks, and anything else.

I ordered a resin cast helmet from Artfunk in Nov. 2012 and got it in early December, since I wasn't going about the model/mold/cast process by myself with extremely limited experience and he had an amazing version available. The only problem with this was that when I received the helmet from the courier it was utterly destroyed...


Now, I have to say here that ArtFunk Props handled this situation EXTREMELY well, and they had a notice in with the courier for damaged items and were going to make a new cast within a day of me messaging them about what had happened, and I received my new helmet only a few weeks after.
I can't tell you how much I appreciated that quick response and getting a replacement helmet to me so quickly.
Now with the resin helmet I started by cleaning up the whole cast, cutting out the visor, earpucks, cutting all of the excess off the bottom and cleaning out the mouth and nostrils. This was very, very dusty and dirty work with my dremel, but well worth it!

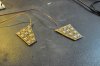
Now I measured all of the acrylic parts for my visor, sub-visor, a small frame for the sub-visor to fit into the front of the helmet, and the circles for the ear pucks. I had a plan put together for this before I received the cast but couldn't cut or fit any of the parts until I had the helmet to make measurements off of, so this fell together fairly quickly and the 1mm acrylic I used was excellent for bending around the visor.

The next part was one of the most boring and difficult parts of this build, cutting and drilling out all of the holes for the LED's to sit in on the sub-visor and I opted to put the LED leads in through the panel rather than the whole body of the LED, so my 1/32" bits got a good workout that day.

(For those of you who are photo-keeners, you've probably noticed that the acrylic above looks thicker than what I show below, this is because I went through 3 sub-visor pieces trying to get one drilled out and cut down that didn't crack or split somewhere.)
Now it's time for the sub-visor assembly! Yay!
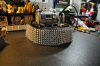
So I mounted all 256 LEDs into the 1mm acrylic with CA glue and had a black foam backer on each one (5mm hole punch is wonderful for this), and while gluing I had to make sure I didn't get CA glue 'clouds' on the acrylic because those are the portions I would be trying to see through later on.


Next step is to wire all those suckers! I used tek's method here of using 30AWG black solid wire to create my rows and columns and connected them to headers mounted in the top bracket (you'll see that later). For now I left the wires a little long and not installing the bracket gave me a ton more room to work around with the soldering iron and wire.
Plus, I only burned myself once or twice! (okay, maybe three or four times...)

Then after all of that tedious work was done I wanted to take a break from the visor for a bit so I decided to work on the ear pucks and the rainbow LED pattern. Here I used some 2mm acrylic cut and sanded perfectly round, then drilled cutouts for the LEDs to sit flush with the acrylic and CA glued them into place, then I soldered all of the leads together (they're done in parallel with the required resistor because I'm using a 5v source and it makes the most sense for this setup).


Here I've fitted them into the ear pucks using a piece of acrylic across the interior of the puck and a bolt screwed into the outer piece to hold the entire assembly together. This means that once the inner piece is epoxied into the helmet itself I'll still be able to remove the outer parts for prep and paint.


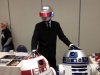
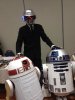
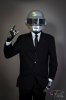
Here I started assembling the top and bottom frame plates to hold the main visor and sub-visor together and keep them in the front visor mount of the helmet. I had to do quite a bit of fitting and finickying to get this right because I wanted fans in the front and they had to sit between my face and the sub-visor, also over the nose vents to pull cool air into the helmet and into my face.

Test fit! And if I do say so myself, d@@@@@@@mn she looks good!

To be continued...
It was going to have a full LED matrix display, hand-made so I could see out through, with rainbow earpucks, a clean chin and helmet line (that really stands out to me when I see those helmets) and it had to have a decent chrome job on top (but not real chrome since I'm not made of money).
You'll see what I actually ended up with at the end of this post, but suffice to say that I accomplished most of my goals and I'm happy with the helmet, and I still have more improvements to make yet!
Stage 1 - Designing and References
I took most of my design notes on the helmet itself from both tek and Volpin, seeing as they have much better and clearer pictures of their helmets than almost anything of the original, but I still have a bunch of pictures of the originals from searching (and thedaftclub, those guys are awesome!) to keep it as original as possible. This helmet is being made to the Discovery era, since that was the helmet I most liked so far with a nice display and clear helmet lines.
The first parts I ordered were a SURE 8032 Dot matrix display board from Sure Electronics and I already had an arduino lying around with a bunch of parts and wires, so my first task was to build the working display with animations and a selector switch. The code is original arduino code from which I modified with a selector switch, a Mode2 switch (for walking around in dim lighting) and some custom animations. With that all done I moved on to how the display was going to fit into Artfunk's cast and what acrylic I needed to buy for the visor, sub-visor, earpucks, and anything else.
I ordered a resin cast helmet from Artfunk in Nov. 2012 and got it in early December, since I wasn't going about the model/mold/cast process by myself with extremely limited experience and he had an amazing version available. The only problem with this was that when I received the helmet from the courier it was utterly destroyed...
Now, I have to say here that ArtFunk Props handled this situation EXTREMELY well, and they had a notice in with the courier for damaged items and were going to make a new cast within a day of me messaging them about what had happened, and I received my new helmet only a few weeks after.
I can't tell you how much I appreciated that quick response and getting a replacement helmet to me so quickly.
Now with the resin helmet I started by cleaning up the whole cast, cutting out the visor, earpucks, cutting all of the excess off the bottom and cleaning out the mouth and nostrils. This was very, very dusty and dirty work with my dremel, but well worth it!
Now I measured all of the acrylic parts for my visor, sub-visor, a small frame for the sub-visor to fit into the front of the helmet, and the circles for the ear pucks. I had a plan put together for this before I received the cast but couldn't cut or fit any of the parts until I had the helmet to make measurements off of, so this fell together fairly quickly and the 1mm acrylic I used was excellent for bending around the visor.
The next part was one of the most boring and difficult parts of this build, cutting and drilling out all of the holes for the LED's to sit in on the sub-visor and I opted to put the LED leads in through the panel rather than the whole body of the LED, so my 1/32" bits got a good workout that day.
(For those of you who are photo-keeners, you've probably noticed that the acrylic above looks thicker than what I show below, this is because I went through 3 sub-visor pieces trying to get one drilled out and cut down that didn't crack or split somewhere.)
Now it's time for the sub-visor assembly! Yay!
So I mounted all 256 LEDs into the 1mm acrylic with CA glue and had a black foam backer on each one (5mm hole punch is wonderful for this), and while gluing I had to make sure I didn't get CA glue 'clouds' on the acrylic because those are the portions I would be trying to see through later on.
Next step is to wire all those suckers! I used tek's method here of using 30AWG black solid wire to create my rows and columns and connected them to headers mounted in the top bracket (you'll see that later). For now I left the wires a little long and not installing the bracket gave me a ton more room to work around with the soldering iron and wire.
Plus, I only burned myself once or twice! (okay, maybe three or four times...)
Then after all of that tedious work was done I wanted to take a break from the visor for a bit so I decided to work on the ear pucks and the rainbow LED pattern. Here I used some 2mm acrylic cut and sanded perfectly round, then drilled cutouts for the LEDs to sit flush with the acrylic and CA glued them into place, then I soldered all of the leads together (they're done in parallel with the required resistor because I'm using a 5v source and it makes the most sense for this setup).
Here I've fitted them into the ear pucks using a piece of acrylic across the interior of the puck and a bolt screwed into the outer piece to hold the entire assembly together. This means that once the inner piece is epoxied into the helmet itself I'll still be able to remove the outer parts for prep and paint.
Here I started assembling the top and bottom frame plates to hold the main visor and sub-visor together and keep them in the front visor mount of the helmet. I had to do quite a bit of fitting and finickying to get this right because I wanted fans in the front and they had to sit between my face and the sub-visor, also over the nose vents to pull cool air into the helmet and into my face.
Test fit! And if I do say so myself, d@@@@@@@mn she looks good!
To be continued...


 )
)