Battlestar Atlantia In Drydock

Griffworks

Well-Known Member
So, being the AMS/OCD suffering modeler that I am, and yet conversely seeing as how I like to build non-Hero / non-canon ships fairly regularly, I got it into my head that I wanted to build one more Mercury-class battlestar before I tackle an attempt at a show-entry worthy Pegasus. Mostly because I wasn't to display Pegasus with open landing bays, with maybe some deck crew, a Raptor and a Viper or two on the Flight Deck. As we all know, practice tends to make perfect, so I figured I could kill two birds with one frak cannon and build both a non-hero ship and reacquaint myself a bit to scratchbuilding.

I'd thought it would be kind of kewel to build the Battlestar Atlantia, apparently the Flagship of the Colonial Fleet - if only over Virgon for the Colonial's counter attack against the Cylons when Admiral Nagala took "personal command" of the ship. I didn't want to build a stock kit, tho, so got to pondering what I wanted in a build. I figured that Atlantia was likely the latest/greatest of the Fleet ships - or pretty darned close to it - so would need to be at least a little different, externally. To that end, I've decided she'll get different paint markings, as well as slightly different decals. I had contacted J-BOT Decals about what all he had that might not be currently displayed on his site and he sent me a sample of a custom Mercury-class decal sheet he had done for someone a short while ago for Atlantia and which includes flight deck decals for all four of the bays. Coincidence, luck or destiny? :)

In addition to the decals, I'm going to be using the Catalyst Creations Battlestar Pegasus Upgrade Set. You'll have to contact G-Man directly to get in the queue for a set of these. They're sweet and I'll be doing an In-Box Preview that I'll submit to Starship Modeler in another week or so.

One of the other resources that I've been looking at of late is 3D grown parts. Hiring someone to do parts at this level is cost-prohibitive. However, Shapeways.com has all kinds of interesting things there. Specifically there are a bunch of interesting parts designed by aptivaboy for use as alternate parts on the Bad Azz Models Pegasus kit. One is an antenna/probe array, there's some engine inserts, gun emplacements w/platforms, a missile box launcher and even completely original designed battlestars. He's a frakkin' genius, far as I'm concerned!

Well, about two weeks ago I ordered one of the antenna array's and two missile box launchers and they arrived a couple of days ago. These parts are very, very kewel looking. You can find them onaptivaboy's Shapeways store page.


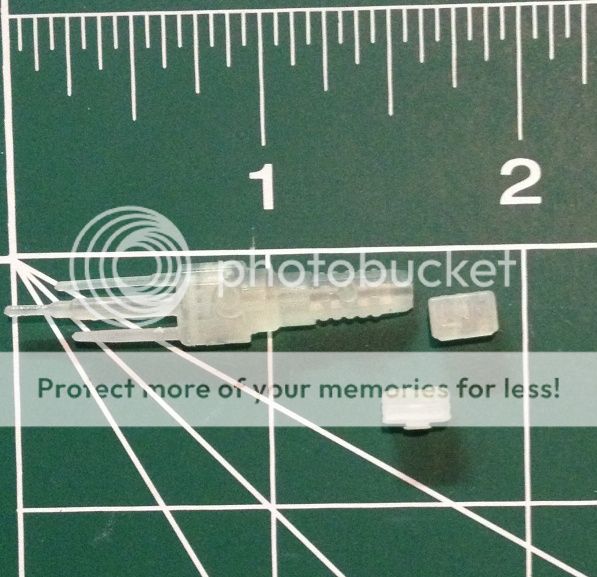
Again, I just ordered the antenna probe and two missile box launchers. The missile boxes are too small to hit w/primer very easily w/o risk of them being blown all over the place, so I'll likely have to attach then in-place where I want them for primering.


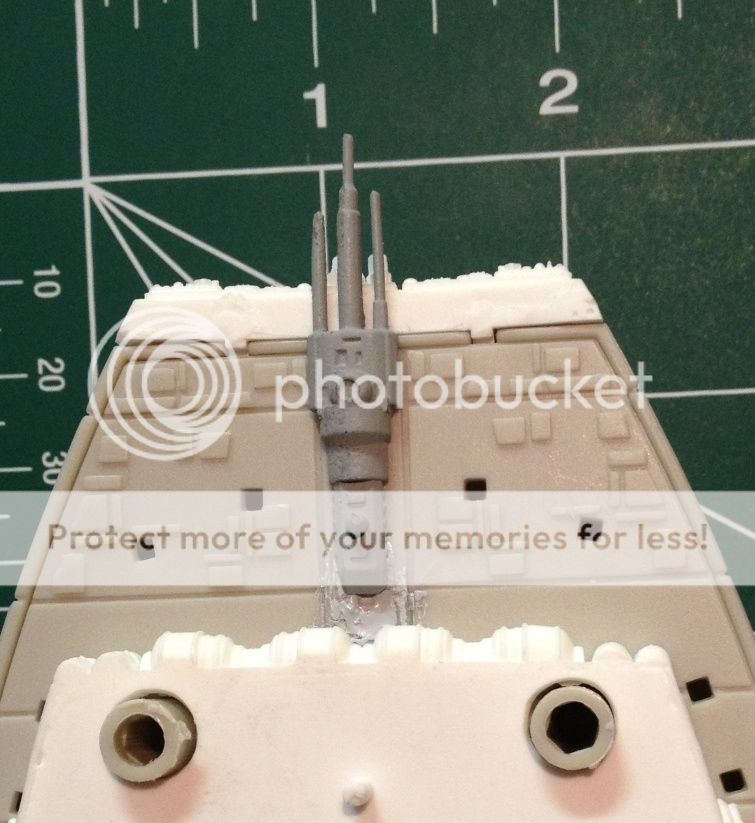
I had already removed the detail on the part of the Pegasus kit where this is meant to go in anticipation of adding this. It fits nice and tight in the void - after minor trimming w/the Xacto and some light sanding of the kit parts. I think it looks pretty darned nice and not at all out of place. Of course, that might change once I glue it in place and start painting....


I really like this antenna array and will likely buy at least one more for a later project. Definitely want more of the missile boxes, too.


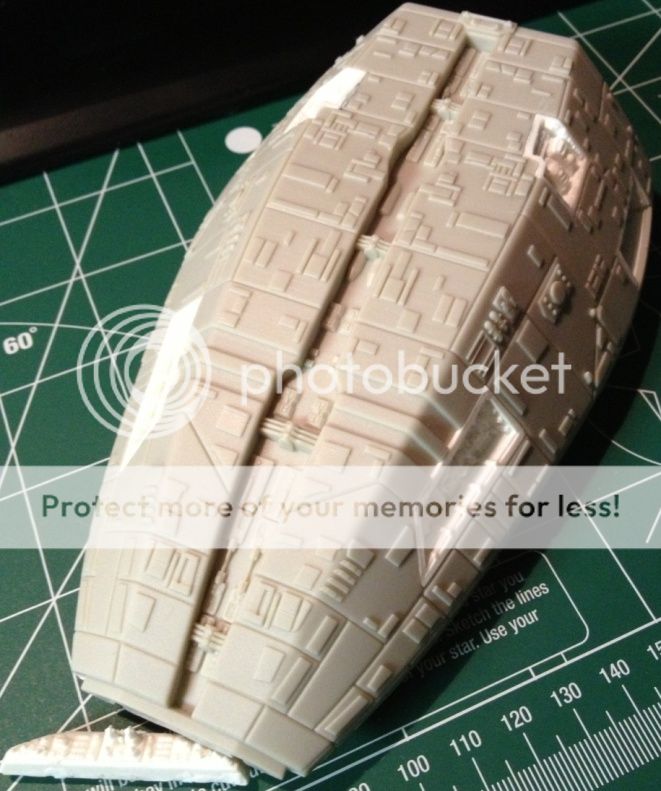
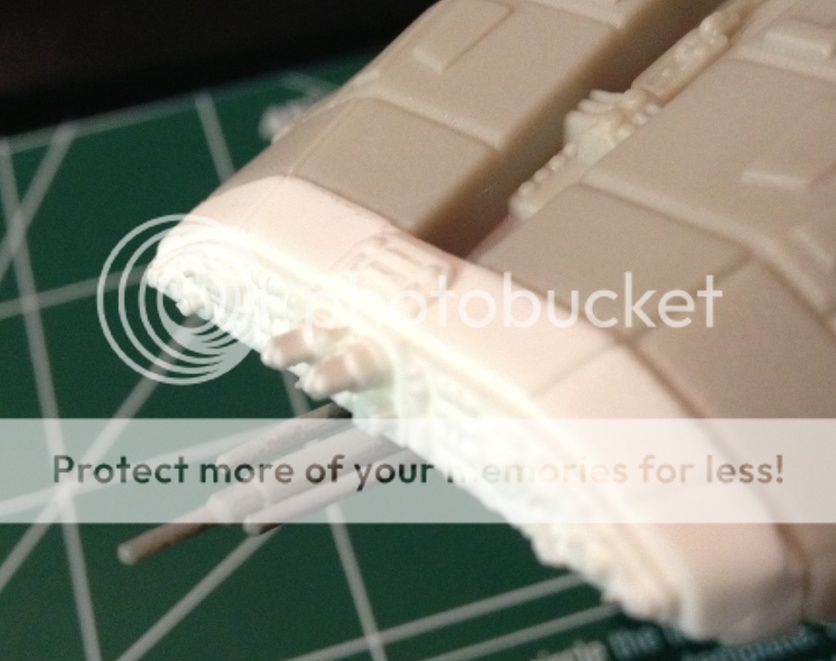
The parts that I've handled thus far all fit pretty tight, just like the original kit parts. I've test fit the flight pod arms into their slots on the Moebius kit part and they're nice and tight there, too, just like the original kit parts are - tighter, even. As with pretty much any resin kit, you have some basic clean up work to do, as well as the obligatory washing of the parts prior to painting. A little degreasing dishwashing soap, Xacto or other edged device for cutting off the pour stubs and a bit of sand paper for cleaning up the seams is standard and works well.

Couple of more pics can be found in my Battlestar Atlantia album on PhotoBucket.

.
 
Not as much done today as I'd hoped or wanted. :(


I spent a goodly amount of time last night and this morning first carving on, then sanding the Upgrade FTL part, as the back of the part was fairly thick and wasn't quite fitting. The problem was that it wouldn't let me get a good seam seal on the main hull section. I got it pretty close, as you can see in the above pic, but still not close enough, as in the pic I'm holding that aft section pretty tightly. If I couldn't get it to where I could close it up with minimal effort, then the seam would eventually pop due to the internal pressure. So, I took an Xacto blade and shaved off along the edges, then sanded it so that I could get a thinner area. It was angled a bit, but still wasn't allowing a good seam. So I decided to just sand the crap out of the back of the whole thing.


Every time I thought I had it to-shape and that it was good, I'd ease up a bit on the pressure and the gap would instantly appear. So, sand, clean, look and fit, then start it all over again.


I eventually got it to where I was happy enough with it. I figure that if the seam will stay about like the above pic, it won't be too much of a PITA to fill the seam and get it where I want it.


I also used some .010" Evergreen sheet stock, trimmed to fit, to cover the gaps that exit on the aft beam/extrusion on the kit. If you don't cover that up, it's an open area and doesn't look right. If nothing else, I get the feeling that it would be like the exhaust port in the Death Star and the Cylons could fire a missile up the astral's any battlestar and Blow It Up Real Good. I used Ambroid Safe Weld Plastic Welder Non-Toxic. I had to let it cure for a good 8 hours, tho.


I also finished adding most of the Catalyst Creations Upgrade parts to the Gator head. The fit was pretty tight, tho some minor puttying was required on the inside and I've started puttying on the exterior in the joins of a couple of spots. No major gaps, but I guess one or two of the parts had some minor warping or shrinkage. The nose and chin piece fit alright, tho the nose piece had some minor bit of warping, as well as a slight chip in the resin. Overall, nice, easy fit on the parts, any issues easy to fix with some putty.


The only resin part for the Gator head that I didn't use was the one on the bottom of the lower "jaw" area. It requires you to cut out a section from the inside of the hull and replace it w/the upgrade part. This is an area where the detail is definitely much crisper on the resin part, but I just didn't feel like putting the energy into cutting the plastic, as its something of an awkward area.

One thing I noticed about the resin parts that I hadn't before is for the "mouth" trench area. The MM kit part has a dome shaped detail on the back that's not represented on the resin part. It's definitely there on the CGI model, as seen in this screencap from "Exodus, Part 2". I'm not sure how I'll "fix" that omission. Prolly look at cutting that part off of the original cut part and gluing it in place or taking this opportunity to add something completely different.


I also got out the trusty old razor saw and removed the "lock" part of the positioning tabs that are on the front parts of the main hull. This is the area of the part that the Gator head is secured to. Since I had already built up the Gator head, I decided to just remove that, as they're not really necessary to secure the head to the main hull. I did the same thing on my Battlestar Triton build and have had no problems since finishing her.

I've been scribing the base of the "arms" where they connect to the flight pods. I hope to have that done tonight, but don't want to rush it. Once I've completely removed the arms from the kit parts, I'll start removing the positioning pins and the "walls" that separate the front and rear openings from the interior. I'm hoping maybe to have that much done by tomorrow evening, as well as get started on building the blanks for the walls. I plan to cut the sheet styrene a bit large so that I can sand to fit.
 
OK, made some progress today, tho not what I would have liked. My Dremel is working, so I'm having to do all of the cutting by hand. Need to check on a replacement battery, I guess. That or just go buy a corded version. Suxx0r not having use of the grinder and cutting wheel.

Anyhow, on with the show!


FTL engine detail area. You can see where there's practically no seam and what little bit of a seam is pretty much sealed with regular Gorilla Glue (not the CA stuff).


Port side engine section of the main hull seam area - or pretty much a lack thereof. I love this Gorilla Glue! (y)


Starboard side - I'm not likin' this Gorilla Glue! :mad:

Yeah, not really. Sometimes you just have to fill a seam. :D


Seam area for the Gator head to the main hull. I'm going to have to fill a few areas w/my Tamiya, but I was actually expecting that to happen. Not a big deal and it's a smaller seam area than I would have if I'd just used regular CA.

Now's where the fun begins - and bogged me way the Heck down....


As already mentioned, my Dremel is dead. As such, I had to use my Xacto, some elbow grease and musckleses to remove the sections inside of the lower bays that I wanted out. I left a bit of the "walls" as well as parts of the tabs in-place to act as supports for when I get around to building the walls and ceiling for the landing bays. Should give it plenty of support for those parts, as well as possibly adding overall support for the landing bays. Or so I hope.

I should have slowed down a bit and thought this thru a bit better, tho, as I had removed all of the alignment pins from the bottom landing bay part, as well as the keyed flat deck portions prior to aligning the parts and gluing them together. I left the small tabs for the top part, tho, so that made it easy to properly align the upper deck portion to the trench detail piece. However, I'm pretty much having to eyeball the alignment for the bottom part, and have already had to pop the parts loose - yes, you can pop Gorilla Glue apart, I discovered, just not as easily as with CA - , clean the parts and re-glue the parts together.

When I do the port side, I plan to "snap" all the parts in place, but put glue on the center three "meat" parts together before I remove the alignment pins and the like. Lesson learned!

As you can also see, the bottom portion of the arms have been removed in anticipation of using the Catalyst Creations flight pod arms from their Pegasus Upgrade Set. :D


Top portion of the starboard Flight Pods. I've cut off the most forward arm and done a test fit of the parts. I still need to remove some of the details just outboard of where the arm is intended to go in these pics so that the arms will properly seat in-place. It looks like there will be no issues other than I might have to buildup the connection point on the bottom landing bays a bit so that everything seats properly. I'll continue to test fit all the arms on the starboard flight pods before I begin work on the port set. I want to work out as many of the issues as I can before I get too involved with the second in case I need to cut things differently.

As it turns out, I'm not going to be using the "trench" detail piece for the flight pods, as they're flipped upside-down per the key tabs, as well as orientation of the details. They're also not entirely accurate, regardless of if you attempt to use them as they're keyed to go on the model.

Looking closely at the original kit part, you'll see a total of three Raptor launch tubes - yeah, we've never seen them actually launch Raptors this way, but they added it. On the kit part, those Raptor tubes are on the "rightside up" elliptic, not flipped, so that the orientation of the Raptors once launched will be the same as the main plane of gravity (mainly on the plains) and also note the orientation of the other detail parts.

Now if you own the Upgrade Set, compare it to the Catalyst Creations part. There are only two Raptor launch tubes and they're upside down, as are the detail parts. For them to go on correctly, you have to flip them upside down, remove the two key tabs and if you're building the landing bays as-is, you have to re-drill the large tab alignment holes. And even then, the spaces that are meant to position the guns aren't placed accurate, as they "drift" the further aft you go. The number of Viper launch tubes is incorrect, as well. The two outer groups of Viper launch tubes should be thirteen each, while the inner group should be eleven.

If you have doubts, here's one of the reference images I'm using, easily found on DaInfernalWebz at Modelers, Miniatures and Magic: http://www.modelermagic.com/wordpress/wp-content/uploads/2008/12/kg_cg_ns_pegasus-058.jpg I recommend that you save the image to your 'puter and open it up with a program such as Windows Live Photo Gallery or Photo Viewer so that you can expand the image up four or five clicks to definitively see the details in the "trench" area.

I don't say this to be negatively critical of the Upgrade Set or the manufacturer. I just want to point this out so that other folks know what to expect if they buy it, as well as a possible and relatively easy fix to this.

Instead of doing that extra work, I chose to be lazy and just use the parts from the kit. I chopped up two of the recessed parts for the Gator head from the kit and have used some of the inside detail pieces to add some extra detail to this build, since it's not the Pegasus or some other "Hero" ship where I feel I need to be more accurate. I'll be posting some more buildup pics shortly.

I contacted G-Man about this to make sure he was aware. Unfortunately, he can't do anything about the masters, as the parts are pretty much "welded" together. It would cost him quite a bit to have new parts grown and a new master worked up for just those two parts.

Other than that and the missing "domes" on the back of the Gator head "trench" detail piece, this is a great set. I've not found any other issues with it beyond the standards for a resin kit - some minor warpage of thin parts, a couple of areas a bit too thickly cast, pour stubs and some flash. Nothing that the average, experienced modeler who's built some kits can't easily remedy with a sharp Xacto blade and/or some sandpaper & elbow grease. The arms are especially excellently detailed. I plan to cut the domes off the back of the kit part that I didn't use and add it to the back of that resin piece.


Anyhow, back to my build... Since I'm not using the flight pod trench detail piece and the kit parts are lacking in detail at the fore and aft sections of said trench, I decided to get a bit creative and recycle some kit parts. I cut up one of the lower Gator head section parts from the aft inserts. I first used a #11 Xacto blade to cut in to the plastic so that I would make sure that I wasn't cutting at an angle w/my razor saw. The razor saw made short work of cutting the parts once I had the guide marks cut into the plastic. I cleaned up the edges a bit w/my Xacto, then some light sanding the two parts to be glued together.


I then used Gorilla Glue to glue the two parts into place. I'm not sure why it is that Moebius Models didn't included detail there, on the "outside" portion of the arms and on the top back of the Gator head. Same with having the landing bays closed up. My understanding is that it was done so that the flight pods had good structural integrity, but I really don't feel that would be an issue had they left them opened up and just added the supports along the inside areas where you can't see them.

Well, that's it for today. Hope to make some decent headway tomorrow afternoon at some point!

.
 
Here's what I've got so far, tho.


Dry fit of the arms for the starboard side, with the upper part of the landing bay balanced on there.


I added a piece of Evergreen half-tube to the underside nose section. This is meant to act as some sort of conduit to the antenna array, as well as help to cover up the excised section of the kit part. I beveled it so that it fits over the curve of the back section of the array.


Landing bay interior, showing the sections I've cut out, as well as a pretty good idea of how far into the landing bay interior that the stubs of the arms will go in. I'll possibly have to shave off 1/8" of resin to give me enough room to work with on the interior walls. I'll play around with it a bit before doing anything as drastic as that, tho. Ideally the interior stubs for the arms will act as wall supports.


I used the kit part for the inside/underside of the landing bays to trace out the basic shape on .040" Evergreen sheet stock. The two sets of straight lines is me trying to figure where to cut the sheet stock, as I can't really cut the full width of the flight deck area, as I don't want to waste sheet stock, as well as want to use the "ledge" that would be created as a sort of brace for the side walls.
 
Last edited:
I've started adding commentary to each of the images uploaded to my PhotoBucket album for this build. It's something I want to do regardless of what's shared and what's not. That and since threads at some forums are pruned and/or archived, I figured that I'd just go this thread.

That being said, I've not stopped working on this build. I've run into a couple of issues that have made aspect drag out a bit longer than I had anticipated, tho. Mostly due to the toe-in that I discovered of the "arms" - specifically the two "front" arms on each side toe-in somewhat - and the building of the landing bay interiors. Today, I modified every one of the engines, which took me prolly the better part of four hours of work.

Newest pics on Page Two of the Battlestar Atlantia, start with image Atlantia036.

I've not added commentary to the all of the images, but to everything I've uploaded the last ten or so days. I'll eventually go back and add it to the first page of images, as well.
 
Thanks, Fellas! I appreciate the kind words.


Lots of Updated pics, starting on Page Two with Atlantia040. Highlights are that I finished the landing bay interiors, finally! I also added some gun platforms to the Gator Head, as well as some missile launch doors to the underside of the Gator Head.

Unfortunately, the Atlantia build has somewhat stalled. I had originally used Mr. Surfacer as the primer, then ran out. I can't get it locally w/o having to drive about 70 miles, round trip, so decided to go with my old standby - Rustoleum. Well, I sprayed the Rustoleum on there four days ago and it's still tacky to the touch. I've put it in a box in an upstairs closet that tends to get fairly hot in hopes that maybe it'll bake it a bit and fully cure. If not, I'll end up having to strip it - which might well cause the glue to come apart on the landing bay interior work that I've done, so I'm trying to avoid that if possible.

On the upside, this has allowed me to start work on my Battlestar Pegasus build, which I'm trying to complete before a local model club contest on 21 September. I've already started on that build, and will be using most of the Catalyst Creations Pegasus Upgrade Set parts. I've already got the Gator Head mostly complete and plan to get a new thread for that at some point in the next two days.
 
Quick update. I've not done a whole lot to Atlantia, as the focus has been on Pegasus. However, I did the following:

* finished painting the landing bay interiors. They're sloppy as Hell, tho since you can't really see all that well inside there, anyhow, so I wasn't terribly concerned.
* got in the Aptivaboy Pandora gun sets last week and started adding them while putty and paint were curing on Pegasus.
* added some detail pieces to the "flight pod gun fantails", to included a circular part that the box missile launchers will sit on top of.


Guns!


Atlantia's going to be able to put out one Hell of a broadside!

Updates on Battlestar Atlantia, Page Four starting with pic Atlantia080.
 
Well, my modeling mojo left me for a while. I've fiddled with a few parts here and there, but nothing concrete.
Until last weekend, anyhow.

Finally got back to Atlantia. The below pic is from Monday or Tuesday evening (Hell, maybe Sunday?) showing that I was cutting out the sections on the engines to open them up.


Since this was taken, I've cut out all four and plan to get to working on the conduit/piping that will go "underneath" those open sections on the engine, sort of like what I did for my Pegasus build.


I think I'm going to change it up a bit inside, maybe show two small conduits in that open area instead of just the one. I'm also thinking of spacing it out away from the section a bit, give it a bit more of a 3D effect.

More when I've made progress with the engines!
 
Work proceeds slowly on Atlantia. I'm almost done with the engine modifications for her engines. I added various diameters of rod & tube stock for the middle section, as well as a wall to each end of that section. I also wasn't sure if I was going to open up that skinny rectangular section on the top of the engine nacelle, tho went ahead and finally opened them up.


This thread is more than 9 years old.

Your message may be considered spam for the following reasons:

  1. This thread hasn't been active in some time. A new post in this thread might not contribute constructively to this discussion after so long.
If you wish to reply despite these issues, check the box below before replying.
Be aware that malicious compliance may result in more severe penalties.
Back
Top