Arch27
Member
Hello all -
I've been in the 501st Legion for a few years now. I started out as a Biker Scout, but circumstances arose (medication made me gain weight) and I didn't quite fit into that costume anymore. I wanted to continue to troop at 501st events, so I sought something a bit more comfortable. I acquired a Tusken Raider costume through the 501st forums. It had already been with two other members, and I was quickly approved in the costume. I was satisfied with it for the most part. I even made my own gaffi stick.
Fast forward to a couple years later. After Celebration VI I was looking over photos of the group and saw that I stuck out like a sore thumb. My costume looked glaringly white (though it was tan) and remarkably clean (though it was quite dirty). That, combined with my own frustrations over the ill-fitting bandolier setup, is why I set out to make some improvements.

The Costume:
The Weapon:
I had originally constructed the "wooden" end of the weapon using a metal sink drain flange, a metal sink pipe elbow, a metal wall escutcheon, a 4' long 1" diameter wooden dowel, a cast resin 'pineapple' (the bulbous part with a spike) and a lot of auto body filler paste to disguise the metal elements.
I've been in the 501st Legion for a few years now. I started out as a Biker Scout, but circumstances arose (medication made me gain weight) and I didn't quite fit into that costume anymore. I wanted to continue to troop at 501st events, so I sought something a bit more comfortable. I acquired a Tusken Raider costume through the 501st forums. It had already been with two other members, and I was quickly approved in the costume. I was satisfied with it for the most part. I even made my own gaffi stick.
Fast forward to a couple years later. After Celebration VI I was looking over photos of the group and saw that I stuck out like a sore thumb. My costume looked glaringly white (though it was tan) and remarkably clean (though it was quite dirty). That, combined with my own frustrations over the ill-fitting bandolier setup, is why I set out to make some improvements.
The Costume:
- Dyed both inner and out robes. I used a combination of RIT Tan and Pearl Grey. When first pulled out of the vat, the outer robes were chocolate brown. I hung them on my chainlink fence and hosed them down, aiming at the top and letting the dye trickle downward as it washed out. The inner robe wasn't in the dye bath as long, but enough to tame down the white.

- Reapplied weathering. This was a combination of flat black spray paint and sand - real sand. I sprayed the robes with the paint and let it get tacky, then laid them out on the driveway and poured a few cups full of play sand on them. The next step was to stomp all over them, grinding in the sand and creating stains.
- Bought two new bandoliers (Martini-Henry and English 1903) as well as a new 5-pouch ammo belt. The two bandoliers came from IMA-USA. The 5-Pouch came from a guy in the 501st that makes Sandtrooper pouches. I ran them all through the wash, then laid them out in the blisteringly hot sun and threw sand on them. I wet the sand down a bit and threw even more sand on. The effect I was going for is what ultimately happened - they looked dirty, dusty, but not caked with sand.


- Repaired neck breather canister. Since it's made like the real deal, there are a lot of little parts that need to be glued together. This is a point where the glue can - and will - fail, and has failed on me nearly every single time I've been in the costume. Inevitably one of the plastic caps will come off the metal spray can ends. Well, not anymore. I coated those connections in superglue.
- Reattached flopping boot wraps. The duck canvas wrappings were glued to brown rubber rain boots. The area at the toes had come loose and would flop when I walked. I used to silicone adhesive that stated it would bond anything to anything (with cloth and rubber being two of the items listed).
The Weapon:
I had originally constructed the "wooden" end of the weapon using a metal sink drain flange, a metal sink pipe elbow, a metal wall escutcheon, a 4' long 1" diameter wooden dowel, a cast resin 'pineapple' (the bulbous part with a spike) and a lot of auto body filler paste to disguise the metal elements.
- Secured the 'pineapple' end. This part was initially epoxied in place, though thinking back I suppose I just didn't give it enough surface in which to bond. Long story short, it popped off one day, though, luckily, I wasn't at an event. A friend had put a screw through the metal escutcheon into the pineapple. It seemed to work nicely so I balanced it out with another on the opposite side.
- Added epoxy putty. According to the packaging, this is supposed to be used to repair broken molded ceramic tile soap dishes. I used it liberally to hide the aforementioned screws and create a better taper around the sink drain flange piece.

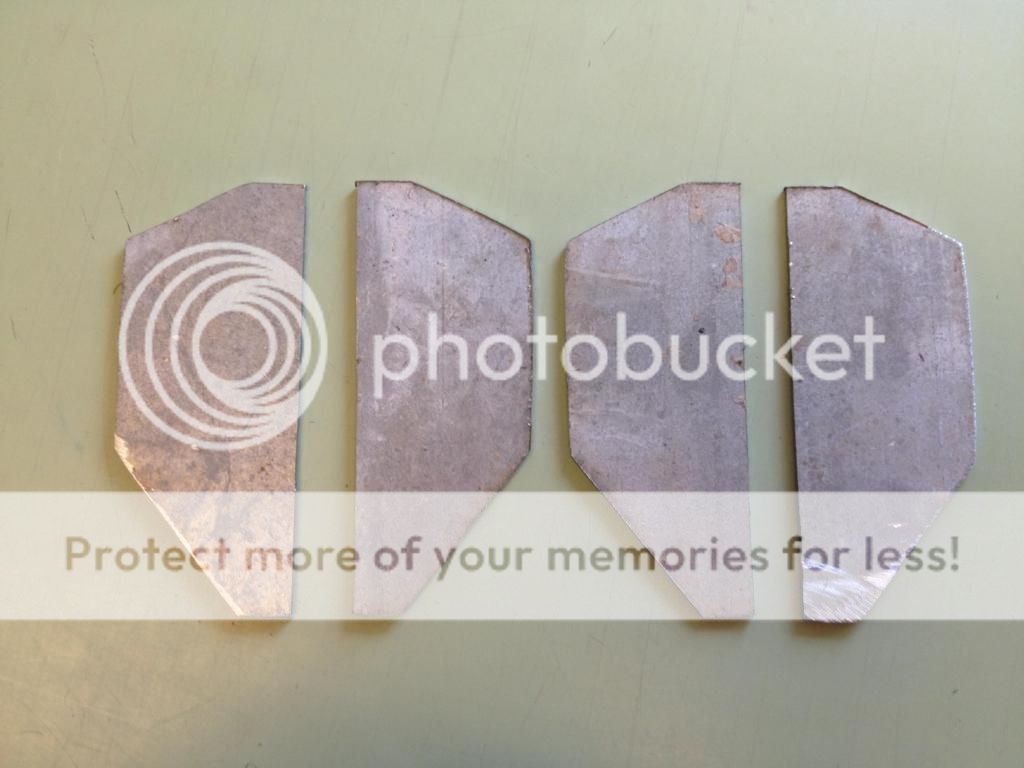
- Remake the fins. Luckily I work at a place that happens to have a good amount of scrap metal. I found a handy drawing with dimensions through a 501st forum (the Krayt Clan, for Tuskens & Jawas mostly). Some guys in the shop cut them out for me out of a light gage galvanized metal that was the same thickness as the plexi I had used before.
- Use a different spike. I had a plastic garden hose guide with a metal spike, so I cut the plastic parts off and reused the metal end.
- Add the 'ring'. One tiny detail I've always noticed about a screen-used gaffi was that the metal end had this ring a few inches up from where the wood met the metal. I imagine it was some sort of pipe fitting, because it would have been easiest to affix a short pipe into the wooden club and then screw on a larger, decorative piece than it would be to try to do it whole. I aimed to replicate that, and redoing this end made it possible. I used a 2" PVC join piece that I cut down to 1/2" and beveled the edges to make it look ring-like.

- Re-evaluate the assembly. To strengthen the entire end, I ran a wooden dowel through the 3/4" PVC. I then slotted the PVC for the fins to fit into. The dowel kept them from sliding too far in. I also notched the dowel on the end where the garden spike would go. It was slightly off center, which worked out great as it wedged the dowel in place. Copious amounts of epoxy was applied, and I also glued together the entire thing to the rest of the weapon. I didn't disturb it for about two days just to be sure it set up completely.


- Filled in the spike. The original item had a solid, four-sided spike. I filled in the voids on mine using more of that epoxy putty, scraping it off level. When it dried, I sanded it with a block. It came out looking pitted and aged, which is perfect to me.
- Paint and weathering. I sprayed it with primer, then aluminum. I misted some of the flat black and tried to wipe it down a bit with a wet rag while it was still wet so it would look uneven. It didn't do what I had hoped but it worked. After the black dried, I used a lightly diluted mixture of Burnt Sienna and Glazed Carrot acrylic paints and dripped it all over the 'metal' end. I let it dry for a few minutes, then wiped off the excess. In places where I felt it caked on too much I just wiped it with a damp rag.
Initial Color Pass:

Weathered:


