3D Printed Samus Varia Suit - FINISHED! (Pics on pg.14)

Re: 3D Printed Samus Varia Suit

to add in for power source. If you have the space look at adding a nice rechargeable battery and a Boost converter. that way you can use almost any power source (cough USB backup end cough) and have it deliver the power you need
 
Re: 3D Printed Samus Varia Suit

Been watching this thread for a while now and I've got to say your work is great and the progress has been a joy to watch. Amazing job!

Out of curiosity, where did you get your EL tape?

Thanks! Your ED build is phenomenal by the way. ;D

I got my tape here: Light Tape®

This all looks amazing! Those EL strips look similar to what they used for the suits in TRON. Those had extremely short battery life though. Any plans for a power source yet?

According to the site, this tape is really power efficient but I'm not sure what exactly that means. The sample I got just runs on a single 9v, which can power 1 to 33 sq in of tape surface area. From what I can tell that's the only power source they provide that is portable, so I either have to have 8 of those (which would be fine since I'd be putting seven in the large chest armor cavity and one in the arm cannon), or figure out my own power source. I'm not sure yet if their power sources do something extra required to run the tape technology. 9v's would be nice though because I could change them on the fly at the con, versus having to wait to recharge lithium batteries.
 
Re: 3D Printed Samus Varia Suit

9v's would be nice though because I could change them on the fly at the con, versus having to wait to recharge lithium batteries.
That's what I run my LED arrays off of in most cases. They last a good long time, and are easy to swap out. Velcro cable ties glued to the inside of the armor work WONDERFULLY to hold them in place.
 
Re: 3D Printed Samus Varia Suit

Bleh. Well, for some reason even the gesso is able to be peeled off my thigh armor. I don't know what the deal is. It's possible that gesso is always able to be peeled off but I never saw it happen previously. The thigh had a little bondo on it when I applied the gesso over the entire thing. When the gesso started peeling off the bondo, as I discovered it does, it created edges for the gesso to continue peeling off the worbla as well (even with the thigh roughed up for adhesion). The bicep and shoe tongues had no issue with gesso. So I guess maybe you just absolutely have to have a coat of gesso over the entire thing all at once and be careful not to sand through it.

A coworker/friend of mine suggested I try Apoxie Sculpt. I've read it's a fair bit heavier than bondo (although it doesn't seem that much different to me) but on the other hand this stuff sticks to damn near anything and is rock hard when cured (bondo tends to stay a bit rubbery or sticky even when fully, properly cured). I tried it out on one side of one of the shoe tongues and I really like working with it. No fumes, 2-3 hour working time, is clay-like so it's easy to build up corners and make it very smooth even before sanding. I'm hesitant to apply it to the larger pieces like the thigh and shins though.

Anyone have experience working with this stuff?

The inside of the tongue before and after sanding:
IMG_3382.JPGIMG_3388.JPG


Now that I know the EL tape is going to work, I began work on the shins again. I was concerned that they were going to end up being too tight so I did some surgery on the inside and removed the layer of worbla and the inner foam, then reinforced it with a layer of worbla and angled the cut edges so it would be comfortable. So far it seems to help a lot.
IMG_3379.JPGIMG_3374.JPG

I also finished cleaning up the edges from where I had cut the shin apart, and started adding the flange along the seams where the two pieces will fit together.
IMG_3393.JPG
 
Last edited:
Re: 3D Printed Samus Varia Suit

LED's use very little power, if these things are anything like the ones from TRON a larger power source will be needed. Their suits lasted 12 minutes and used rechargeable lithium ion batteries on their back and in the identity disks. I can see you having plenty of room for batteries in that suit though :) I would definitely have a switch to turn them on and off to conserve power..
 
Re: 3D Printed Samus Varia Suit

The problem with store bought rectangle 9V batteries is the runtime, it's terrible. Lithium would run much longer and brighter, but you'd need 3 cells as each power source.
 
Re: 3D Printed Samus Varia Suit

I would think that Apoxie would get expensive and heavy really quick. When it comes to armor, the less weight, the better, as heavy armor gets really hard to wear in a hurry. Maybe you might want to look into a better brand of body filler instead of Bondo. Evercoat's Zgrip is comparable in price to Bondo, but much nicer to work with and has really good adhesion. Stuff gets hard a s a rock, too, but is still easy to sand.
 
Re: 3D Printed Samus Varia Suit

Thank you so much you guys for all the suggestions. I've given this some more thought and I think before I do anything else I'm going to revisit the wood glue and bondo thing again. I'll do a test to see if bondo truly doesn't peel off the glue, and if so I should be able to apply the bondo thick enough that I never sand through it, thus avoiding the different sanding speeds of the two materials. Part of the problem was I had applied the wood glue quite thick and I was going to use it as part of the sanding process. If I instead treat it like a thin adhesion layer alone I should be able to simply use bondo to smooth out my pieces. This way I'm also definitely sure that the two thighs weigh the same since this is how the first one was done (just not very well - had to fix it up a lot). But first thing's first: gotta test it to be sure.
 
Re: 3D Printed Samus Varia Suit

Oops. I meant to say I use Evercoat Easy Sand. I use SMC as well, but that definitely won't do what bondo does.
 
Re: 3D Printed Samus Varia Suit

Not a lot to post about recently; my sister came up to visit me for a week and we mostly just got a lot of sanding done...oh and we made another creepy duct tape body part - this time, a disembodied arm! :Þ

The other thing I've been doing is attempting to fix the stupid shin armor. You may recall that I removed the foam from some areas to create more space on the inside. Well, it wasn't enough. No matter what I did I couldn't get the shin to fit - even worse, every time I have to heat it up to fix an area I risk warping the entire thing. So frustrating. With no other options left, I chose to slice the shin down the back and add a spacer. Now, this may seem like, "duh, just add more to it and it'll fit". Oh, but it is not that simple. Because of the way the grooves are positioned, adding a spacer to the front, for example, would mean that the knee spike would no longer match up with the other half it's not connected to, not to mention there would be a gaping groove down the front center which would look dumb.

The back, however, is a slightly different story. The top center groove would get super wide but since its angles are 90 degrees (the front is a V shape, not a rectangular groove) that means I can easily expand it, then fill it back in with Apoxie Sculpt or even just leave it as is. Since the seam for the two halves already runs along that top groove I only had to cut the bottom section. Down there it splits into two grooves which angle apart from each other. This makes things a bit tricky. I can't just cut down one groove and add the spacer on that one side; things would no longer match up, same as the front knee spike. So instead I cut straight through the center. This destroys the point at the top of that section, but I can easily rebuild it with Apoxie just like the top groove.

The back before cutting, line showing where I will cut:
rueZTVW.jpg

After the cut:
mhygjyq.jpg

Spacer added in:
HipTEHK.jpg
It still looks a little wonky because I have to go in and fix warped areas.


And finally, IT FITS!!
7wz0e68.jpg

I guess that's my first official "I'm wearing multiple pieces of my costume" picture! Yay!

It's still quite painful since the inside bits haven't been fully smoothed out, but it's the right size now.

Obviously that's not the Samus shoe. I couldn't put on the real one since it's currently filled with tin foil to protect from painting (never ended up putting the clear coat on it last summer so it's still all masked off). That thigh is the problematic/peeling second thigh. My sister sanded all the bondo off of it and applied a new coat of gesso. I'll be bondo'ing it soon.

I'll be using Apoxie on at least some of the shin, but I haven't decided if I want to do the entire thing with it. The shin isn't really the strongest, even with double layered worbla. I may try to just strengthen it in key areas and bondo the rest (unless bondo also peels off of Apoxie, ugh).
 
Last edited:
Re: 3D Printed Samus Varia Suit

If that spacer ends up being the biggest "defect" in your suit, you've done an immaculate job. Again, awesome work so far. The spacer looks pretty good. Keep up the good work, Talaaya!
 
Re: 3D Printed Samus Varia Suit

I've been watching this from afar for a while now, but I'm really excited to see the progress! Great work Talaaya!
I'll start working on Ridley later this year, and he's going to be coming for you! >:D
 
Re: 3D Printed Samus Varia Suit

Thanks guys!

I've been watching this from afar for a while now, but I'm really excited to see the progress! Great work Talaaya!
I'll start working on Ridley later this year, and he's going to be coming for you! >:D

Oooh, I can't wait to see how you tackle that one. I'll have my arm cannon charged and ready!


I decided to just go ahead and cover the entire shin with Apoxie Sculpt. I applied it as thin as I could without it being too thin, so about 1 to 2mm thick. Even spread that thin it adds a surprising amount of strength to it. I'm working with a 1 lb container of Apoxie so even if I used the entire thing to cover it, which I'm not, it would only weigh 1 lb more which is inconsequential.

I gotta say again, I freakin love this stuff. <3
Look at those wonderfully crisp, smooth edges! ...Before sanding!!

5fYGXEr.jpg

I've gotten much better at applying it. There are still blobby seams all over the place, but those are unavoidable and won't be a problem after sanding. They're there because I had to keep waiting for areas to cure in order to continue with other areas, so I couldn't blend the new soft areas into the hard areas.

The shoulder has been mostly sanded and has had its test coat of primer applied. Another sanding pass and it's ready for molding and casting!

B1p2oab.jpg

Those bumps and grooves at the bottom are annoying as hell to sand.
 
Re: 3D Printed Samus Varia Suit

How are you securing the Shoulder Pauldrons? I'm working on my own Samus build at the moment and am trying to figure out how to secure these--they fit on my shoulders, but any more than the slightest motions cause them to fall off. I was considering installing straps on the insides as a means of anchoring them, but am not sure this is the best option. Do you have any ideas?

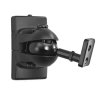
The plan is to use a pair of these
81PKUu0t0qL._SL1500_.jpg
which will be mounted to the chest's rigid shoulder straps. The large side will hide inside the shoulder itself. Those are wall mounts for speakers which, by the way, I am very proud of myself for finding if I do say so myself. ;D

I chose these because they have angle restrictions. Vertically it can only rotate between the two "cups" which hold the ball joint (what is that, like 30 degrees?), but it can rotate 180 degrees horizontally. This allows me lots of movement forward and back with my arms, but with less risk of smacking my helmet with the shoulders when I lift my arms. It also means that when I put my arms down the weight of the shoulders should rest on the joint and not my arms. Bonus: the big fat side has a slide on the back which means I can easily lift the individual shoulders off their mounts to detach them, versus having them permanently mounted to the chest armor.

Amazon.com: Pinpoint Mounts AM30-Black Universal Wall Mount for Home Theater Speaker: Electronics
 
This thread is more than 9 years old.

Your message may be considered spam for the following reasons:

  1. This thread hasn't been active in some time. A new post in this thread might not contribute constructively to this discussion after so long.
If you wish to reply despite these issues, check the box below before replying.
Be aware that malicious compliance may result in more severe penalties.
Back
Top