1/260 Scale - ST:TMP Drydock

June Updates - 2015 Hey Everyone!
It's good to be back! We just came back from a week long cruise to the BAHAMAS! A much needed and relaxing vaca! Enough to recharge batteries and enthusiasm to get back to the task at hand.
Anyway, I was going to set up the June updates before I left, but I ran out of time, so here we go....
I needed to wait for some other parts for the model so I had to divide my time on working on the gangway/interface/armature and the port side detailing on the panel frames.
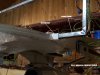
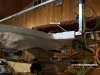
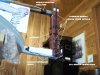
I first had to feed all of the wiring through the armature and feed it up to the top of the armature so I could add the gangway and tower details around the wiring. This will hide all of the wiring and make it appear as though the ship is under it's own power. I built the gangway on this version of the model the same way I did it for the 1/350 scale version of the model. I first started at the hull of the saucer section and work my way out to the tower section then build the actual tower section on three sides and detail it. By only building it up on three sides allows me to add any last minute additional wiring that might be needed. When I'm sure I won't need to add anything I can then seal all of the wiring in and paint all of the details. I was also able to add the three hydraulic lines that are seen in the movie. I used an enhanced screen cap to follow how these lines hang on the sides of the gangway.
In other areas I've added the lower tier mark lights as well as the port side mooring tractor beam turrets. So more soldering and wiring were needed. Also, I began working on the tension rod assemblies for the port side panel frames. I started with the mounting nuts then added the washers and bolts then cement the turnbuckles into place. Next I cement only one end of the tension rod into one end of the turnbuckle and leave the other end to slide in and out of the turnbuckle. This helps keep the rods from bending when I assemble the panel frames to the overhead modules when the weight of the structure shifts.
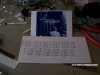
The last pieces I've worked on in the last month are the outside panels that are seen when the Enterprise takes off from the Dock. I just added some small details. I put some c-channel pieces as well as some tanks on either side of the c-channels. I will be adding an LED to each of these panels later on to add some more lighting effects to the outside of the panel frames. Well, now that vacation is over with, it's back to work on all counts! Enjoy the pics in which there are 12 new ones on the Updates for June - 2015 page! See you in a month!
Mark
 

Attachments

  • 100_6705.JPG
    100_6705.JPG
    465.2 KB · Views: 335
  • 100_6708.JPG
    100_6708.JPG
    515.1 KB · Views: 344
  • 100_6709.JPG
    100_6709.JPG
    508.7 KB · Views: 386
  • 100_6749.JPG
    100_6749.JPG
    387.4 KB · Views: 356
  • 100_6713.JPG
    100_6713.JPG
    418.7 KB · Views: 329
Last edited:
July Updates - 2015

Hi my fellow model builders!
This month's updates are now posted for your enjoyment. I have pretty much been doing a lot of clean up with the port side framework. I'm getting all of the tension rod assemblies in place as well as the port side mark light bars which run along the length of the model. I've also added all of the panel frame details to the sides of each of the panel frames. Everything is pretty much in place and all I have to do now is connect all of the wires and do a lighting test to make sure everything works okay. The only part I didn't detail as of yet is between the top tier 2nd and 3rd panel frames. This is because I will have to cut into the tubing to allow the armature tower to fit in between these panels. I'm a little bit nervous about cutting into these tubes just because I don't want to ruin anything. But this has to be done in order for the ship to be supported inside the dock.
In the meantime, I will be painting up all of the added details that I've put on this last month to match the rest of the dock model. In the updates there are 32 new pics for this month. I've taken more photos to show how the tension rods are added one by one into the structure. It takes about 40 to 45 minutes to complete one panel frame. This is mainly because of all of the small parts I'm using to build this part of the dock. I can't tell you how many times I've wound up dropping parts while trying to put them all in place. I've also been doing some piece counting for the model. There are 9 parts to each of the tension rods. 2 mounting nuts, 2 mounting bolts, 2 washers 2 turnbuckle sleeves and one tension rod. There are 12 tension rods on each panel frame. So just for the tension rod assemblies alone there are 108 pieces per panel frame. 42 panel frames total including the port and starboard frameworks. This equals 4,536 individual pieces just for the panel frames alone. At the end of the entire build I will give you a complete total of all the individual parts needed for this model.
In other areas, I have scratch built some support clamps that are needed to hold the mark lighting rods in place on the outside of the port framework. These clamps were all cemented to the outside of the dock and aligned so that the entire length of the rod would appear straight over the entire length of the dock. The mark light rods are then snapped into the clamps holding them in place. Next I will be doing the wiring for these lights and then do a light test. After everything looks good I can then paint all of these parts to match the dock. I can finally move to get the Enterprise in place. Hope you enjoy all of the pics for this months. As always if you have any comments or questions I'd be happy to hear from you. See you next month! Be safe!
Mark
100_6835.JPG
 
Last edited:
Amazing build:eek And I was complaining about my 240 windows from my 2001 Space Station! Your number of pieces for this model is into the thousands;). This will be unbelievably cool when everything is said and done; in the mean time, keep up the great work:cool
 
Thanks joberg and mofo77. I think I can't wait for this one to be done as well so I'm looking forward to this being finished as well. I should have a few more pics in a couple of weeks.
Keep checking for the updates,
Mark
 
WOW! This is amazing! The details? Are you kidding me? Fantastic! If there is anything I have learned is (but always fail to apply) to never set yourself to a deadline. Just have fun with the build and enjoy your accomplishments. This is amazing! :)
 
August Updates - 2015


Hello Everyone!

I apologize for the delay with this month's updates. A lot going on in my life, lately! Whew! I finally am able to post the update! Anyway, Most of the past month I've been painting all of the turnbuckle assemblies on the inside as well as the outsides of the frames. No easy task considering they needed to be done one part at a time. Some parts needed more than one coat. I would have preferred to airbrush all of this but the masking would be too time consuming and the parts are way too fragile to keep in place. There are too many details on the light panels to worry about overspray and the like.

I have 9 new pics in the August Updates - 2015 page. This shows the painting completed. I've also added the cryo-tanks to the bottom tier of the frames and those are now secured in place as well. About half of the pics are some light test shots. The only other thing I was able to work on are the outside "B" panels. I've added a few more details to each of them. That's pretty much it for this month, now let's get that STARSHIP inside the dock and launch this puppy!

Thanks for being patient, See you next Update!

Mark
 
Last edited:
Fantastic work; I cannot believe the amount of details being put together with this model:cool Love it! I know what you mean by doing 2 models like that at the time; it's crazy for sure (I did that several years ago and that was the first and last time I did that stunt:rolleyes). Eager to see the next update!
 
Thanks Guys! Work work work! Hopefully I'll be able to get a few good update pics for the upcoming month!

Mark
 
October Updates - 2015

I Apologize for the lack of updates for September, but Life Happens! Mom's been in the hospital and a nursing home for the last Month and a half, I'm getting ready for a move and everything has been very hectic this past month - (phew)
The little I've been able to get done however is in the October Updates 2015 page. I found out that the pieces I cast for the Roof section of the overhead modules were apparently not thick enough to hold a flat shape. Some of them have warped a tiny bit, so instead of recasting all of them I had some pieces of c-channel left over from when I made the frames of the overhead modules and decided to use them for trusses to help keep any of the other panels from warping. The trusses are held in place with 2 screws. The trusses have also stiffened up the entire frame of the roof sections so it all worked out for the better on this build.
So I was able to paint up the top sides of all the roof panels the overall RUST color to match the rest of the dock. All of the panels are connected to the L-strips of aluminum so they can be dropped onto the overhead module assembly as well as be removed for any maintenance or additional details that need to be added to the module assemblies. There are 7 new pics for this month update. I know that's a little weak on what was accomplished in the last couple of months, but now I can get back to the normal work routine of this build. Once again I apologize for the lack of updates, but I'll have more to come for next months updates. Thanks for the patience and I'll see you next month!
Mark
 
Last edited:
Hoping your mother is OK already.

This is historical!
Every pics are amazing.

Can't wait to see this on station on the orbit over SFO.

Katsu
 
Thanks guys! BTW Mom is doing much better!

November Updates - 2015

Hi Everyone!
Thanks for your patience. I was able to move all of my model building stuff to my new location so after this update you will see some pics of my new work area. For this months update I have 15 new pics for you to view. I've been spending most of my time trying to mount and balance the Enterprise model into the Overhead modules. This scale ship weighs a lot more than the 1/350 scale version, so the issue of weight stands out a lot more in this build. I'm trying to get the Enterprise to appear as level with the drydock as possible so it will appear to be floating inside of it. It is taking a lot of tweaking to get it centered and balanced. After I get it as leve as possible I can then seal up the saucer section and permanently Secure the Enterprise armature to the Dock. Some of the pics in my update show how I've centered the model. Then I marked off all of the holes to drill for the mounting bolts. There will be three bolts holding the ship in place via the armature. I just had to take several pics of this. It just means I'm that much closer to finishing this build. I think you will like these pics.
Also I've begun measurements for the Hanger deck that is in the Overhead module. The Starboard side module will show the depth of the Hanger. This will also suggest that both modules actually look this way even though only one will have the doors in the opened position. I've taken all of the Shuttles Craft that I've cast both in opaque and clear castings and will be preparing them for painting. Some of the craft will be lighted up while others will be in a stand by mode. I've also cast many Travel pods and cargo containers as well as work bees. These will all be painted up and stored in the hanger.
Because of the framework of the overhead modules I will not be able to go as deep into the model with the hanger deck as I wanted. I was thinking of adding a mirror at the back end of the hanger to add some depth to it. I'll see how this works out as I continue to add details to this part of the build. That's it for this month. See you next Update. Take care,
Mark
 
Last edited:
Thanks joberg. I'm going into my busy season at work, so I won't have any updates until the beginning of next year. Hang in there and see you then!
Mark
 
February Updates - 2016 Okay! Finally I've been able to get some updates back on the site. I've started by adding 12 new pics to the February Updates- 2016 page. My primary work is for the Hanger bays seen on the front of the Overhead modules. My version of the dock will also include Hangers on the rear of the dock as well. The larger one will have the Hanger doors open so you can see into the hanger and view the storage containers as well as the work bees and shuttle craft that are stored there. After I finish the assembly of the hanger walls I will be working on the main hanger deck. I'm also adding a little more functionality to the smaller flight decks that are seen on the Starboard side module. I'm adding some access doors to the back walls to give them a little more depth. Thanks for your patience in all of this. I will have more updates coming next month! See you then!

Mark
 
Last edited:
This thread is more than 4 years old.

Your message may be considered spam for the following reasons:

  1. This thread hasn't been active in some time. A new post in this thread might not contribute constructively to this discussion after so long.
If you wish to reply despite these issues, check the box below before replying.
Be aware that malicious compliance may result in more severe penalties.
Back
Top