APU Mecha

Strode

Sr Member
hi all. i am currently attempting to build the APU from the matrix revolutions. It is quite a complex model and frankly, i've never made anything this dense before. I am attempting to make it out of stuff lying around the house mostly and with what limited tools i have in my possession. I looked around on the web and came across this paper-model.

314D46ADB9254CF0DEED254CF0DC80_zpse4d8cbae.jpg


2D4D46ADAC204CF0DEDF2A4CF0DC73.jpg


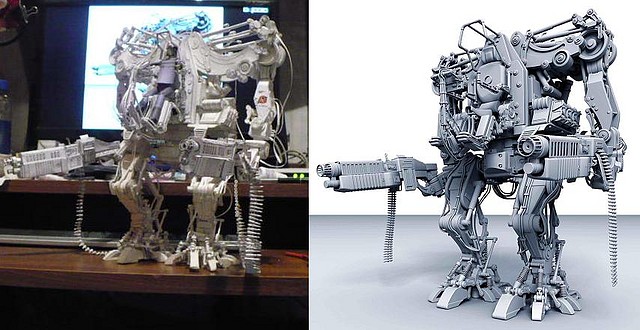
it looked awesome but far too flimsy. so i decided to use this as a reference and build my model entirely out of scratch. for those interested, the model can be found here:

A.P.U. Mecha MATRIX - Modelismo en papel

and the original creator's build thread here:

Maquetas y modelismo en papel - A.P.U. Mecha MATRIX - El rincón del diseñador

oh and a proper download link to the model is here:

http://www.mediafire.com/?74v65qpqac1xjma

I am making this with just a couple of x-acto knives, scissors, pliers, toothpicks, superglue and some form of foam board locally known as "sun-board" so my, erm...quality of the product might not be entirely upto scratch or at least the level of finish i see out here so please bear with me :rolleyes
 
Last edited:
i plan to make the model as best as i can. once complete, all the parts will be bondo'd (or puttied or whatever sandable thing i can find out here and sanded till i achieve a good finish. so please excuse the initial roughness. the board is only about 2mm thick so i have to cut each part individually and then stick it layer-by-layer till i finish the part. this has to be done twice for each part; the arms and the legs. so as you can imagine, the process is long and tedious. especially using cutters and glue.

this is the board i am using. came across it quite by accident when i was looking for balsa for another model:
IMGP5769_zpsfad22682.jpg


cut into pieces and then stuck layer-by-layer:
IMGP5770_zps3124d933.jpg
 
started with the base of each foot:
IMGP5771_zps1af5ca5b.jpg


IMGP5773_zps0ae48b57.jpg


the metal bits you see used are actually the metal jackets covering standard AA batteries. many many years ago i peeled these jackets off the batteries, intending to do something with them but never did. coming in useful now though...:lol

IMGP5774_zps56fa499e.jpg
 
more leg bits. it's been quite a few days and yet i am nowhere near the end of the legs. it has many tiny pieces and many pistons and actuators. plus i epoxy the parts together and leave them to dry overnight as white glue it too weak to hold and superglue is too brittle. it'll hold initially but will come off under pressure.
IMGP5775_zpsd39e322a.jpg


IMGP5777_zpsa4d0675a.jpg

IMGP5780_zps6ba792a8.jpg
 
thanks guys. i hope it turns out as good as i hoped it would be. never did anything as detailed before....by the way joe, loved your claptrap model. i envy you all :lol
 
some updates. work is going at a snail's pace...oh well...
hinges...
IMGP5787_zps105ce2db.jpg


pistons...
IMGP5788_zpse693cd84.jpg


IMGP5789_zps28155ac3.jpg


test fit. all the parts are essentially test fit till i get it done properly puttied, sanded and primed. the excess will be trimmed to fit.
IMGP5790_zps62f66a1f.jpg
 
Sweet!! I am going to tuck this away for a future build. What scale are you doing it in? I would think 1/35 would be a great scale, with the abundance of military figures out there that could be used for the pilot.

Ashton
 
Sweet!! I am going to tuck this away for a future build. What scale are you doing it in? I would think 1/35 would be a great scale, with the abundance of military figures out there that could be used for the pilot.

Ashton

mate, i have no idea. essentially i am transposing the papermodel onto other materials just cause i have no interest in working with the paper one. you will note, the paper model, although good looking is structurally weak and flimsy at best with very fiddly bits. the parts themselves are roughly drawn and give a rough idea as to how to go about making it. plus with all the talent here i thought it deserved better, hence my attempt. i have no idea how it will turn out. all the materials i am working with are a new experiment so i hope everything goes as well as i hope...:$
 
IMGP5797_zpsb34f2219.jpg


fiddly bits for the ends of the pistons/actuators
IMGP5798_zpsa7e7e1ed.jpg


essentially translating ^ to these. the rods are to be made into pistons
IMGP5800_zps09985b3e.jpg


IMGP5801_zps18a5cf42.jpg


IMGP5802_zps5a29c799.jpg
 
This thread is more than 10 years old.

Your message may be considered spam for the following reasons:

  1. This thread hasn't been active in some time. A new post in this thread might not contribute constructively to this discussion after so long.
If you wish to reply despite these issues, check the box below before replying.
Be aware that malicious compliance may result in more severe penalties.
Back
Top