You are using an out of date browser. It may not display this or other websites correctly.
You should upgrade or use an alternative browser.
You should upgrade or use an alternative browser.
Blade Runner Blaster news: model kit version of the Tomenosuke Blaster is coming
- Thread starter phase pistol
- Start date
I love what you did to the grips, looks spot on!
Thanks, after looking at it again and stepping away from it a bit, I agree with what Prefect42 said about it needing to be more orange. The red sharpie did bring it down a little too much.
SO!
I was going to remove the red sharpie and try again with orange, BUT as I started removing it with alcohol and a cotton ball, I noticed that it gradually pulled the color away as well as evened out a few streaks that it had. The result was PERFECT! I just kept wiping it with clean cotton balls soaked in alcohol until I got the color I wanted. It was actually really easy!
See for yourself and tell me what you think!
After cleaning the left one with Alcohol

Comparison with Original.

And on the blaster:
Original Grips:

After darkening them with red sharpie (too red):

After cleaning with alcohol (just right:lol):


So, if anyone wants a quick, easy way to get a perfect tone on the Blaster Kit grips, just color them in with Red Sharpie, let it dry completely, then take a cotton ball soaked in alcohol and wipe it down, using a new cotton ball every 20 strokes or so, until it's the shade you want.
Last edited:

Here's a pic of it.Ahhhh I gotcha now. Thanks a bunch")

I also just did another quick mod to fix the rattle. This is also an alternate method to solving the floppy arm.
Mine was rattling quite a bit and I found that it was the looseness of the swivel portion of the sleeve (part number 11) jiggling against the bolt. It has to swivel because the arm swings up but the sleeve stays put and slides back. but it had a bit too much space between the inside of the sleeve and the end of the bolt. So I put a small plastic washer in between these two pieces. This quiets the rattle and provides some additional friction for the bolt, which keeps the arm in place. Now it sounds nice and clacky when I open the bolt but it's solid and quiet when it's closed.
Me likey!

budgeysmuggler
Well-Known Member
I love how people on this forum have such great ideas. The washer and the red sharpie technique, superb. As soon as I'm finished with my bathroom reno I'm back into finishing mine off proper, thanks to all the great ideas you fellas have come up with! :thumbsup
Trooper_Trent,
That new color you managed with the alcohol trick is perfect. WOW! Your work is excellent.
I'm guessing for the bluing, you blued the pieces and then sanded them down? I've got sanding pads on order and a bottle of Casey's here. Just need time this week to start.
And Brian, thanks for the updates on Rich. So glad to hear he's back at work.
Ted.
Prefect42.
And to everyone who jumped in with the washer to help the loose lever fit, THANK YOU!
Actually, I buffed them before bluing. Depending on the finish you want, the more polished it is before hand, the more even the bluing will be.
I just wanted to take off the original finish so that they were smooth. I used a sanding sponge and then went to medium grade steel wool to get the look I wanted, then blued them with a few coats, lightly buffing the uneven spots with fine steel wool.
I just wanted to take off the original finish so that they were smooth. I used a sanding sponge and then went to medium grade steel wool to get the look I wanted, then blued them with a few coats, lightly buffing the uneven spots with fine steel wool.
nostromo20
Active Member
Thanks for tips on blueing, looking to do this myself for the first time.
There are several videos in YouTube on how to do it. Watch a couple of those first and you'll be fine. Unless you want an absolute perfect finish, it's hard to mess it up really. If you're going for at least a semi used look you'll be fine. If you want it to look like glass you may want to have it professionally done. By a gun smith.
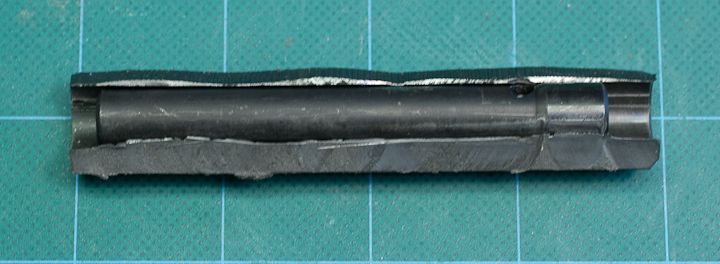
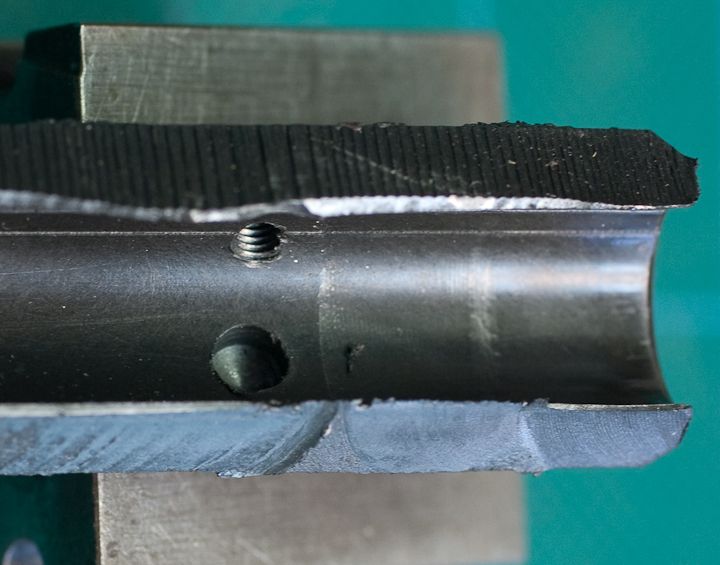
DISSECTING THE PLASTIC BARREL
So I got curious about the metal plug inside the plastic barrel and did a little surgery on one that I chopped off for the steel barrel upgrade. First I clamped the barrel in my mill and tried to mill away one side. I discovered that the plug is made of hardened steel and is a separate piece from the little plate in the breech. I then sliced off some more plastic along one side on the band saw. The plug did not appear to the molded in place. It's what you are seeing when you look in either end of the barrel.
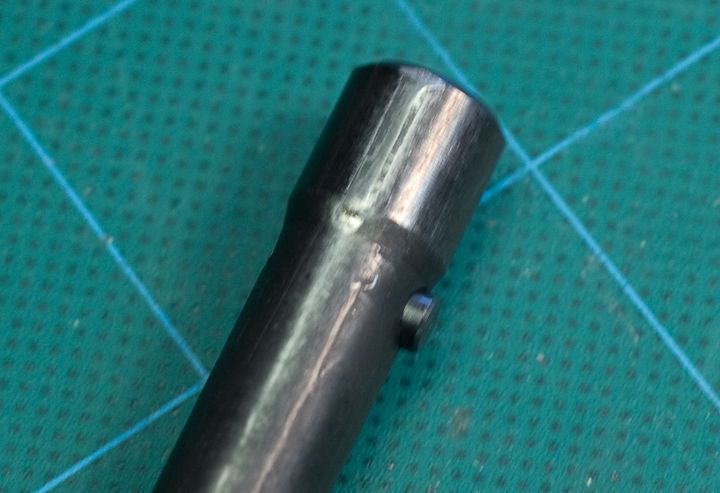
I was able to easily pry the plug from the plastic and discovered a small dowel pin that was holding it in place. Also interesting was that the plug was stepped in diameter, larger for a short length at the muzzle end.
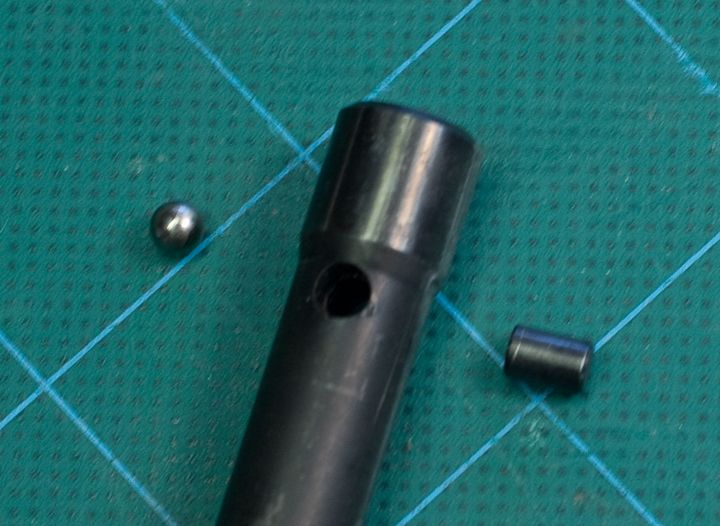
The dowel pin was held in place in a through hole where the ammo clip bolt attached by a small ball bearing.
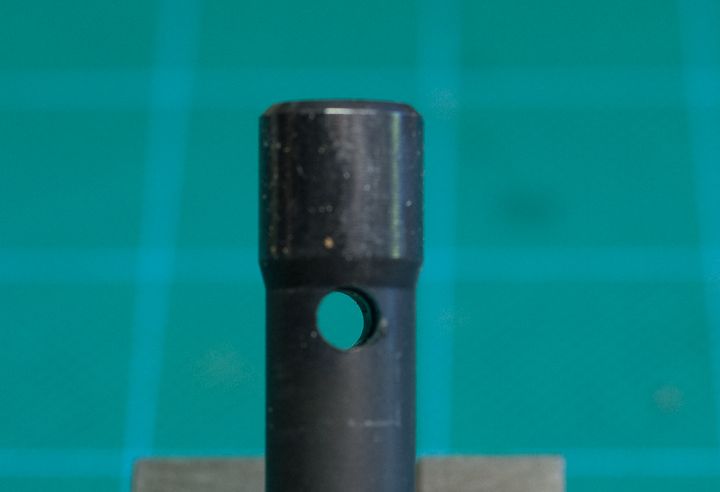
Looking at the inside of the plastic barrel you can see the shallow hole into which the dowel pin fit. Note also that the small hole on the side is through threaded, but that there was no corresponding hole in the plug. Meaning that the barrel and frame were molded without the plug in place and that it was added after the holes were threaded.
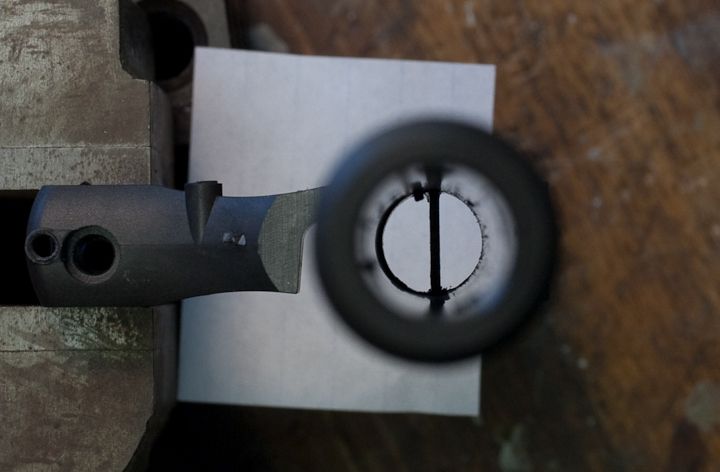
Close inspection of the through hole in the plug revealed a little bit of clear residue, probably from a drop of glue used to keep the ball bearing from falling out. In some cases, the ball bearing was loose in the box, having fallen out of the hole.
So this gave me an idea. I put a couple of drops of lacquer thinner in the hole on another intact barrel to soften the glue. (The solvent had no effect at all on the plastic so it's not styrene.) Then I rapped the barrel against my workbench which caused the ball and pin to drop down a bit. I could then easily push the plug out of the barrel with a stiff piece of wire through the breech end. This plastic barrel is going to be replaced with a steal one anyway.
Related to this, I was able to remove the metal washer from the cylinder by cutting away the plastic on the front end. I did it on my lathe, but you could do the same thing with a Dremel.
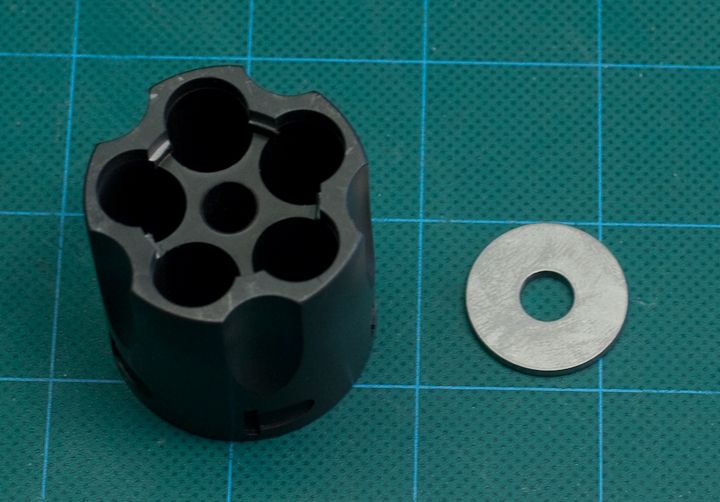
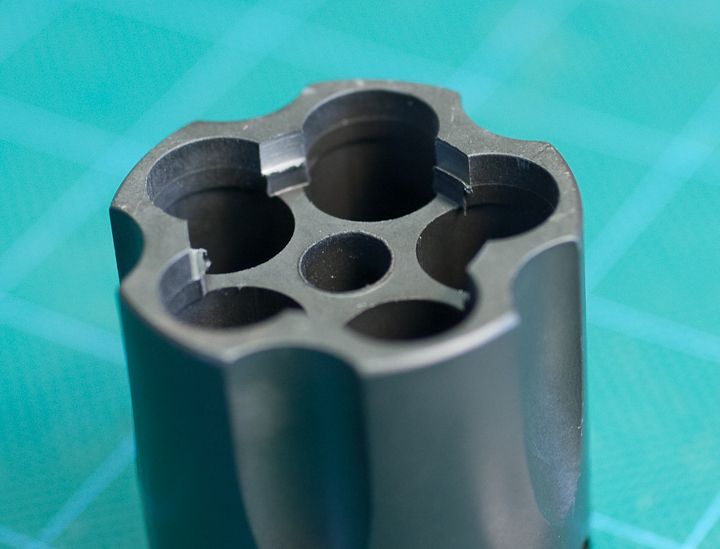
And while I didn't do it, with a little bit of careful grinding, the zinc plate in the breech could be removed leaving a free and clear open barrel.
What all this means for our members in the U.K. is that if you're a little clever (and very stupid!) with a little bit of work, and using common tools, you could turn the Tomenosuke into a real shooter. Of course the plastic barrel and frame would blow apart with the first shot and shred your hand, but I bet the bullet would come out the end!
DON'T TRY THIS AT HOME KIDS!!!
So I got curious about the metal plug inside the plastic barrel and did a little surgery on one that I chopped off for the steel barrel upgrade. First I clamped the barrel in my mill and tried to mill away one side. I discovered that the plug is made of hardened steel and is a separate piece from the little plate in the breech. I then sliced off some more plastic along one side on the band saw. The plug did not appear to the molded in place. It's what you are seeing when you look in either end of the barrel.

I was able to easily pry the plug from the plastic and discovered a small dowel pin that was holding it in place. Also interesting was that the plug was stepped in diameter, larger for a short length at the muzzle end.

The dowel pin was held in place in a through hole where the ammo clip bolt attached by a small ball bearing.


Looking at the inside of the plastic barrel you can see the shallow hole into which the dowel pin fit. Note also that the small hole on the side is through threaded, but that there was no corresponding hole in the plug. Meaning that the barrel and frame were molded without the plug in place and that it was added after the holes were threaded.

Close inspection of the through hole in the plug revealed a little bit of clear residue, probably from a drop of glue used to keep the ball bearing from falling out. In some cases, the ball bearing was loose in the box, having fallen out of the hole.
So this gave me an idea. I put a couple of drops of lacquer thinner in the hole on another intact barrel to soften the glue. (The solvent had no effect at all on the plastic so it's not styrene.) Then I rapped the barrel against my workbench which caused the ball and pin to drop down a bit. I could then easily push the plug out of the barrel with a stiff piece of wire through the breech end. This plastic barrel is going to be replaced with a steal one anyway.

Related to this, I was able to remove the metal washer from the cylinder by cutting away the plastic on the front end. I did it on my lathe, but you could do the same thing with a Dremel.


And while I didn't do it, with a little bit of careful grinding, the zinc plate in the breech could be removed leaving a free and clear open barrel.
What all this means for our members in the U.K. is that if you're a little clever (and very stupid!) with a little bit of work, and using common tools, you could turn the Tomenosuke into a real shooter. Of course the plastic barrel and frame would blow apart with the first shot and shred your hand, but I bet the bullet would come out the end!
DON'T TRY THIS AT HOME KIDS!!!
Last edited:
WOW, that is very interesting! I guess we now know what that little ball bearing was that was rolling around in one member's box! Great detective work.
This information could also potentially help members in the UK that have their kit stuck in customs. proof that the plug is solid steel could possibly help their case.
This information could also potentially help members in the UK that have their kit stuck in customs. proof that the plug is solid steel could possibly help their case.
Well I guess if the Border Agency have been watching this post you've just done them a huge favour!?!DISSECTING THE PLASTIC BARREL
So I got curious about the metal plug inside the plastic barrel and did a little surgery on one that I chopped off for the steel barrel upgrade. First I clamped the barrel in my mill and tried to mill away one side. I discovered that the plug is made of hardened steel and is a separate piece from the little plate in the breech. I then sliced off some more plastic along one side on the band saw. The plug did not appear to the molded in place. It's what you are seeing when you look in either end of the barrel.
http://i1053.photobucket.com/albums...nosuke Blaster Build/CRW_5232_zps81e6c6c7.jpg
I was able to easily pry the plug from the plastic and discovered a small dowel pin that was holding it in place. Also interesting was that the plug was stepped in diameter, larger for a short length at the muzzle end.
http://i1053.photobucket.com/albums...nosuke Blaster Build/CRW_5237_zps67f69dfa.jpg
The dowel pin was held in place in a through hole where the ammo clip bolt attached by a small ball bearing.
http://i1053.photobucket.com/albums...nosuke Blaster Build/CRW_5239_zpse37f5513.jpg
http://i1053.photobucket.com/albums...nosuke Blaster Build/CRW_5241_zpsf2717a34.jpg
Looking at the inside of the plastic barrel you can see the shallow hole into which the dowel pin fit. Note also that the small hole on the side is through threaded, but that there was no corresponding hole in the plug. Meaning that the barrel and frame were molded without the plug in place and that it was added after the holes were threaded.
http://i1053.photobucket.com/albums...nosuke Blaster Build/CRW_5234_zpse5b97381.jpg
Close inspection of the through hole in the plug revealed a little bit of clear residue, probably from a drop of glue used to keep the ball bearing from falling out. In some cases, the ball bearing was loose in the box, having fallen out of the hole.
So this gave me an idea. I put a couple of drops of lacquer thinner in the hole on another intact barrel to soften the glue. (The solvent had no effect at all on the plastic so it's not styrene.) Then I rapped the barrel against my workbench which caused the ball and pin to drop down a bit. I could then easily push the plug out of the barrel with a stiff piece of wire through the breech end. This plastic barrel is going to be replaced with a steal one anyway.
http://i1053.photobucket.com/albums...nosuke Blaster Build/CRW_5227_zpsf4025b02.jpg
Related to this, I was able to remove the metal washer from the cylinder by cutting away the plastic on the front end. I did it on my lathe, but you could do the same thing with a Dremel.
http://i1053.photobucket.com/albums...nosuke Blaster Build/CRW_5242_zps9dfe537c.jpg
http://i1053.photobucket.com/albums...nosuke Blaster Build/CRW_5243_zps9a91ee80.jpg
And while I didn't do it, with a little bit of careful grinding, the zinc plate in the breech could be removed leaving a free and clear open barrel.
What all this means for our members in the U.K. is that if you're a little clever (and very stupid!) with a little bit of work, and using common tools, you could turn the Tomenosuke into a real shooter. Of course the plastic barrel and frame would blow apart with the first shot and shred your hand, but I bet the bullet would come out the end!
DON'T TRY THIS AT HOME KIDS!!!
I think he was being sarcastic because of your situation. There is NO WAY to turn this kit into a real shooter from the parts that are included in the kit.
There is no firing pin, the spring mechanism is WAY too weak, the cylinder is PLASTIC, there's a block at the front of the cylinder, the barrel is PLASTIC, there's a metal shim going through it, and there's a STEEL plug embedded in the PLASTIC barrel.
No way this could be modified to be a real gun.
The only way you could potentially do that is if you substituted a real bulldog frame from the one included in the kit. But to do that, you'd have to already have a real gun, which at that point, you're already in trouble.
I'm from Texas, so I'm pretty sure we all come out of our mothers holding a six shooter. :lol. I own several guns and have shot all my life, as well as take down, clean, and rebuild revolvers. Using the parts from this kit, no matter what you do to it, you cannot make this into a firing gun.
Last edited:
Sorry I had not seen your previous post, implying it couldn't be done I saw DaveG's post and thought Oh FCUK
Yes, a heavy dose of sarcasm should be read into my previous post. In order to turn the Tomenosuke kit into a real firing handgun you would have to:
1) Remove the steel plug from the barrel (required tools: a stiff coat hanger)
2) Grind out the plate in the breech (required tools: a Dremel)
3) Remove the washer cast into the cylinder (required tools: a Dremel)
4) Drill a small hole in the hammer to hold a short bit of a nail for a firing pin (required tools: a hand dill and some wire clippers)
5) Drill a clearance hole in the back of the frame for the firing pin (required tools: a hand drill)
6) Replace the hammer spring with something stronger (50 cents @ Home Depot)
7) Call a friend to take you to t he hospital when you BLOW YOUR FRIGGIN' HAND OFF!!! (But make sure he's not standing in the line of fire or you'll need to call a second friend!)
But it can be done.
:rolleyes
Here's a pic of it.
[url]http://i272.photobucket.com/albums/jj179/trooper_trent/IMG_2458_zpsa86fa8c1.jpg[/URL]
I also just did another quick mod to fix the rattle. This is also an alternate method to solving the floppy arm.
Mine was rattling quite a bit and I found that it was the looseness of the swivel portion of the sleeve (part number 11) jiggling against the bolt. It has to swivel because the arm swings up but the sleeve stays put and slides back. but it had a bit too much space between the inside of the sleeve and the end of the bolt. So I put a small plastic washer in between these two pieces. This quiets the rattle and provides some additional friction for the bolt, which keeps the arm in place. Now it sounds nice and clacky when I open the bolt but it's solid and quiet when it's closed.
Me likey!
[url]http://i272.photobucket.com/albums/jj179/trooper_trent/IMG_2461_zps242bbea1.jpg[/URL]
Thanks so much for the tips. I installed the washer and it works great.
Ck
Anyone know which shots in the film are of the hero gun? I watched the HD theatrical release with my wife tonight and while trying to get some good glimpses of the blaster, now that I'm more familiar with it, it looked to me that the bolt was blued as well, not polished. At least it looked to be the same color as the Steyr receiver.
Lazerblade
Active Member
Thanks Dave for the barrel, it's fantastic as everyone has said. But the stand is also worth mentioning. Your little touch's make it a beautiful setup when the pistol sits on it. I also have a badge that I am trying to figure out how to display with it. Thanks for the extra effort.
Paul
Paul
Similar threads
- Replies
- 2
- Views
- 650
- Replies
- 5
- Views
- 926
- Replies
- 15
- Views
- 908