Avanaut
Well-Known Member
Hi All!
There are so many threads on the Finemolds' 1/72 Millennium Falcon, so many! One more won't hurt. See, I'm one of those guys who quit model building at the age of about 20. The kits you can purchase these days is just something that I could've never dream of back in the day, the possibilities are almost limitless, yet, at the core, it's all still the same. Kitbashing hasn't changed at all, same rules, better paints. It took me over two decades to return to the workbench and I love it, but I didn't come back for just the models, I came back with a camera.
I'm an illustrator by profession, a little bit of a photographer, too. I needed to try shooting some realistic miniatures, for that I began experimenting with the Finemolds' 1/72 Y-Wing in Jan 2012. Building the ship was a lot of fun and I have managed to shoot some nice photos with it. I have another one in store for building a lighted up version later.

 (Link to my Flickr folder of a few more scale model photographs)
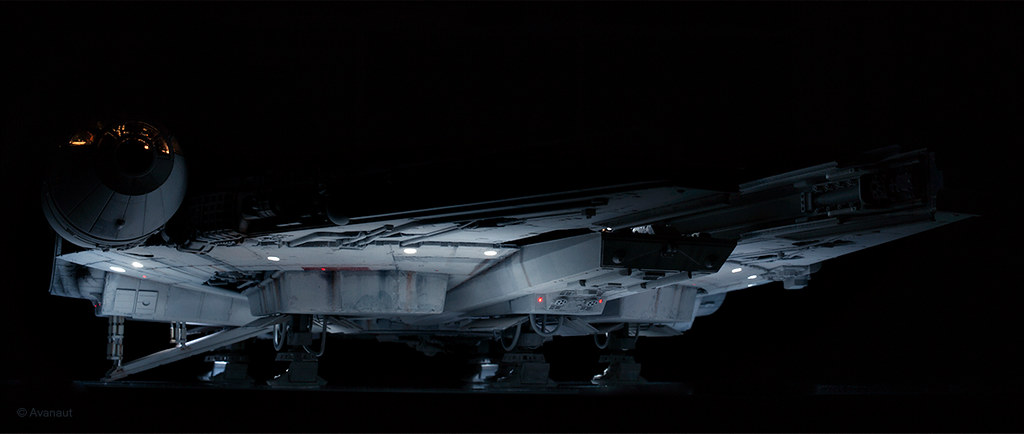
After the Y-Wing it was time for something a bit more challenging: the Finemolds' 1/72 Millennium Falcon. It started out in March 2012 as a simple oob build, but as I was gluing on the first parts it quickly became clear that it had to be lit properly in order to stand out. I've tinkered with soldering and led lamps a bit before, so that did not scare me off.
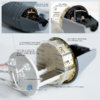
After some planning and researching I ended up having a grand total of 43 individual leds in the ship along with about two metres of optic wire and the Acreation Model's photoetch set for the cockpit, I have to say it took a while to figure out how the lighting should be arranged. The Falcon was to be built for photography and it should therefore have an internal powersource, no visible wiring, no switches, also, there should be different lighting modes: landed, in flight and parked with the little red lights on only. I decided to have the cockpit tube loose so I could hide all the necessary switches and stuff under it. I simply had to make connections for the cockpit lights, the connections also act as a locking mechanism, as the cockpit element is pushed to it's place the electric connection bits snap around each other and hold the tube in place.
First I soldered in 3 mm cool white leds for the under hull park lights, they seemed too cold, I stripped them off and replaced them warm white leds. After some camera tests the warm whites were removed and replaced with the cool whites again. In camera the cool whites were closer to flash and/or daylight, besides, the warm whites had differences in the colour temperature and that inconsistency looked really bad in camera. I left the warm whites for the cockpit, though, as they produce a nice warm glow in the cockpit and that looks rather inviting to my eye.
During the building process there were some decisions that maybe weren't optimal, like plating the engine light box with mirror plastic. I thought it would maximize the ten superbright 5 mm leds' lumens, but I think it actually does the opposite. It's not that important, though, in a photograph this can be dealt with. With the cockpit PE parts I had the biggest problems, the rear wall came out great, but the floor and console were really difficult and in the end I discarded them and used the plastic originals. I later learned that the Acreation Models's PE set is designed for the AMT model and doesn't fit the FM that well.
I tried to find information on the landing gear well covers, but at the time I did not come across good references so I just winged them together. I added some hoses and lit the wells with one overhead led each. The landing gear arrays are attached to the hull with Rare Earth magnets, so the Falcon can easily be switched to flying mode. Later I learned that the well covers should be divided by thirds, not twos, but I'm not going to rebuild them.
Just as I was preparing to painting the model I began running across some interesting threads over here at RFP. I realized that I had missed a LOT of what can be done to the already fantastic Finemolds' kit. I couldn't go back anymore and so I settled for painting the thing with enamels, (yes, I'm oldschool with paints) and weathering it with assorted weathering products. I did not look at reference of the big studio models too closely because I wanted to do something that just looks good in a photograph, besides, I don't think I could've replicated the paint schemes on the studiomodels that well anyway. I still have to add a little more grit to the Falcon and mess with the PE grilles a bit for that definitive scruffy looks, but overall I'm happy with the paintjob, it looks great in photographs and has a lot of promise.
However, I'm in a quest for that perfect Millennium Falcon photograph and my Falcon just doesn't cut it, I missed too much detail. So, after some deep thoughts and profoundly inspired by the works of Alaneye, Scratchy, Mancini and many others, I had to give in and, well, there will be another Falcon in the workbench soon. I've purchased all the aftermarket items I need and know of, I also managed to catch one of the last Falcons from HLJ just a couple of days before it was discontinued. Now I'm broke, but I have all that I need for that ultimate model with a deeper level of detailing, rebuilt jawboxes and repositioned mandibles, the electronics will be a lot different, too. It'll be nerve racking!
I'll see if I have the balls to start a thread when the work on my second and last Falcon begins. Meanwhile, I hope you like the first Falcon, the one that ended up being a warm-up for the ultimate thing.
Enclosed below are a few project photos from along the building process.
Cheers,
Vesa
Ps: While building the new Falcon I'll keep a keen eye on a studioscale Y-Wing kit, that's my real dream, my unicorn!
There are so many threads on the Finemolds' 1/72 Millennium Falcon, so many! One more won't hurt. See, I'm one of those guys who quit model building at the age of about 20. The kits you can purchase these days is just something that I could've never dream of back in the day, the possibilities are almost limitless, yet, at the core, it's all still the same. Kitbashing hasn't changed at all, same rules, better paints. It took me over two decades to return to the workbench and I love it, but I didn't come back for just the models, I came back with a camera.
I'm an illustrator by profession, a little bit of a photographer, too. I needed to try shooting some realistic miniatures, for that I began experimenting with the Finemolds' 1/72 Y-Wing in Jan 2012. Building the ship was a lot of fun and I have managed to shoot some nice photos with it. I have another one in store for building a lighted up version later.
After the Y-Wing it was time for something a bit more challenging: the Finemolds' 1/72 Millennium Falcon. It started out in March 2012 as a simple oob build, but as I was gluing on the first parts it quickly became clear that it had to be lit properly in order to stand out. I've tinkered with soldering and led lamps a bit before, so that did not scare me off.
After some planning and researching I ended up having a grand total of 43 individual leds in the ship along with about two metres of optic wire and the Acreation Model's photoetch set for the cockpit, I have to say it took a while to figure out how the lighting should be arranged. The Falcon was to be built for photography and it should therefore have an internal powersource, no visible wiring, no switches, also, there should be different lighting modes: landed, in flight and parked with the little red lights on only. I decided to have the cockpit tube loose so I could hide all the necessary switches and stuff under it. I simply had to make connections for the cockpit lights, the connections also act as a locking mechanism, as the cockpit element is pushed to it's place the electric connection bits snap around each other and hold the tube in place.
First I soldered in 3 mm cool white leds for the under hull park lights, they seemed too cold, I stripped them off and replaced them warm white leds. After some camera tests the warm whites were removed and replaced with the cool whites again. In camera the cool whites were closer to flash and/or daylight, besides, the warm whites had differences in the colour temperature and that inconsistency looked really bad in camera. I left the warm whites for the cockpit, though, as they produce a nice warm glow in the cockpit and that looks rather inviting to my eye.
During the building process there were some decisions that maybe weren't optimal, like plating the engine light box with mirror plastic. I thought it would maximize the ten superbright 5 mm leds' lumens, but I think it actually does the opposite. It's not that important, though, in a photograph this can be dealt with. With the cockpit PE parts I had the biggest problems, the rear wall came out great, but the floor and console were really difficult and in the end I discarded them and used the plastic originals. I later learned that the Acreation Models's PE set is designed for the AMT model and doesn't fit the FM that well.
I tried to find information on the landing gear well covers, but at the time I did not come across good references so I just winged them together. I added some hoses and lit the wells with one overhead led each. The landing gear arrays are attached to the hull with Rare Earth magnets, so the Falcon can easily be switched to flying mode. Later I learned that the well covers should be divided by thirds, not twos, but I'm not going to rebuild them.
Just as I was preparing to painting the model I began running across some interesting threads over here at RFP. I realized that I had missed a LOT of what can be done to the already fantastic Finemolds' kit. I couldn't go back anymore and so I settled for painting the thing with enamels, (yes, I'm oldschool with paints) and weathering it with assorted weathering products. I did not look at reference of the big studio models too closely because I wanted to do something that just looks good in a photograph, besides, I don't think I could've replicated the paint schemes on the studiomodels that well anyway. I still have to add a little more grit to the Falcon and mess with the PE grilles a bit for that definitive scruffy looks, but overall I'm happy with the paintjob, it looks great in photographs and has a lot of promise.
However, I'm in a quest for that perfect Millennium Falcon photograph and my Falcon just doesn't cut it, I missed too much detail. So, after some deep thoughts and profoundly inspired by the works of Alaneye, Scratchy, Mancini and many others, I had to give in and, well, there will be another Falcon in the workbench soon. I've purchased all the aftermarket items I need and know of, I also managed to catch one of the last Falcons from HLJ just a couple of days before it was discontinued. Now I'm broke, but I have all that I need for that ultimate model with a deeper level of detailing, rebuilt jawboxes and repositioned mandibles, the electronics will be a lot different, too. It'll be nerve racking!
I'll see if I have the balls to start a thread when the work on my second and last Falcon begins. Meanwhile, I hope you like the first Falcon, the one that ended up being a warm-up for the ultimate thing.
Enclosed below are a few project photos from along the building process.
Cheers,
Vesa
Ps: While building the new Falcon I'll keep a keen eye on a studioscale Y-Wing kit, that's my real dream, my unicorn!
Attachments
Last edited: