You are using an out of date browser. It may not display this or other websites correctly.
You should upgrade or use an alternative browser.
You should upgrade or use an alternative browser.
Terminator Endoskull (New design)
- Thread starter dasAdam
- Start date
-
- Tags
- terminator
dasAdam
Active Member
Re: Endoskull (Custom design)
lets say i have a rectangle middle plate with 2mm and both sides covered with 1,5mm acrylic chips. that would be only 5 mm in total. i already thought about cramming one led in the middle or something but that would make the contruction too fragile and i would also need to implement a solid system where the 2 contacts of the led would touch the - and + somewhere inside the slot without malfunctioning.
BUT im eager to install some blinking LEDS inside the slot and around the slot hole. i may wait to go into detail until i got some pictures ready doesnt make sense to try to describe it in words i guess hehe. OH i sure plan to make the eyes fade in and fade out! =)
many many thanks!
im curious to see what you came up with
thanks Talyn! yeah i can totally get your T-70 comparison here i need to build the lower jaw and then it will look more human proportioned. i plan to build a neck and a base too . so with some additional room for design and form i can achieve a more advanced looking terminator bust initially i was aiming for a prototype terminator that led to the T-X. as i plan to install some slit eyes which would look similar to the T-X's eyes ,too
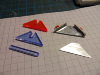
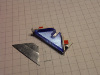
Today i got my ordered acrylic glas sheets with 3mm thickness . transparent ,RED and BLUE as well so im looking farward to create my first EYE dummies and experiment with colors, metallic sheet or foil as a mirror coverage to bounce the light like flahslights. you guys get the idea!
till then: thanks for commenting and all the encouragement!
thanks for commenting =) well it would be awesome but i wont be able to build in an led directly into the cpu itself . the acrylic sheet im working on is 1,5mm.Acrylic glass for the chip design is a brilliant idea. Hopefully you can incorporate some kind of a light feature with this.
lets say i have a rectangle middle plate with 2mm and both sides covered with 1,5mm acrylic chips. that would be only 5 mm in total. i already thought about cramming one led in the middle or something but that would make the contruction too fragile and i would also need to implement a solid system where the 2 contacts of the led would touch the - and + somewhere inside the slot without malfunctioning.
BUT im eager to install some blinking LEDS inside the slot and around the slot hole. i may wait to go into detail until i got some pictures ready
doesnt make sense to try to describe it in words i guess hehe. OH i sure plan to make the eyes fade in and fade out! =)Awesome work!!!
many many thanks!
great to hear! you can post some pictures of your resultsI have some varying thickness clear acrylic so might have to have a go at this tomorrow.
im curious to see what you came up withmany thanks mate! D: thanks for your interestThis is crazy awesome! I love where you are going with this. Totally subscribed.
Awesome design. Looks to me like it would certainly fit somewhere in line of the model progression from the T-70 of the Universal Parks attraction to the T-800.
thanks Talyn! yeah i can totally get your T-70 comparison here
i need to build the lower jaw and then it will look more human proportioned. i plan to build a neck and a base too . so with some additional room for design and form i can achieve a more advanced looking terminator bust initially i was aiming for a prototype terminator that led to the T-X. as i plan to install some slit eyes which would look similar to the T-X's eyes ,tooToday i got my ordered acrylic glas sheets with 3mm thickness . transparent ,RED and BLUE as well
so im looking farward to create my first EYE dummies and experiment with colors, metallic sheet or foil as a mirror coverage to bounce the light like flahslights. you guys get the idea!till then: thanks for commenting and all the encouragement!
cavx
Master Member
Re: Endoskull (Custom design)
Took a look at my stash today and I have clear acrylic in 4.5 or 5.0mm and I have a polly carb in 1.2mm and 5.0mm but it won't glue with Weldon#3 like the perspex. The beauty of the 1.2mm polly carb is that you can cut it with scissors so nice clean cuts. Maybe super glue might work, not sure. I can't use PVC solvent because that attacks the polly carb. Everything else I have is solid colour, mostly white.
My train of thought on this is 3 x 1.2mm = 3.6mm total and will give the plug in part close to the correct thickness, but in clear so it can be lit from an end.
I have some varying thickness clear acrylic so might have to have a go at this tomorrow.
great to hear! you can post some pictures of your results
Took a look at my stash today and I have clear acrylic in 4.5 or 5.0mm and I have a polly carb in 1.2mm and 5.0mm but it won't glue with Weldon#3 like the perspex. The beauty of the 1.2mm polly carb is that you can cut it with scissors so nice clean cuts. Maybe super glue might work, not sure. I can't use PVC solvent because that attacks the polly carb. Everything else I have is solid colour, mostly white.
My train of thought on this is 3 x 1.2mm = 3.6mm total and will give the plug in part close to the correct thickness, but in clear so it can be lit from an end.
dasAdam
Active Member
Re: Endoskull (Custom design)
ah yeah these very tiny ones. scale wise it might work. i could also just use thin metal plates on the tip of the CPU. one being PLUS and opposite site being MINUS. , then build in such contact pins inside the walls of the pcu slot which would lead to the circuit and power. such ideas are really really cool! id like to fumble around with such details but i also plan to make a small run of this terminator head/bust so all the stuff has to work 100 percent, it has just TO WORK
Hi bak9799Not sure if this would work, but you could try using some SMD LED's and Bare conductive paint as wiring? Just a thought.
ah yeah these very tiny ones. scale wise it might work. i could also just use thin metal plates on the tip of the CPU. one being PLUS and opposite site being MINUS. , then build in such contact pins inside the walls of the pcu slot which would lead to the circuit and power. such ideas are really really cool! id like to fumble around with such details but i also plan to make a small run of this terminator head/bust so all the stuff has to work 100 percent, it has just TO WORK
dasAdam
Active Member
Re: Endoskull (Custom design)
3,6mm is the original cpu prop? well i didnt check it to be honest since im taking all the freedom of "FANART" here i guess
i bought some special acrylic glue too... only to realize that ma REVELL contacta glue does not harm the acrylic surfaces at all... doh!
Took a look at my stash today and I have clear acrylic in 4.5 or 5.0mm and I have a polly carb in 1.2mm and 5.0mm but it won't glue with Weldon#3 like the perspex. The beauty of the 1.2mm polly carb is that you can cut it with scissors so nice clean cuts. Maybe super glue might work, not sure. I can't use PVC solvent because that attacks the polly carb. Everything else I have is solid colour, mostly white.
My train of thought on this is 3 x 1.2mm = 3.6mm total and will give the plug in part close to the correct thickness, but in clear so it can be lit from an end.
3,6mm is the original cpu prop? well i didnt check it to be honest since im taking all the freedom of "FANART" here i guess
i bought some special acrylic glue too... only to realize that ma REVELL contacta glue does not harm the acrylic surfaces at all... doh!
bak9799
Well-Known Member
Re: Endoskull (Custom design)
I see. I was thinking you could use the channels you've carved out in the acrylic to put the conductive paint in so it wouldn't be seen from the top. Also the paint would be thin enough that it won't add to much bulk to the chip. Even if you don't use it for a run, you could try it with yours. Here's the link for the conductive paint just incase, Make ? Bare Conductive
Hi bak9799
ah yeah these very tiny ones. scale wise it might work. i could also just use thin metal plates on the tip of the CPU. one being PLUS and opposite site being MINUS. , then build in such contact pins inside the walls of the pcu slot which would lead to the circuit and power. such ideas are really really cool! id like to fumble around with such details but i also plan to make a small run of this terminator head/bust so all the stuff has to work 100 percent, it has just TO WORK
I see. I was thinking you could use the channels you've carved out in the acrylic to put the conductive paint in so it wouldn't be seen from the top. Also the paint would be thin enough that it won't add to much bulk to the chip. Even if you don't use it for a run, you could try it with yours. Here's the link for the conductive paint just incase, Make ? Bare Conductive
cavx
Master Member
Re: Endoskull (Custom design)
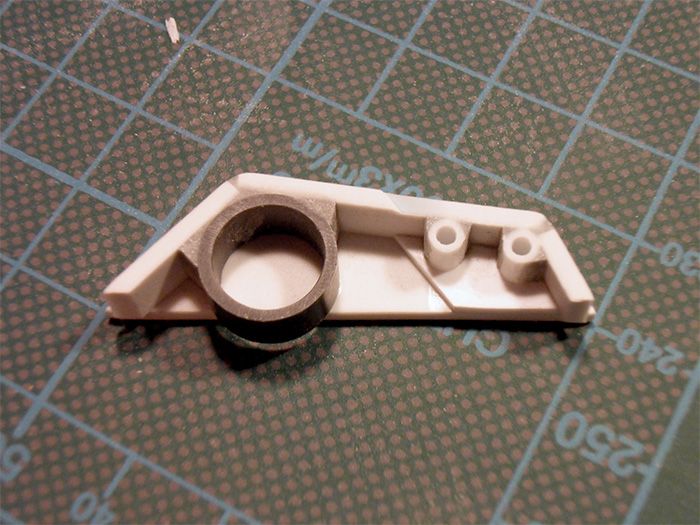
Not sure how large the actual chip would be because I read that the prop CPU that is pulled out of the port in the Terminator's head for the "switch reset" scene in T2 was in fact a larger than real size for the close up.
My idea to light the chip is to make a base with a light (LED is simple) inside and a slot that excepts the end of the chip. The cool thing about perspex is that light passes through the plastic until is hits a scratch. By default the edges are just that, so once the chip is inserted, all the edges of all the little details should light up.
3,6mm is the original cpu prop? well i didnt check it to be honest since im taking all the freedom of "FANART" here i guess
i bought some special acrylic glue too... only to realize that ma REVELL contacta glue does not harm the acrylic surfaces at all... doh!
Not sure how large the actual chip would be because I read that the prop CPU that is pulled out of the port in the Terminator's head for the "switch reset" scene in T2 was in fact a larger than real size for the close up.
My idea to light the chip is to make a base with a light (LED is simple) inside and a slot that excepts the end of the chip. The cool thing about perspex is that light passes through the plastic until is hits a scratch. By default the edges are just that, so once the chip is inserted, all the edges of all the little details should light up.
dasAdam
Active Member
Re: Endoskull (Custom design)
many thanks for the link! that conductive paint is something i sure will remember! it might come in handy for other builds to trigger hidden light effects =)
yeah ive read about that close up cpu =)
building an led in the base is something i did consider so far as well. i can make that happen if ill be able to put everything i need into one circuit only and my restriction is that 9 volts i will work with. the circuit im building is based on a 9v batterie stored in the beack of the head. i got that fade out effect going but it gets disrupted by any other led built into it.......ahhh! and im certainly no real electrician . WE SHALL SEE!
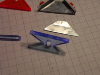
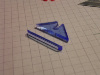
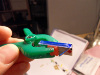
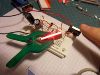
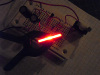
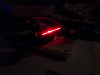
this is how far ive come! light tests! yay
im sorry for the lit up led shots. my cam surely cant convey the real look here...


here you can see carved in panel lines! they are sloppy and not accurate. its just for the sake of testing =)
panel lines filled with black! i also sanded the front face so that the light would get affected and fill the whole surface . on top of that comes the neaty polished and clean piece. this way the panel lines will appear inbetween hopefullly more profesionell looking once i build the real thing


and here are 2 little videos showing the fade in and fade out.
once again...sorry for the bad quality. next time i shall record it with some proper equipment!
:cheers:cheers:cheers cheers!!! =)
yeah the thing is these are small little acrylic squares. not touching each other. the easiest thing to go for would be REAL thin cables instead of that conductive paint i guess.I see. I was thinking you could use the channels you've carved out in the acrylic to put the conductive paint in so it wouldn't be seen from the top. Also the paint would be thin enough that it won't add to much bulk to the chip. Even if you don't use it for a run, you could try it with yours. Here's the link for the conductive paint just incase, Make ? Bare Conductive
many thanks for the link! that conductive paint is something i sure will remember! it might come in handy for other builds to trigger hidden light effects =)
Not sure how large the actual chip would be because I read that the prop CPU that is pulled out of the port in the Terminator's head for the "switch reset" scene in T2 was in fact a larger than real size for the close up.
My idea to light the chip is to make a base with a light (LED is simple) inside and a slot that excepts the end of the chip. The cool thing about perspex is that light passes through the plastic until is hits a scratch. By default the edges are just that, so once the chip is inserted, all the edges of all the little details should light up.
yeah ive read about that close up cpu =)
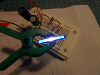
building an led in the base is something i did consider so far as well. i can make that happen if ill be able to put everything i need into one circuit only
and my restriction is that 9 volts i will work with. the circuit im building is based on a 9v batterie stored in the beack of the head. i got that fade out effect going but it gets disrupted by any other led built into it.......ahhh! and im certainly no real electrician . WE SHALL SEE! this is how far ive come! light tests! yay
im sorry for the lit up led shots. my cam surely cant convey the real look here...
here you can see carved in panel lines! they are sloppy and not accurate. its just for the sake of testing =)
panel lines filled with black! i also sanded the front face so that the light would get affected and fill the whole surface . on top of that comes the neaty polished and clean piece. this way the panel lines will appear inbetween
hopefullly more profesionell looking once i build the real thingand here are 2 little videos showing the fade in and fade out.
once again...sorry for the bad quality. next time i shall record it with some proper equipment!
:cheers:cheers:cheers cheers!!! =)
Attachments
-
 skull__0000_SDC13069JPG_zps83482f95.jpg150 KB · Views: 53
 -
 skull__0000_SDC13069JPG_zps83482f95.jpg150 KB · Views: 55
 -
 skull__0000_SDC13069JPG_zps83482f95.jpg150 KB · Views: 51
 -
 skull__0000_SDC13069JPG_zps83482f95.jpg150 KB · Views: 52
 -
 skull__0001_SDC13070JPG_zps751a94a6.jpg139.8 KB · Views: 55
 -
 skull__0001_SDC13070JPG_zps751a94a6.jpg139.8 KB · Views: 48
 -
 skull__0001_SDC13070JPG_zps751a94a6.jpg139.8 KB · Views: 49
 -
 skull__0001_SDC13070JPG_zps751a94a6.jpg139.8 KB · Views: 45
 -
 skull__0004_SDC13075JPG_zps64c37262.jpg124.3 KB · Views: 47
 -
 skull__0004_SDC13075JPG_zps64c37262.jpg124.3 KB · Views: 49
 -
 skull__0004_SDC13075JPG_zps64c37262.jpg124.3 KB · Views: 50
 -
 skull__0004_SDC13075JPG_zps64c37262.jpg124.3 KB · Views: 54
 -
 skull__0002_SDC13071JPG_zps8ad0a405.jpg121.4 KB · Views: 54
 -
 skull__0002_SDC13071JPG_zps8ad0a405.jpg121.4 KB · Views: 59
 -
 skull__0002_SDC13071JPG_zps8ad0a405.jpg121.4 KB · Views: 60
 -
 skull__0002_SDC13071JPG_zps8ad0a405.jpg121.4 KB · Views: 61
 -
 skull__0003_SDC13073JPG_zps44f787b7.jpg111 KB · Views: 55
 -
 skull__0003_SDC13073JPG_zps44f787b7.jpg111 KB · Views: 48
 -
 skull__0003_SDC13073JPG_zps44f787b7.jpg111 KB · Views: 48
 -
 skull__0003_SDC13073JPG_zps44f787b7.jpg111 KB · Views: 51
 -
 skull__0005_SDC13076JPG_zpsb76f48b6.jpg133.7 KB · Views: 51
 -
 skull__0005_SDC13076JPG_zpsb76f48b6.jpg133.7 KB · Views: 51
 -
 skull__0005_SDC13076JPG_zpsb76f48b6.jpg133.7 KB · Views: 48
 -
 skull__0005_SDC13076JPG_zpsb76f48b6.jpg133.7 KB · Views: 49
 -
 skull__0006_SDC13082JPG_zps225b51bf.jpg129.2 KB · Views: 62
 -
 skull__0006_SDC13082JPG_zps225b51bf.jpg129.2 KB · Views: 59
 -
 skull__0006_SDC13082JPG_zps225b51bf.jpg129.2 KB · Views: 59
 -
 skull__0006_SDC13082JPG_zps225b51bf.jpg129.2 KB · Views: 60
 -
 skull__0007_SDC13083JPG_zpsa670b441.jpg158 KB · Views: 48
 -
 skull__0007_SDC13083JPG_zpsa670b441.jpg158 KB · Views: 50
 -
 skull__0007_SDC13083JPG_zpsa670b441.jpg158 KB · Views: 51
 -
 skull__0007_SDC13083JPG_zpsa670b441.jpg158 KB · Views: 53
 -
 skull__0008_SDC13092JPG_zps04211c08.jpg112.3 KB · Views: 48
 -
 skull__0008_SDC13092JPG_zps04211c08.jpg112.3 KB · Views: 47
 -
 skull__0008_SDC13092JPG_zps04211c08.jpg112.3 KB · Views: 45
 -
 skull__0008_SDC13092JPG_zps04211c08.jpg112.3 KB · Views: 47
 -
 skull__0009_SDC13101JPG_zps0d875cc9.jpg180.8 KB · Views: 45
 -
 skull__0009_SDC13101JPG_zps0d875cc9.jpg180.8 KB · Views: 49
 -
 skull__0009_SDC13101JPG_zps0d875cc9.jpg180.8 KB · Views: 46
 -
 skull__0009_SDC13101JPG_zps0d875cc9.jpg180.8 KB · Views: 47
 -
 skull__0010_SDC13107JPG_zps0475239d.jpg139.6 KB · Views: 44
 -
 skull__0010_SDC13107JPG_zps0475239d.jpg139.6 KB · Views: 47
 -
 skull__0010_SDC13107JPG_zps0475239d.jpg139.6 KB · Views: 43
 -
 skull__0010_SDC13107JPG_zps0475239d.jpg139.6 KB · Views: 46
 -
 skull__0011_SDC13115JPG_zps6474d9ec.jpg88.6 KB · Views: 51
 -
 skull__0011_SDC13115JPG_zps6474d9ec.jpg88.6 KB · Views: 45
 -
 skull__0011_SDC13115JPG_zps6474d9ec.jpg88.6 KB · Views: 44
 -
 skull__0011_SDC13115JPG_zps6474d9ec.jpg88.6 KB · Views: 43
Last edited by a moderator:
cavx
Master Member
Re: Endoskull (Custom design)
Mine won't be that complex. I'll just use s 3V setup and a single LED. I'm using the same set up in my MAGs and just hit 40 hours of use and whilst dim, are still going. The LED will will be stored in the base stand and only light the chip when the chip is plugged in.
Mine won't be that complex. I'll just use s 3V setup and a single LED. I'm using the same set up in my MAGs and just hit 40 hours of use and whilst dim, are still going. The LED will will be stored in the base stand and only light the chip when the chip is plugged in.
dasAdam
Active Member
Re: Endoskull (Custom design)
40 hours is neat for a single led =)
hey guys ive been working on the eyes today. i did build some proper eye "bodies" sadly i cant show you the skull with lit eyes today BUT ,y bro came over bringin his neat camera along so we did a little skynet lab fotoshoot
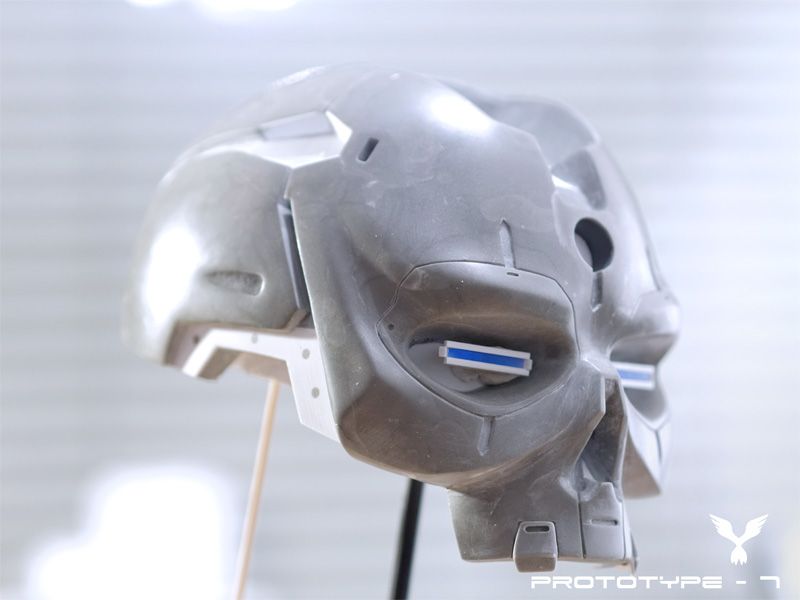
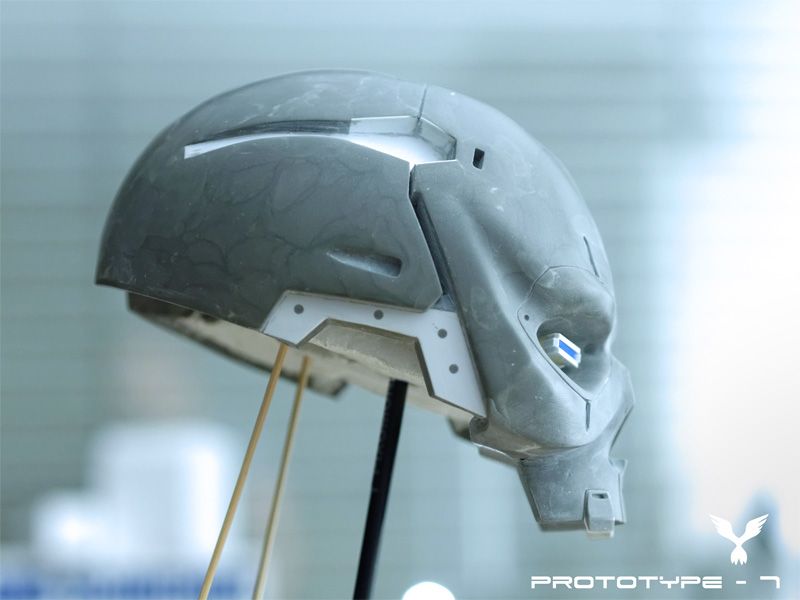
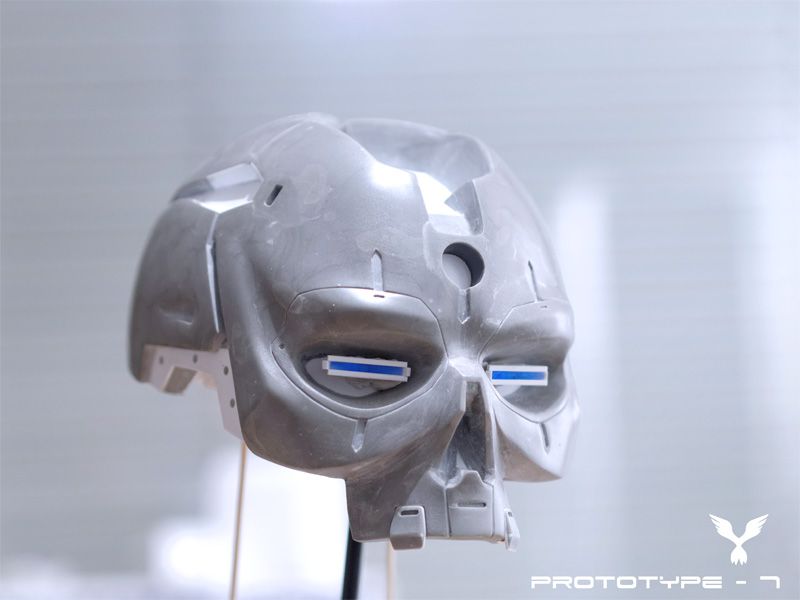
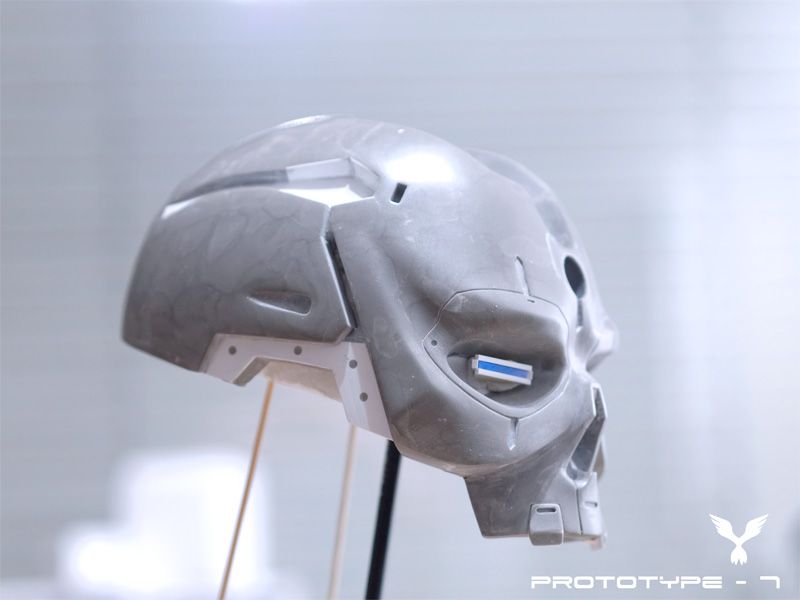
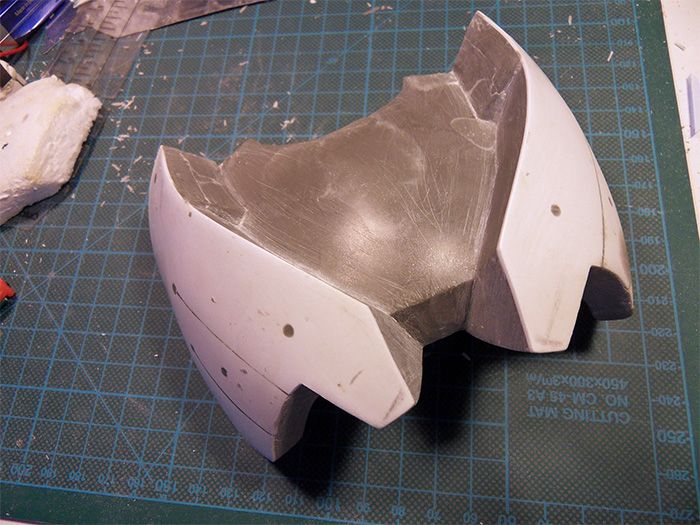
OH! and i was brave enough to cut off the back head piece and work both parths seperately
cheers! =)
40 hours is neat for a single led =)
hey guys ive been working on the eyes today. i did build some proper eye "bodies" sadly i cant show you the skull with lit eyes today BUT ,y bro came over bringin his neat camera along so we did a little skynet lab fotoshoot


OH! and i was brave enough to cut off the back head piece and work both parths seperately
cheers! =)
Wreckhur
Jr Member
Re: Endoskull (Custom design)
This is my favorite build to watch hands down. I love Terminator and I really enjoy when someone applies their imagination to a piece and comes up with something top notch like this. I'm sure you could find work in a lot of places with this as the only project in your portfolio. Keep up the amazing work!
This is my favorite build to watch hands down. I love Terminator and I really enjoy when someone applies their imagination to a piece and comes up with something top notch like this. I'm sure you could find work in a lot of places with this as the only project in your portfolio. Keep up the amazing work!
Cerberus442
New Member
Re: Endoskull (Custom design)
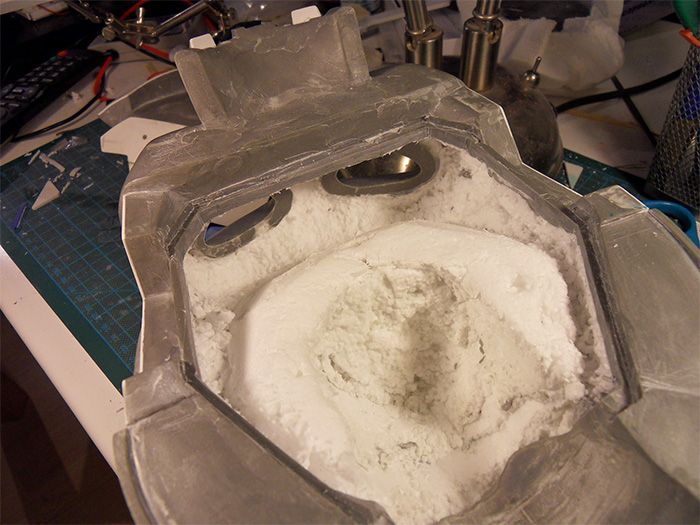
Styrofoam Head... revisited...!!!
Styrofoam Head... revisited...!!!
The Barn Owl
Active Member
Re: Endoskull (Custom design)
INCREDIBLE. The progress is beautiful
INCREDIBLE. The progress is beautiful
dasAdam
Active Member
Re: Endoskull (Custom design)
...but still so much to dooooooo..... ahhh!! many thanks
thanks for visiting!
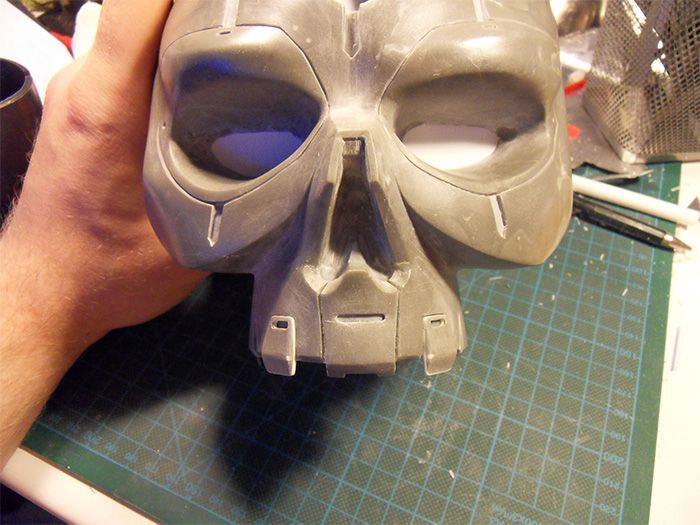
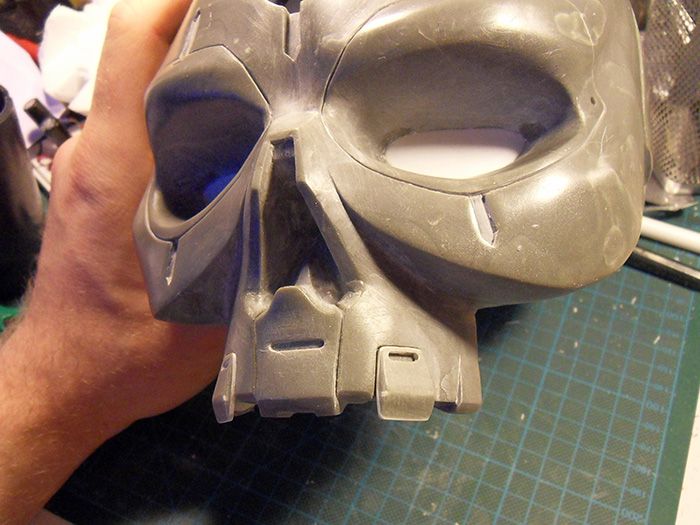
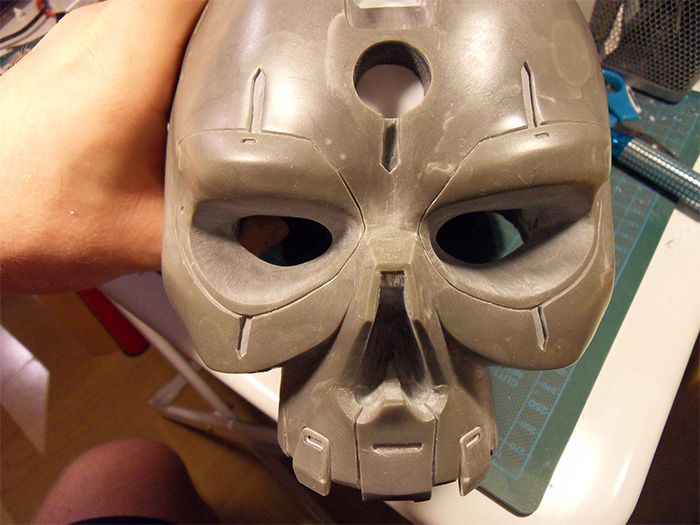
update!
it might not look like much but i actually was able to revisit many areas and adress spots /pieces i didnt flesh out so far like the back head and the mouth
first some photos of the left ear. its almost done =)
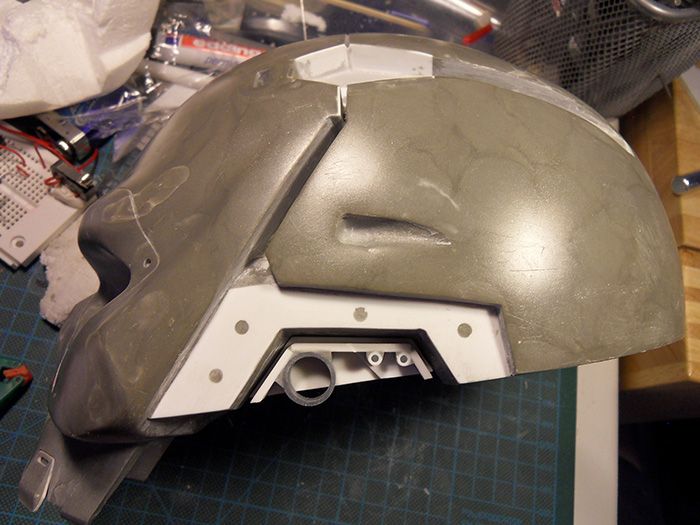
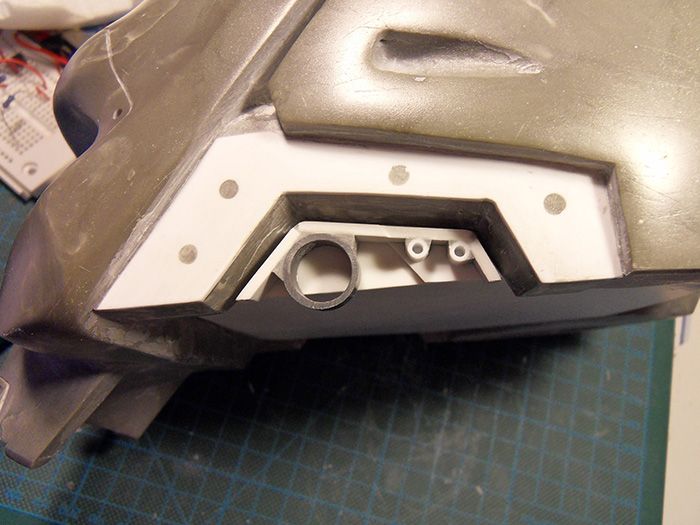
the next images show the back head piece
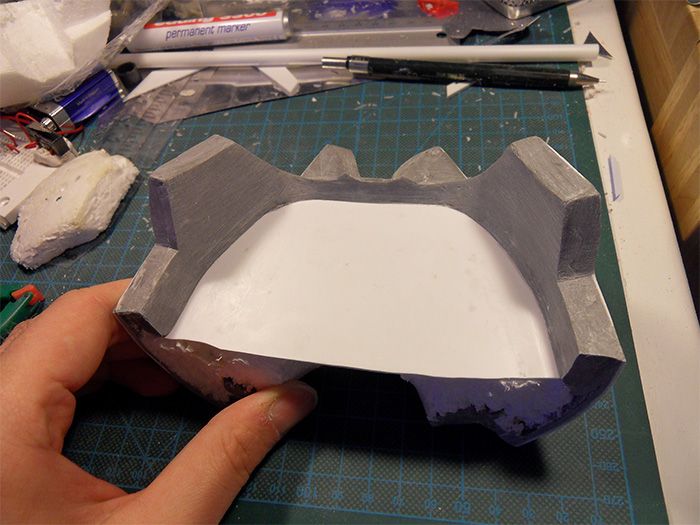
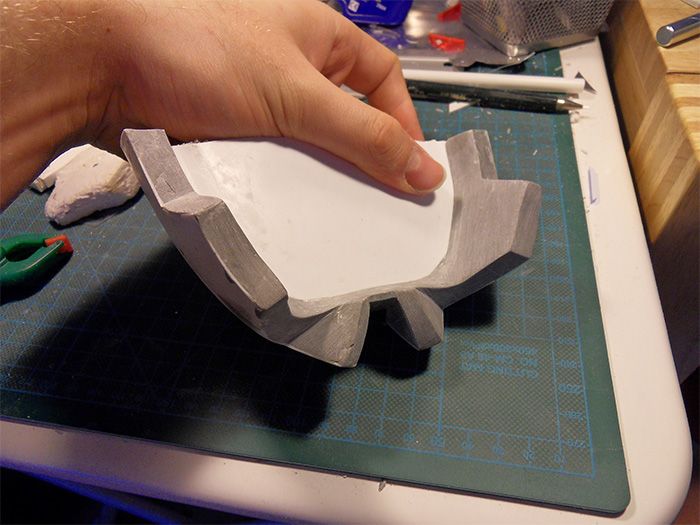
this back head piece will hopefully fit nicely into the carved out sockets i worked on this afternoon
the last shots show the updated mouth/teeth. im pretty happy how it turned out i was worried the middle tooth would look silly.. well it really did in the beginning before i cut in that bevel edge
happy happy!
thanks for all the interest and comments guys!
i cant wait to be honestThat looks sweet and will be amazing once lit.
...but still so much to dooooooo..... ahhh!! many thanks.....wow you made my day :cry thats so encouraging! it is so great to hear someone being that interested in my project. i will try to speed up and finish it in the next following weeks =) thanks man!This is my favorite build to watch hands down. I love Terminator and I really enjoy when someone applies their imagination to a piece and comes up with something top notch like this. I'm sure you could find work in a lot of places with this as the only project in your portfolio. Keep up the amazing work!
styrofoam for presidentStyrofoam Head... revisited...!!!
thanks for visiting!thank you The Barn Owl.im happy you like it so far! =)INCREDIBLE. The progress is beautiful
update!
it might not look like much but i actually was able to revisit many areas and adress spots /pieces i didnt flesh out so far like the back head and the mouth
first some photos of the left ear. its almost done =)


the next images show the back head piece


this back head piece will hopefully fit nicely into the carved out sockets i worked on this afternoon

the last shots show the updated mouth/teeth. im pretty happy how it turned out
i was worried the middle tooth would look silly.. well it really did in the beginning before i cut in that bevel edgehappy happy!


thanks for all the interest and comments guys!
dasAdam
Active Member
Re: Endoskull (Custom design)
Wreckhur! thanks for the like and the reputation =)
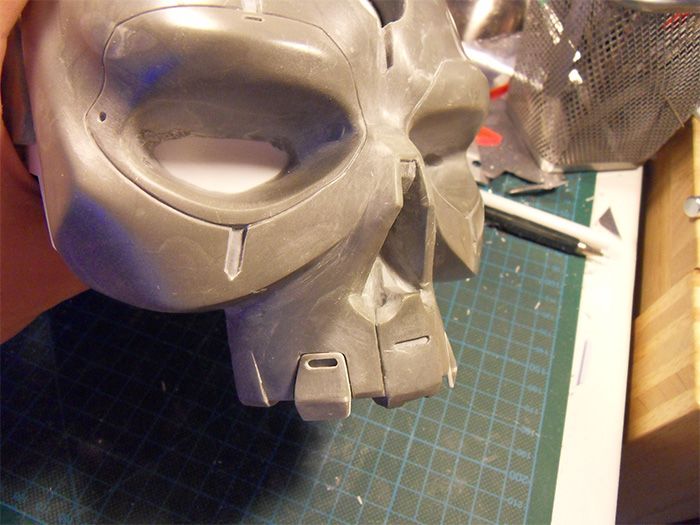
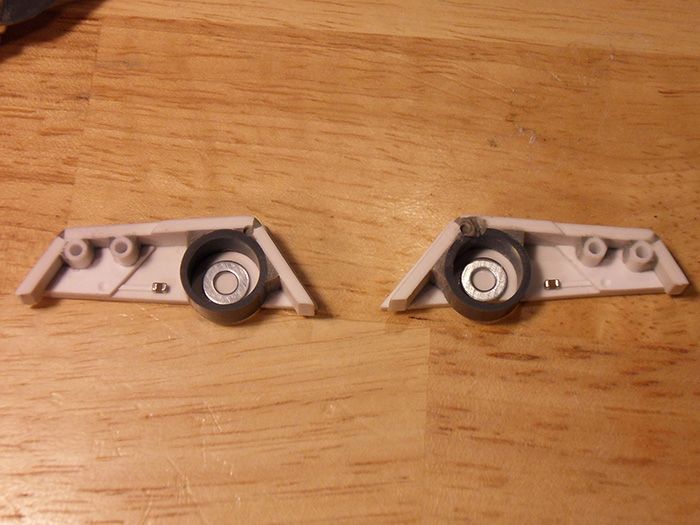
here is a lil update
this time i got BOTH ears ready to show. i added some more little details. hopefully i will be able to mold em and cast them without much trouble :wacko
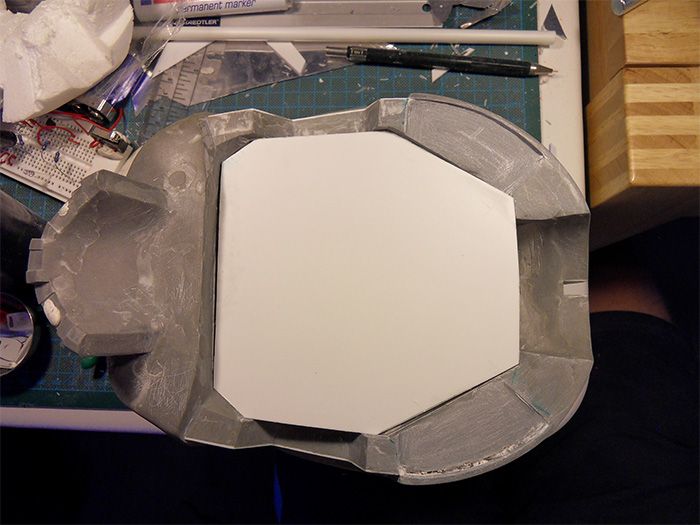
i cleaned the edge where the ground plate will sit on
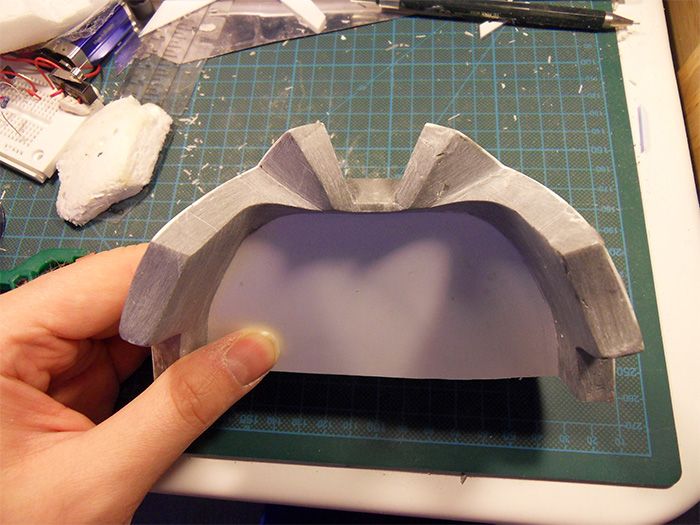
AAAND i dug my way through the styrofoam to the back of the eye holes this way i was able to sand these areas and hopefully will be able to pinpoint the eye pieces in their final position. this will sure be a deliacte task later on. so being able to detach the plate of the eye sockets will be a plus. also i now might be able to add some detail to that said plate as the origianl t-800 eye sockets have some nice techy shapes and holes in there too
forst time seeing the eyes sockets without that white wall there is kind of a difference *happy*
next big thing to tackle: lower jaw!!!opcorn im excited and scared at the same time...considering how long it takes to not only build that thing but to design it and change stuff on the fly.... my brain is going in circles already
cheers guys! a great sunday is ahead of us
Wreckhur! thanks for the like and the reputation =)
here is a lil update
this time i got BOTH ears ready to show. i added some more little details. hopefully i will be able to mold em and cast them without much trouble :wacko

i cleaned the edge where the ground plate will sit on

AAAND i dug my way through the styrofoam to the back of the eye holes
this way i was able to sand these areas and hopefully will be able to pinpoint the eye pieces in their final position. this will sure be a deliacte task later on. so being able to detach the plate of the eye sockets will be a plus. also i now might be able to add some detail to that said plate as the origianl t-800 eye sockets have some nice techy shapes and holes in there too 
forst time seeing the eyes sockets without that white wall there is kind of a difference *happy*
next big thing to tackle: lower jaw!!!
opcorn im excited and scared at the same time...considering how long it takes to not only build that thing but to design it and change stuff on the fly.... my brain is going in circles alreadycheers guys! a great sunday is ahead of us
dasAdam
Active Member
Kept scrolling down wanting more. your doing amazing stuff with this. keep at It please....when could we see the lighted eye's In the skull?
Hi sean. ill keep at it! roger that!:thumbsup
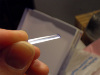
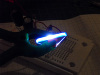
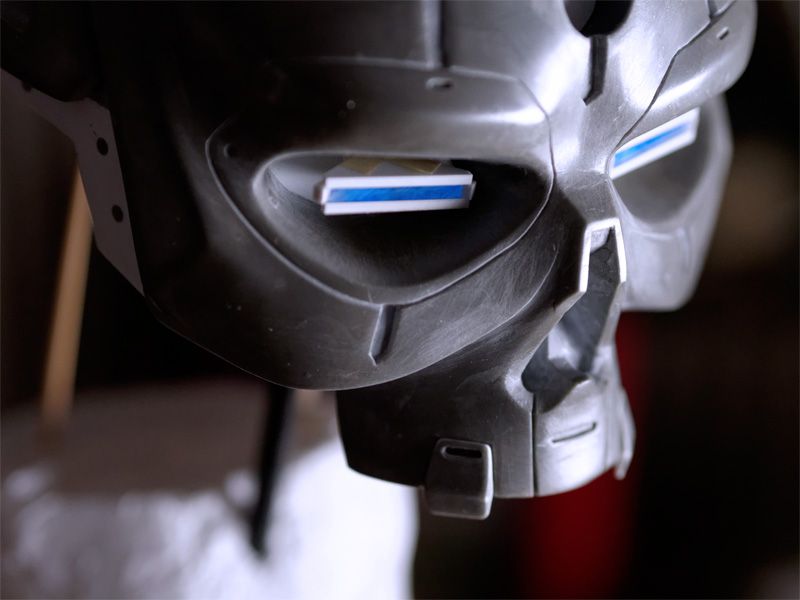
here is a quick mock-up. please dont kill me for the rather poor image quality. the LEDS are 3.2 volts and very bright and my cam cant simply handle it. its a snapshot cam and even with manuel settings different timings and ISOs these were the only ones that worked ;_;
here we go


Similar threads
- Replies
- 7
- Views
- 981
- Replies
- 3
- Views
- 1,312