Gears of War 3/Judgement -- Onyx Guard Build

TONKA1675

Active Member
I've had a ton of people ask me to post a tutorial of how I made my Onyx Guard armor, so here it is!

This was an extrememly challenging costume to make, and was only possible due to all of the resources I recieved through contacts at EPIC games. I had never used foam, done a pep, or used lighting in a costume before, so I was very pleased as to how it turned out. As far as I know it's currently the only Onyx guard in the world, but I hope to start seeing a lot more of them in the future!

**Please do not message me for the references. I was given them under a Non-Disclosure Agreement

Here is an article that the Epic Community did on it. I was lucky enough to be invited to Epic Games to show it off to the staff when it was finished!

Epic Gamers: Onyx Guard Cosplay | Epic Games Community

And another from a convention while costuming with some friends who work at Epic:

PixelKitty and Tonka cosplaying Anya and the Onyx Guard at Escapist Expo | Epic Games Community

Lets start with a pic of the character:

tumblr_ltla2xUWhc1qkx8cao1_500.jpg


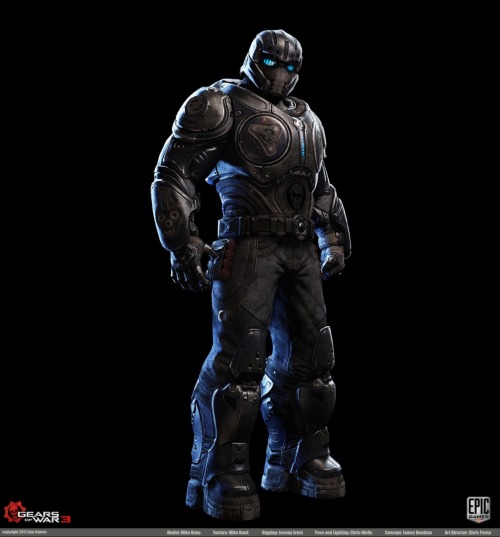
This entire costume is made from EVA foam with the exception of the Lancer (NECA with mods) and the helmet (pepakura - Jakkrit file).

Here's how mine turned out:
 
Step 1: Templates

My templates were made using two methods.

#1 -- The chest/back was made by building a pep (Jakkrit), drawing all of the details on from the references provided by Epic, and cutting it back apart into it's individual pieces.

#2 -- The rest of the foam pieces were made by scaling the material file from the game (character skin) and printing out templates.

The hardest part of making Gears of War armor is that the characters are built like prehistoric gorillas on steroids.....the type of look that only a pro bodybuilder can pull off. It is very tricky to make the armor the right size to fit yet maintain the bulky look of the armor.
 
Step 2: Cut out foam pieces

Templates were used to cut out the flattened shape of the foam pieces and the details are drawn on. Details are dremeled in and craft foam details are layered on before the heat shaping.

**Tip: When sanding, use a sandpaer drum for faster results but finish with the sanding stones for a smoother finish.

**Tip: always use BLACK craft foam. When the paint rubs off, it will show black. There are many areas I've had to touch up where the paint has rubbed off and exposed blue or yellow foam.
 
Step 3: Heat bend and glue

Heat bending is pretty self explanitory...heat the inside and hold in place. Tips to help would be to bend it more than needed to account for springback when you let go, try not to heat previous bends as they will straighten out, and try to do everything with bending instead of with "darts" like in sewing. If you are doing a piece that is spherical like the shoulders, heat the piece on BOTH sides and sandwich the piece between two mixing bowls. Just make sure the foam piece is much bigger than you need to account for the curve.
 
Step 4: Painting

Once everything is glued, the foam needs to be coated with Plastidip spray. Luckily for me I needed a satin black look anyways, so the only things I had to paint after the plastidip were the details. The plastidip will cure on the foam, making the paint added on top of the platidip not only cure but flexible. The paint on top of plastidip will not crack, but it will cause wrinkles if it's flexed too much.
 
Step 5: Electronics

I started by using EL wire, but unfortunately while they looked fantastic in person, any flash washed them out to the point that the costume looked like it didn't light up. THe first 2 pics are EL wire but later on LED's got swapped in. The only place that still has EL wire is the helmet lenses because they are supposed to light up in stripes. The lancer is a NECA replica that got gutted of the existing electronics, had the lighted areas dremeled out, repainted, LED's installed, and I remade the decals in photoshop and printed them on waterslide transfer paper.
 
Step 6: the soft parts

Undersuit: the undersuit is a NASCAR style, single layer summer pit crew suit made by OMO. I altered it by adding the belly COG made from vinyl and added a buttonhole for the sound system wire to go through.

Gloves: Gloves are Mechanix gloves painted black with the knuckle armor made from foam

Neck seal: I basically made a loose "neck corset" that zips in the back and is laced into the helmet. The helmet lacing is a detail that you can't even see while playing the game...I only noticed it because I had the material file (character skin).

Leather hip pads/ammo holders: Sewn from a fabric from hobby lobby called "Ponderosa". This fabric had the correct football leather pattern, but is a material that has a bit of stretch making it great as long as you sew it double sided with some interfacing to stiffen it up a bit.
 
Step 7: The helmet

I saved this to the end and was really worried I wasn't going to pull it off. It's a straight pep job (Jakkrit file), so it was build it out of cardstock, 2 layers of fiberglass resin on the inside and the outside, 2 layers of rondo (resin + bondo mixed) slushed on the inside, the bondo and spot putty on the outside. The lenses are aftermarket Oakley lenses in Ice Blue with EL wire added. Any place that looks like mesh is privacy screening for ventilation.
 
Step 8: Show it off!

After finally finishing this long project, I got the opportunity to go to Epic and show it off to the staff. Highlights were taking pics with the staff, meeting the Senior concept artist who designed the Onyx Guard, the Senior 3d modeler who created the in-game version, getting to play Gears of War Judgement (not released yet) with the game testers, and meat shielding Cliffy B! The staff was awesome and it will go down as the best experience I have had with costuming to date!
 
A few days ago I was thinking that it should be possible to build a Gears of War armour heating eva foam... I just never imagined it could look THIS awesome. Congratulations for your work and your day at Epic!
 
A few days ago I was thinking that it should be possible to build a Gears of War armour heating eva foam... I just never imagined it could look THIS awesome. Congratulations for your work and your day at Epic!

Appreciated!


I'll be adding pics of individual pieces over the weekend, so stay tuned. Heres the shotgun shells on the thighs. I used a dremel to groove a dowel rod, made the brass caps from foam, and painted!
 
Wow bravo. There are such talented people are this forum. Talented and extremely patient during some tedious and painstaking tasks such as these. Incredible. Wish I had a few but altered with to be different from the game to be used in films. Great job!
 
wow man that turned out great. Amazing work there... and very very cool being invited to the Epic studio. I was at the Gears 3 launch event in nyc and had a blast
 
This thread is more than 6 years old.

Your message may be considered spam for the following reasons:

  1. This thread hasn't been active in some time. A new post in this thread might not contribute constructively to this discussion after so long.
If you wish to reply despite these issues, check the box below before replying.
Be aware that malicious compliance may result in more severe penalties.
Back
Top