Warhammer 40K Space Marine Full Scale - New at this (WIP Breakdown)

Re: Warhammer 40K Space Marine Full Scale - New at this

Thanks for all the feedback guys. This project has been awesome! A lot of fun and I couldn't have done it without all the other folks who have figured this stuff out before me on this forum and others.

I got the costume done to a reasonable state - still plenty to tweak and add. Backpack was getting too heavy so I didn't paint it up yet.

As was the hands were still tacky in a few places in these shots and I had to rebuild the lower right leg that day.

Entry01_Tiny_28_o.jpg


Walking_Tiny_30_o.jpg


Waldo_Tiny_29_o.jpg


I won first prize!

I updated my first post with some pics. More to come as I get wip pics orginized.

For reference: Waldo in the one pic is 6'2" :D
 
Last edited:
Re: Warhammer 40K Space Marine Full Scale - New at this

Hey all, I finally got around to putting together some WIP stuff. If I've missed anything folks want to know about, just let me know:

1.) I spent a good amount of time up front on this project just planning. I took personal measurements, researched drywall stilts, and tried to imagine the best way to construct each piece before ever making the first cut. Once I had purchased some stilts (15 inches - the shortest I could find for cheap), I built CG models of the components to scale for me on said stilts. In some cases I used the Space Marine game dcm files for reference.

SpaceMarine_Construction_01_900.jpg


2.) Using the same process for texturing CG assets for film and games, I unwrapped the models at seams I determined would best allow for "normalizing" of the atlased surface. Often when you try to flatten out a three dimensional surface, there's a bit of distortion, from area to area, the more seams you have, the more consistent the resolution of your surface area when flattened and thus less distortion. I wanted as few seams as possible, as well as seams that would help in forming the appropriate shapes, fortunately Space Marine armor is fairly simple in this regard, and so lends itself well to flattening.

SpaceMarine_Construction_02_900.jpg


3.) Converting the flattened UV data into an image file set to scale, I laid out my templates so that they could be divided and printing on 8.5"x11" letter paper. I printed out the templates, taped them together (or my wife did) and then traced them out onto the foam sheets.

SpaceMarine_Construction_03_900.jpg

SpaceMarine_Construction_04_900.jpg


4.) I used 3/5" and 1/2" foam sheets for the suit. Templates were traced onto foam for one side of the suit, then flipped and traced for the other.

SpaceMarine_Construction_05.jpg


5.) Once the components were cut out I glued them together using mostly 3M Hi-Strength 90 spray adhesive, sprayed on both sides. In some places I used hot glue as well as toothpicks stuck in the foam to help hold it together.

SpaceMarine_Construction_06.jpg

SpaceMarine_Construction_08.jpg


*At this point, I think it's important to note that where I wanted the armor to have thickness to it around rims and such, I doubled, or tripled up the foam. I either used rim bits cut to the same shape as the part about 1.5-2" tall, or in some cases doubled up the whole part, so that the final component was 1"+ thick throughout. The belt buckle for instance is shaped form three layers of .5" foam glued together.

SpaceMarine_Construction_09_900.jpg

SpaceMarine_Construction_10.jpg

SpaceMarine_Construction_11.jpg
 
Re: Warhammer 40K Space Marine Full Scale - New at this

6.) For some of the components, such as the the feet and the shoulder plates, I wanted something rigid for the foam to be mounted to, to which I could also mount the drywall stilts and armor hangers, etc. For this I ended up using some thin pine I got out of the scrap cart at Home Dept for $0.51 cents. I used small nails to tack the foam around the rim of the heals/toes, then used hot glue on the inside to finish the connection.

SpaceMarine_Construction_12.jpg


The shoulder rim plates were composed of foam sandwiched between two pieces of wood. I used small nails through the inside wood plate to tack the foam shoulder plate components to before gluing them in place.Originally I dremmeled out some foam inside the detail cutouts on the vertical shoulder plates, then tried to use Elmer's to smooth it out. Later I just removed the rest of the foam down to the other wood plate.

SpaceMarine_Construction_13.jpg

SpaceMarine_Construction_14.jpg

SpaceMarine_Construction_15.jpg

SpaceMarine_Construction_16.jpg

SpaceMarine_Construction_17.jpg

SpaceMarine_Construction_18_900.jpg


7.) I also used a bit of wood on the back panel of the torso section. This served as a good surface I could notch out groves for spring steel ribs, as well as a good mounting surface for the yet to be completed backpack.

SpaceMarine_Construction_19_900.jpg


I used hot glue as well as spray 90 glued foam retainers for the spring steel ribs.

SpaceMarine_Construction_20_900.jpg


8.) At this point I started bouncing around a bit on the build, but mainly I started drawing on detail to be cutout with a soldering iron or knife. I then started carving out the details on various pieces. At this stage I also added things like furniture nails, and cutup plastic Halloween skulls.

SpaceMarine_Construction_21_900.jpg

SpaceMarine_Construction_23_900.jpg

SpaceMarine_Construction_24_900.jpg

SpaceMarine_Construction_27_900.jpg


9.) This is where I decided to try my first attempt at Rondoing a foam piece. I experimented with a small piece of scrap which turned out just fine, but given the time constraints, the tendency for me to not put in enough/too much hardener, plus my lack of patience for the process I ended up abandoning this idea after gooping-up one of my lower leg armor pieces (requiring me to rebuild it (twice! - more on that later).

SpaceMarine_Construction_25.jpg


10.) At this stage I required the input from you folks and others over on the rpf, who directed me to some great links and I decided to skip the rondo stuff.

I started smoothing out cracks and uneven surfaces with latex caulk. I got this idea as well as other inspiration from Kol Badar and his terrific Night Lords space marine build.

SpaceMarine_Construction_26_900.jpg


11.) After detail cuts and scoring and the caulk, the pieces were all painted with a few layers of white glue to fill in any pores in the foam and give the parts a nice smooth surface to receive paint. Note: If I was to build this stuff again, I would probably try some other "sealers." Perhaps something similar to EVA glue, but more flexible. I would probably have tried the Smooth-On resin stuff if I had had time to acquire it.

SpaceMarine_Construction_28_28_900.jpg

SpaceMarine_Construction_29_900.jpg

SpaceMarine_Construction_30_900.jpg

SpaceMarine_Construction_31_900.jpg


12.) At this point I started Plasti-dip spraying components as their construction wrapped up. This was also the point where the build got more expensive than anticipated (Up to this point it had actually been fairly inexpensive). But when you use 17 cans of Plasti-dip...Well.

SpaceMarine_Construction_32_900.jpg

SpaceMarine_Construction_33.jpg

SpaceMarine_Construction_34_900.jpg
 
Re: Warhammer 40K Space Marine Full Scale - New at this

13.) Now I'm getting down to the wire, running out of time, and due to most daylight hours spent at work, I'm limited to when I can paint. I try to get as much paint on components during sun up as possible, while continuing construction on the incomplete (or nonexistent) components at night.

For paint I started with a light gray Rust-oleum auto primmer. I use the fast drying, wet sand-able kind. It's pretty much dried once it leaves the nozzle. I didn't really bother getting a consistent coat of this, in fact, in some cases I used it as a gradient masking, if cracks and crevasses showed more of the black Plasti-dip sobeit. Kind of just dust it on.

SpaceMarine_Construction_35_900.jpg


The next was the metal base. I knew I wanted chips and battle damage to show through, and have always wanted to try doing some frisket masking weathering on something larger than a miniature, much like the Boba Fett costumers do. My Metal Base was Rust-Oleum hammered gray followed by dusting of aluminum. Sometimes I'd dust back over the aluminum with the gray. If there were large areas I knew I didn't want chips - I saved the paint. You could get some great paint effects by doing additional layers of browns or reds, old paint, etc. I just had time for the chips.

SpaceMarine_Construction_36_900.jpg

SpaceMarine_Construction_37_900.jpg

SpaceMarine_Construction_38.jpg


For gold sections, I put down more aluminum over the metal base mentioned above. Often I tried to hit these surfaces from above to give an overall gradient to the components. The brighter aluminum paint acts as a lighter base for the gold and brown paint used on those sections. I then sprayed those sections with "hammered gold," then would try to gradate the gold sections with "hammered brown." If I got too much brown, I'd just hit it with the gold again. At this point I wasn't worried about over spray on the gray/silver sections as I knew I'd be masking the gold bits to paint all the blue.

SpaceMarine_Construction_39_900.jpg


14.) For frisket I used mustard, having seen it used on thorssoli's terminator helmet. I just used the the bottle and my finger to paint it on where I wanted metal to show through. I then started spraying blue. I used three shades of blue, and again gradated darker to lighter away from insets, or from bottom to top. The Brilliant blue I'd try to just dust a bit to catch the tops and edges of things. If I got too much of the brighter blues in there, I'd go back and hit it with the navy blue.

SpaceMarine_Construction_40_900.jpg

SpaceMarine_Construction_41.jpg

SpaceMarine_Construction_42_900.jpg


15.) After letting the paint dry for a few minutes, I then scrapped all the mustard off with my fingers, rinsed the part off with the hose, then you're good to go.

SpaceMarine_Construction_43_900.jpg


16.) Back to building (Some of this is out of sequence as I'd bounce around from component to component): I had made some templates for the chest wings, but they weren't working out, so I started free handing them and eventually got one side looking how I wanted. I then traced my bits for the other side and put it all together with hot glue.

SpaceMarine_Construction_44.jpg

SpaceMarine_Construction_45.jpg


17.) Continuing detail on the torso, earlier I made the lower round greebles out of spray can caps cut down, then stuck 4 thumbtacks through and a washer super glued on top. I also started adding additional detail with bits of styrene or mounting board plus random hardware I had in the garage. More soldering iron work.

SpaceMarine_Construction_46.jpg

SpaceMarine_Construction_47_900.jpg

SpaceMarine_Construction_48_900.jpg

SpaceMarine_Construction_49_900.jpg

SpaceMarine_Construction_50_900.jpg


I had a couple of conversations with some fellow cg artists early on in this build, all about micro detail on a macro scale. "How are you going to detail it up, so it doesn't look like a scaled up toy." That sort of thing. I had a lot of fun adding the little things to this suit that I feel really help give it additional realism and a sense of scale when you're right up on it and it was great being able to just grab the stuff from the garage, around the house, or the clearance shelf at HD. On something big, It's all about the little things.
 
Re: Warhammer 40K Space Marine Full Scale - New at this

18.) Running out of time!

So I could keep spray painting parts at night, I put together a make shift spray booth.

SpaceMarine_Construction_51_900.jpg


19.) More mustard! At this point my fingernails are all dried blue paint and mustard.

SpaceMarine_Construction_52_900.jpg


20.) Masking off the gold sections. I'd then hit the gold overspray with the gray and alum again, before painting on the mustard. (Day before the party this pic)

SpaceMarine_Construction_53_900.jpg


21.) A couple of nights before I blew most of an evening working on the back pack. I got considerably further than this picture, but wasn't going to be happy with the materials I had scrounged up. The base is obviously insulation foam, but I had cut out a skin in flexible plastic wall panel (as used in showers in RVs), too heavy in some places and not enough in others. I decided I'd skip the pack for the party and come back to it later...Good thing I did.

Backpack_900.jpg


22.) Am I forgetting something? Oh yeah, I have to remake the right lower leg armor.

SpaceMarine_Construction_54_900.jpg

SpaceMarine_Construction_22.jpg


As I'm getting it lined up with the other lower leg (already all painted), I say to my wife: "wow, this one turned out much better than the first anyway." Then I notice that something's not quite right. "It's bigger! F@#$-#$#**-F&^#!

SpaceMarine_Construction_55_900.jpg


When I had first gotten started I had printed out my first templates at a larger scale, but hadn't noticed until taping together the lower leg armor. Well for whatever reason I saved that first outta scale template. So when I went to the pile of templates, I of course grabbed that one by mistake. Time to rebuild!

23.) Here you can see the third go at the right lower leg being white glued the night before the party. :(

SpaceMarine_Construction_57_900.jpg


24.) At this point seeing as the party is less than 24 hours away I make the decision to not sleep. I also start taking far fewer photos. I start bouncing around from painting things when coats are dry, to rigging the suit together, to cutting out joint material and so on.

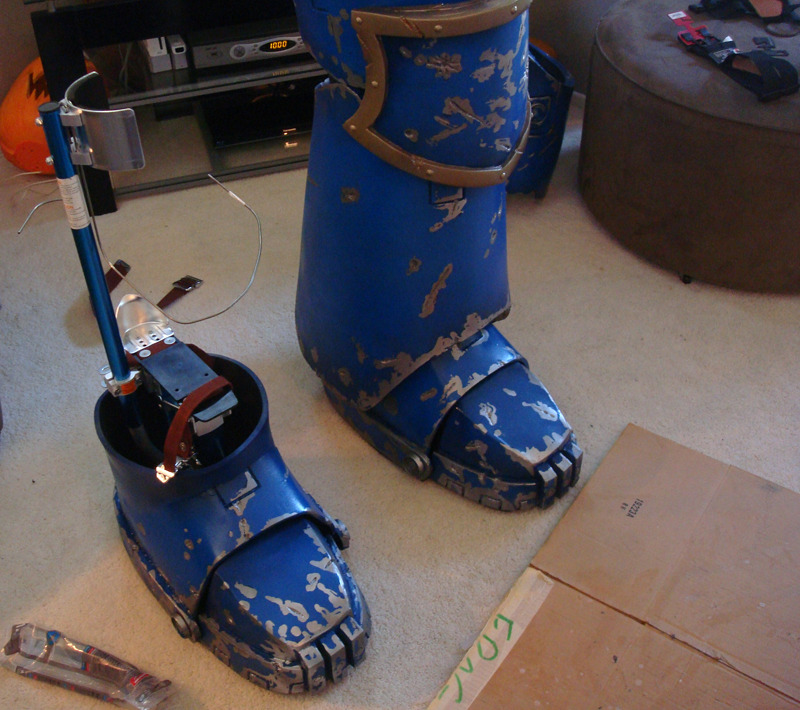
25.) Starting to destroy the house now. Getting the stilts mounted to feet (or is it the other-way-round?). Again night before, notice hockey gloves in foreground untouched :(

SpaceMarine_Construction_58_900.jpg


26.) To pad the bottom of the feet I grabbed some interlocking mats from the back yard.

SpaceMarine_Construction_59_900.jpg

SpaceMarine_Construction_60.jpg


27.) 10 in the morning! Other leg bit still not done. At this point I have the hands put together and primed, but I'm still figuring out mounting and suit adjustments.

SpaceMarine_Construction_61_900.jpg


Unfortunately that's where the WIP pics end, but mostly the parts were all done with the exception of the gloves and the one leg component. Everything else was suspenders, straps, more spring steel, button snaps and a couple of magnets.

If anyone's interested in my haphazard rigging I'm more than happy to try to get some decent pics of it.

I do plan on continuing work on this suit, though I couldn't be happier with what I did manage to get done. I'd like to finish the backpack and make a helmet as well as some weapons. I'll update when I do.
 
Re: Warhammer 40K Space Marine Full Scale - New at this

"new at this"??

Haha. That's not the first time you've said that here. :D I believe the appropriate response is: Aw shucks! :$

I'm certainly not new at building "stuff." And my profession does in fact require me to build stuff, albeit digital. But certainly new at building crazy big costumes out of foam and bondo and plasti-dip. It might not be terribly humble of me to say, but I did really surprise myself on this one. I couldn't stop smiling at the party, I was just so pleased it all came together like I imagined...This was a ton of fun!
 
one of the best builds ive ever seen, really impressed especially with the weathering and never thought of using mustard lol i love mustard:lol :thumbsup oh ya should post a vid of you walkin in it that be cool to see
 
Re: Warhammer 40K Space Marine Full Scale - New at this

I believe the appropriate response is: Aw shucks! :$

No. The appropriate response is "damn straight!"

Well done, sir. I love the finished product. Sooner or later I'll have to get pics of my Titus.
 
Color me impressed and inspired. PORKFRY is a friend of mine and exposed me to your site recently. I think I have my new winter project figured out now.
 
You can't have enough 40K in my eyes. Absolutely stellar work. I'm glad that you included all the little details(vents,impressions,etc.). The proportions are quiet good as well.
 
I now want to build a 40K armor. Your build has inspired me. How is the paint staying on the pieces? does it flake off?
 
This thread is more than 5 years old.

Your message may be considered spam for the following reasons:

  1. This thread hasn't been active in some time. A new post in this thread might not contribute constructively to this discussion after so long.
If you wish to reply despite these issues, check the box below before replying.
Be aware that malicious compliance may result in more severe penalties.
Back
Top